
Crochet Multi-Purpose Blouse, Shawl, Runner Model

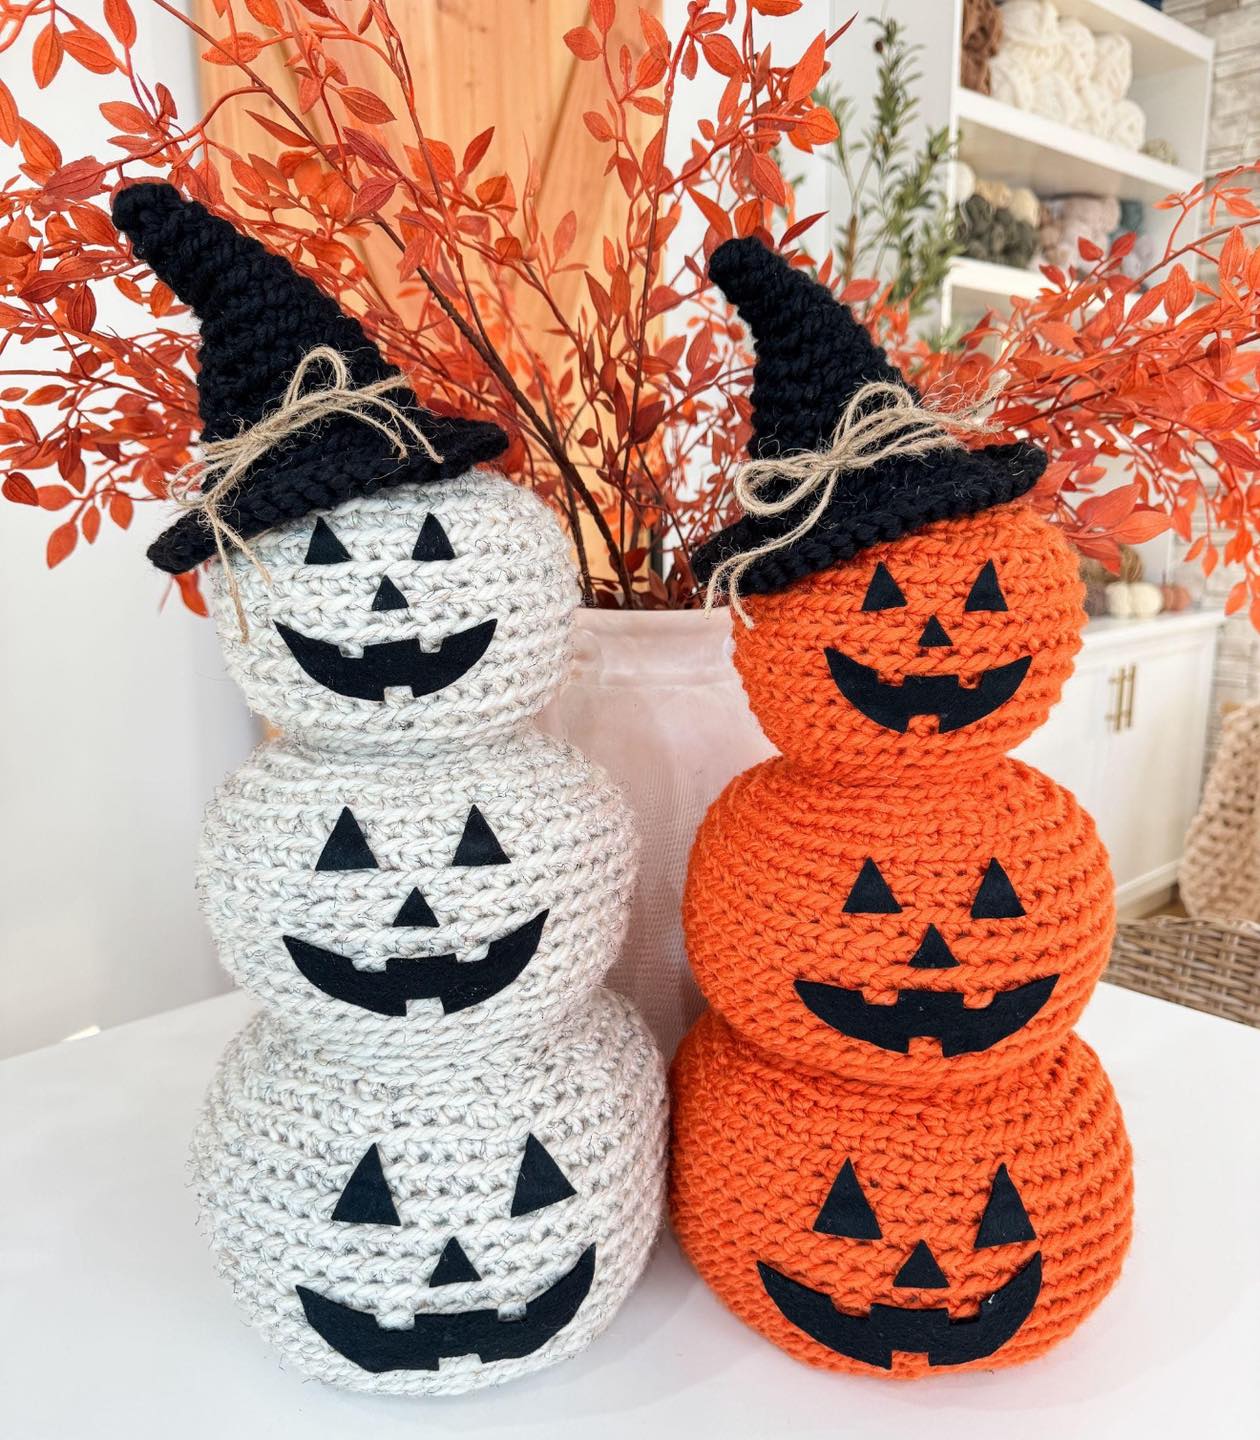
Crochet Jack-O-Lantern Pumpkin Stack – Free Pattern is the perfect Halloween project for crafters who love combining festive décor with handmade charm. Whether you’re decorating your home, preparing a seasonal gift, or simply enjoying the creative process, this Crochet Jack-O-Lantern Pumpkin Stack – Free Pattern offers a delightful way to bring spooky fun to your space.
Crocheting these cheerful pumpkins allows you to create a unique piece that can be enjoyed year after year. With a little patience and creativity, even beginners can achieve stunning results with this pattern.
Choosing a Crochet Jack-O-Lantern Pumpkin Stack – Free Pattern means you’re investing in a timeless Halloween decoration. Unlike store-bought items, handmade pumpkins carry sentimental value and a personal touch. They can be customized with different faces, colors, and sizes to match your Halloween theme or home décor.
The versatility of crochet makes this pattern ideal for creating everything from classic orange pumpkins to playful, non-traditional hues like teal or purple.
This article will guide you step-by-step through the process, from gathering your materials to finishing your pumpkin stack with style. You’ll learn tips for creating smooth stitches, shaping your pumpkins, and adding expressive jack-o-lantern faces.
By the end, you’ll have the confidence to create a stack that’s both festive and durable. Whether you’re making these pumpkins for yourself or as a thoughtful handmade gift, this Crochet Jack-O-Lantern Pumpkin Stack – Free Pattern is a rewarding project you’ll be proud to display.
To begin your Crochet Jack-O-Lantern Pumpkin Stack – Free Pattern, gather your supplies carefully. Start with high-quality worsted weight yarn in traditional orange for the pumpkins, green for the stems, and black for the jack-o-lantern faces. Using soft, durable yarn ensures your pumpkins keep their shape and last for many Halloweens. You may also want to choose alternative colors if you prefer a non-traditional look.
Select a crochet hook size appropriate for your yarn—typically a 4.0 mm or 4.5 mm hook works well for worsted weight yarn. The correct hook size will help you achieve even stitches and a professional finish. Having a few extra hooks on hand in nearby sizes can also be helpful if you need to adjust tension.
You’ll need fiberfill stuffing to give your pumpkins their plump, stackable shape. Make sure you have enough stuffing to fill each pumpkin firmly, as this will help the stack remain stable. A yarn needle is essential for sewing the pumpkins together securely and for attaching the facial features.
Stitch markers can be very useful for keeping track of your rounds, especially when shaping the pumpkins. A measuring tape will help ensure consistency if you’re making multiple stacks or matching sizes for a coordinated display. Good lighting and a comfortable workspace will make your crocheting experience more enjoyable and productive.
Before you start, read through the entire Crochet Jack-O-Lantern Pumpkin Stack – Free Pattern. Understanding each step in advance will help you avoid mistakes and make the process smoother. Setting up your workspace with all tools within easy reach will let you focus entirely on the fun part: crocheting.
Lastly, gather a small pair of sharp scissors for trimming ends and cleaning up your work. Preparation is key—having everything ready will save time and prevent interruptions as you craft your pumpkin stack masterpiece.
Begin your Crochet Jack-O-Lantern Pumpkin Stack – Free Pattern with the base pumpkin. Create a magic ring and crochet your initial round of stitches, following the pattern’s suggested stitch count. A magic ring helps keep the bottom of the pumpkin tight and prevents stuffing from showing through.
Continue increasing stitches evenly in each round until your pumpkin reaches the desired width. Use your stitch markers to track the start of each round, ensuring accuracy as you work. Once you’ve reached the widest point, begin decreasing stitches to form the top of the pumpkin. Stuff the pumpkin with fiberfill before closing it completely.
Repeat the same steps for additional pumpkins in the stack, varying the sizes slightly if desired. A stack of three pumpkins—small, medium, and large—creates a pleasing visual effect. Be sure to stuff each pumpkin firmly so they stack neatly without collapsing.
After finishing the pumpkins, crochet stems and leaves using green yarn. Attach them securely to the tops with a yarn needle. These details add a polished and realistic look to your Crochet Jack-O-Lantern Pumpkin Stack – Free Pattern.
Next, create the jack-o-lantern faces by crocheting or cutting out felt pieces in black. Arrange the eyes, noses, and mouths on each pumpkin before sewing or gluing them in place. Experiment with different expressions—happy, spooky, or silly—to give your stack personality.
Finally, assemble your stack by sewing the pumpkins together from largest to smallest. Take your time to align them properly for stability. The finished stack should stand upright on its own, ready to bring Halloween cheer to your home or gift recipient.
Customizing your Crochet Jack-O-Lantern Pumpkin Stack – Free Pattern is one of the most enjoyable parts of the process. Start by experimenting with colors. While classic orange is traditional, consider using pastel shades for a whimsical look or metallic yarn for a modern twist.
You can also play with different facial expressions. Make one pumpkin look mischievous, another surprised, and the third cheerful. Mixing expressions adds character to your stack and makes it more engaging for guests.
Adding accessories can further personalize your pumpkins. Tiny crochet hats, scarves, or even little bows can give your jack-o-lanterns a unique style. Just ensure accessories are lightweight to avoid tipping the stack.
Consider varying the sizes of your pumpkins or making multiple stacks in different scales. A trio of small stacks on a mantle or table can create a cohesive yet dynamic Halloween display.
For a cozy farmhouse feel, try using natural fibers like cotton or wool and stick to earthy tones. Alternatively, for a more playful aesthetic, incorporate glitter yarn or multi-colored threads for the facial features.
If you’re gifting your stack, consider adding a personalized tag or a small handwritten card. A Crochet Jack-O-Lantern Pumpkin Stack – Free Pattern makes a heartfelt handmade gift that can be enjoyed for many Octobers to come.
Once your Crochet Jack-O-Lantern Pumpkin Stack – Free Pattern is complete, proper care will ensure it stays beautiful. Gently spot-clean any dirt with a damp cloth. Avoid machine washing, as it could distort the shape or loosen the stitches.
When displaying your stack, place it on a flat, stable surface away from moisture or direct sunlight. This prevents fading and helps maintain the structure of your pumpkins.
If you’re giving your pumpkin stack as a gift, consider presenting it in a clear box or wrapping it in cellophane with a festive ribbon. This creates a professional and thoughtful presentation that highlights your craftsmanship.
For larger Halloween displays, pair your stack with other handmade decorations like crocheted ghosts or bats. Mixing textures and sizes creates an eye-catching centerpiece for parties or seasonal gatherings.
You can also use your Crochet Jack-O-Lantern Pumpkin Stack – Free Pattern as a photo prop. Its playful design makes it perfect for seasonal family photos or social media content.
Lastly, when storing your pumpkin stack after Halloween, place it in a breathable fabric bag or box. Store it in a cool, dry place to protect it from dust and humidity. Proper storage will keep your pumpkins looking fresh for next year’s festivities.
Q1: Is the Crochet Jack-O-Lantern Pumpkin Stack – Free Pattern beginner-friendly?
Yes, this pattern is suitable for beginners with basic crochet knowledge. The instructions are straightforward and easy to follow.
Q2: What type of yarn is best for the Crochet Jack-O-Lantern Pumpkin Stack – Free Pattern?
Worsted weight yarn works best, but you can experiment with different textures for a unique finish. Soft acrylic or cotton yarn is recommended for durability.
Q3: How many pumpkins should I include in my stack?
Three pumpkins—small, medium, and large—create a balanced and visually appealing stack, but you can adjust based on your preference.
Q4: Can I make different facial expressions for the pumpkins?
Absolutely. Changing the eyes, nose, and mouth shapes allows you to create a variety of expressions, making each stack unique.
Q5: How should I store my Crochet Jack-O-Lantern Pumpkin Stack – Free Pattern after Halloween?
Place it in a breathable bag or box, keep it in a cool, dry area, and avoid heavy items on top to preserve its shape.
In conclusion, the Crochet Jack-O-Lantern Pumpkin Stack – Free Pattern is a delightful and customizable project that captures the spirit of Halloween. From gathering your materials to adding finishing touches, every step allows you to express your creativity while making a festive decoration that lasts for years.
Whether you’re crafting for yourself, gifting a loved one, or creating multiple stacks for a party, this pattern offers endless possibilities. Share your thoughts and suggestions in the comments—we’d love to hear your honest opinion about this fun and festive project!


