
Crochet Multi-Purpose Blouse, Shawl, Runner Model

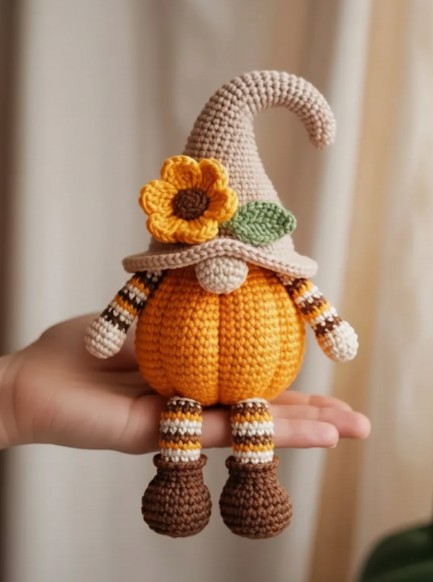
The Pumpkin Gnome with Flower Hat – FREE Crochet Pattern is one of the most charming seasonal projects you can make if you enjoy bringing a touch of whimsy to your handmade creations.
This adorable gnome combines the cozy autumn vibes of pumpkins with the delightful details of crochet flowers, creating a unique piece that works as both décor and a heartfelt gift. The design is beginner-friendly, yet offers enough detail to keep even experienced crocheters engaged.
Crocheting a Pumpkin Gnome with Flower Hat allows crafters to explore textures, colors, and playful shapes that symbolize the joy of fall celebrations. Whether you’re preparing for Halloween, Thanksgiving, or simply decorating your home with warm seasonal tones, this crochet project brings together everything you love about fall.
The soft stitches of the gnome body, paired with the textured pumpkin-inspired hat and delicate flower embellishments, create a handmade treasure that feels timeless.
What makes this project even more special is its versatility. The Pumpkin Gnome with Flower Hat – FREE Crochet Pattern can be adapted with different yarn colors and flower styles to suit your personal preference. You can create a traditional orange pumpkin hat, or switch it up with vibrant shades for a playful look.
Add extra embellishments like leaves, vines, or even beads, and you’ll have a completely customized gnome. Before we dive into the step-by-step process and tips for success, let’s explore the creative journey behind this cozy pattern.
Before beginning your Pumpkin Gnome with Flower Hat, it’s essential to gather the right materials. A medium-weight yarn works best for creating a sturdy body and textured hat, while a smaller hook size helps the stitches stay tight and neat. Choosing the right yarn colors is part of the fun—orange and green for the pumpkin theme, and any color you like for the flower accent.
The gnome body typically starts with a basic amigurumi technique, where you work in continuous rounds. This ensures a seamless and firm shape that can be stuffed easily without gaps. Beginners might find working in rounds a bit tricky at first, but once you get into the rhythm, it becomes second nature. This foundational part is important, as it gives structure to the gnome.
The pumpkin-inspired hat is what makes this design stand out. By using ribbed stitches or back loop techniques, you can mimic the ridges of a real pumpkin. This texture adds depth and personality to the gnome. Adding a flower on top not only softens the design but also adds a touch of elegance, making it perfect for seasonal décor.
Stuffing is another key element in shaping the Pumpkin Gnome with Flower Hat. Polyester fiberfill works wonderfully, as it’s lightweight yet provides enough firmness. When stuffing, make sure to distribute evenly so that your gnome keeps its shape and can stand or sit properly. Avoid overstuffing, as this may stretch your stitches and leave gaps.
When working on the flower, you can choose from many crochet flower patterns. Simple layered petals work beautifully, but you can also try textured flower designs for a more elaborate look. The flower sits on the pumpkin hat, acting as a lovely focal point that balances the whimsical style of the gnome.
This stage is also where you’ll begin to appreciate how customizable this project is. You can create one gnome for fall, another for Christmas with red and green colors, or even spring-themed versions. The Pumpkin Gnome with Flower Hat provides a base that can be reimagined for any season.
To make the gnome body, begin with a magic ring and work single crochet stitches in continuous rounds. As you increase stitches, the base forms a rounded bottom, which gives stability. Gradual decreases help taper the body toward the top, where the hat will later be attached. Patience and careful stitch counting are essential here to maintain a neat, symmetrical body.
The hat is where creativity shines. For a pumpkin look, you can crochet in ribbed rows, then seam the piece into a cylindrical shape before gathering it at the top. This gathered closure creates the stem-like effect, which you can enhance by adding a crocheted stem or green leaf details. The flower is then sewn on, sitting gracefully atop the hat.
Arms, beard, and nose are classic features of any gnome. The beard can be made from strands of yarn attached to the face area or crocheted with a fuzzy yarn for a fluffy look. The nose is a small crocheted ball or oval, stuffed and sewn in place. Together, these features give the gnome its signature charm.
Attaching all pieces neatly is a crucial step. Use a yarn needle to sew parts securely, making sure everything sits in balance. The hat should slightly cover the nose and beard, creating the characteristic gnome silhouette. The flower should sit centered at the top, adding a playful and seasonal flair.
At this point, you’ll see your Pumpkin Gnome with Flower Hat come to life. It’s amazing how simple stitches transform into such a detailed and expressive figure. Whether you keep your stitches tight for a neat look or allow a looser tension for a more rustic effect, the end result always reflects your unique style.
Finishing touches include adding optional accessories. Some crocheters like to add tiny embroidered eyes, small buttons on the body, or even miniature props like a crochet pumpkin for the gnome to hold. These details add personality and turn your gnome into a one-of-a-kind creation.
One of the joys of making the Pumpkin Gnome with Flower Hat is experimenting with colors. While orange is the traditional pumpkin shade, consider using pastel colors for a softer, whimsical look, or even bold tones like purple or black for a Halloween theme. This flexibility ensures you can make multiple versions for different occasions.
Changing the flower design also offers endless possibilities. A sunflower gives a rustic, farmhouse vibe, while a rose adds elegance. Smaller flowers can be clustered together, or you can opt for one large statement flower. Each variation brings a new character to the gnome.
You can also adjust the size of your gnome by using different yarn weights and hook sizes. A bulky yarn will create a large, huggable gnome, while a finer yarn will produce a delicate miniature version perfect for table décor. Both sizes are equally charming and functional.
For a festive touch, you might add glitter yarn or metallic threads into the hat or flower. This subtle sparkle makes your gnome stand out in holiday displays. Seasonal embellishments like crocheted holly, snowflakes, or autumn leaves can also be attached to enhance the theme.
Pairing your gnome with other crochet décor is another idea. Place it alongside crochet pumpkins, fall garlands, or holiday wreaths to create a cozy corner in your home. It also makes a thoughtful handmade gift for family and friends who appreciate seasonal crafts.
The versatility of this pattern means it can grow with your crochet journey. Beginners can keep it simple, while advanced crocheters can experiment with textures, embellishments, and modifications. The Pumpkin Gnome with Flower Hat is truly a project that adapts to your creativity.
When making amigurumi-style projects like the Pumpkin Gnome with Flower Hat, maintaining consistent tension is essential. Tight stitches prevent stuffing from showing through and keep the shape neat. Practice keeping your stitches uniform for the best results.
Stitch markers are very helpful when working in continuous rounds. They ensure you don’t lose track of your stitches and help maintain symmetry in the body and hat. Counting carefully avoids uneven shapes and makes assembly smoother.
Choosing the right stuffing method can make a big difference. Instead of stuffing all at once, add fiberfill gradually as you work. This helps keep the gnome evenly filled without lumps or bulges.
Always leave long tails of yarn when finishing pieces. These tails are useful for sewing the parts securely together, ensuring your gnome is sturdy and durable. A yarn needle is your best friend during this process.
If you’re new to making crochet flowers, start with simple petal patterns. As you gain confidence, you can try layered or textured flowers. The hat flower is the finishing touch, so it’s worth taking the time to make it neat and vibrant.
Finally, don’t be afraid to add your own personality. The beauty of handmade crochet lies in its uniqueness. Your Pumpkin Gnome with Flower Hat doesn’t have to look exactly like anyone else’s—it should reflect your creativity and style.
1. Is the Pumpkin Gnome with Flower Hat suitable for beginners?
Yes! The basic stitches used are beginner-friendly. With some patience and practice, even new crocheters can complete this project.
2. What yarn is best for the Pumpkin Gnome with Flower Hat?
Medium-weight acrylic or cotton yarn works best for durability and structure. Choose vibrant colors for the pumpkin and flower for a lively look.
3. Can I make the gnome larger or smaller?
Absolutely. Using thicker yarn and a larger hook creates a bigger gnome, while thinner yarn and a smaller hook result in a miniature version.
4. How do I keep the gnome from toppling over?
Even stuffing and a flat base help the gnome stand upright. You can also place a small weighted item, like pebbles in a fabric pouch, inside the bottom.
5. Can I customize the flower on the hat?
Yes, you can use any flower design you like—sunflowers, roses, daisies, or even crochet leaves for variation.
6. How long does it take to finish a Pumpkin Gnome with Flower Hat?
It depends on skill level, but on average, it can take anywhere from 6 to 10 hours to complete.
7. Is sewing the parts together difficult?
Not at all. With long yarn tails and a yarn needle, attaching the hat, beard, and flower is straightforward.
8. Can I wash the crochet gnome?
Hand washing is recommended to maintain its shape and prevent damage to the stuffing. Air drying works best.
9. Is this pattern safe for children?
Yes, but avoid using small embellishments like beads if the gnome will be handled by young children to prevent choking hazards.
10. Can I sell gnomes made with this pattern?
Yes, handmade items are often sold at craft fairs and markets, though the pattern itself remains free for personal use.
The Pumpkin Gnome with Flower Hat – FREE Crochet Pattern is a delightful project that combines the coziness of autumn with the charm of handmade crochet. From its pumpkin-inspired hat to the flower embellishment, every detail adds personality and seasonal cheer. By following the steps and tips shared here, you can create a beautiful gnome that reflects your own creativity.
Now that you’ve learned the process, it’s time to pick up your yarn and hook and bring your own gnome to life. I’d love to hear your thoughts—share your opinion and suggestions in the comments. What variation will you try first? Your feedback helps inspire new ideas and keeps the crochet community thriving!


