
Crochet Multi-Purpose Blouse, Shawl, Runner Model

The magic of Christmas often begins with creativity, and what better way to celebrate the season than by bringing a handmade Crochet Santa Claus – Free Pattern to life? This adorable project blends festive charm with the joy of crafting something personal and heartwarming.
Whether you’re a beginner or an experienced crocheter, making your own Crochet Santa Claus will fill your home with holiday cheer and add a touch of nostalgia to your décor. Each stitch holds a bit of the Christmas spirit, making this project both rewarding and delightful.
The Crochet Santa Claus project is perfect for those who love combining tradition with creativity. Crocheting your own Santa gives you complete control over colors, yarn textures, and details like his fluffy beard and jolly red hat. It’s a great way to use leftover yarn from other projects while creating something that can be treasured year after year.
Handmade decorations like this not only brighten your space but also make thoughtful, heartfelt gifts for family and friends.
In this detailed guide, we’ll explore everything you need to know to crochet your very own Crochet Santa Claus – Free Pattern. From materials to step-by-step tips and styling ideas, this tutorial will help you bring the Christmas icon to life. By the end, you’ll have your own cheerful Santa ready to spread joy during the holiday season. Let’s dive in and start crafting a timeless piece that embodies the magic of Christmas.
Before you begin, it’s important to prepare your materials and understand the basic techniques used in this Crochet Santa Claus – Free Pattern. The project can be completed using common crochet stitches, making it accessible even for beginners. The key lies in paying attention to small details like shaping and color transitions to ensure Santa’s face and suit look perfect.
You’ll typically need red, white, and black yarn, along with some skin-tone yarn for Santa’s face and hands. Acrylic yarn is an excellent choice because it’s soft, durable, and maintains its shape well. A 3.5 mm or 4 mm crochet hook usually works best, but feel free to adjust depending on your preferred yarn thickness. Don’t forget a yarn needle for sewing the parts together and some fiberfill for stuffing your Santa.
As you start the project, make sure your stitches are even to achieve a smooth finish. The body of the Crochet Santa Claus usually begins with a magic ring technique, followed by rounds of single crochets to shape the form. Increasing and decreasing stitches strategically will help create the perfect round body and head.
Once you’ve finished crocheting the main parts, assembling your Santa is the most exciting step. Attach his beard, hat, and belt with care, making sure each feature is centered and secure. Adding small embellishments, like a tiny gold buckle or a fluffy pompom on the hat, can make your Crochet Santa Claus look extra special.
This project doesn’t require advanced skills, but patience is key. Working on small details like the nose, eyes, and beard requires focus, yet these are the touches that bring Santa’s personality to life. Even if you’re new to amigurumi-style projects, this pattern is a wonderful way to practice your techniques and grow your confidence.
Lastly, remember that no two Santas need to look exactly the same. Part of the fun of crafting your own Crochet Santa Claus is giving him a unique expression or accessory. Perhaps he’s holding a candy cane, or maybe his beard is extra curly—every variation adds charm and individuality.
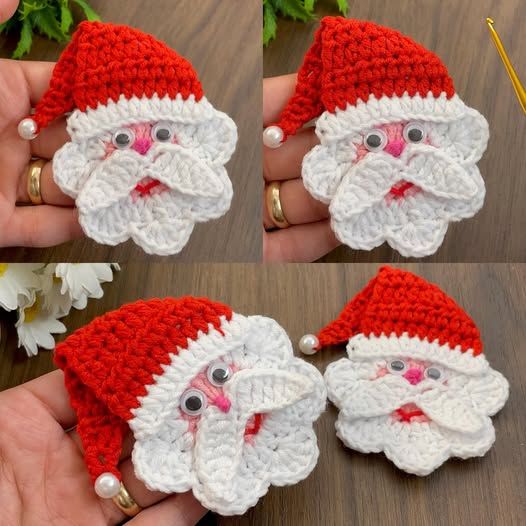
The most recognizable features of Santa Claus are his fluffy white beard, red hat, and cozy suit. In this part of the Crochet Santa Claus – Free Pattern, you’ll focus on those signature elements that make Santa instantly lovable. The trick is to create texture and volume that mimic the real thing while maintaining balance and proportion.
Start with Santa’s hat. Using bright red yarn, crochet a cone shape that narrows toward the top. Add a white trim at the base using single crochet stitches, and don’t forget the pompom at the tip. You can make the pompom by wrapping white yarn around your fingers several times, then tying and trimming it into shape.
Next comes Santa’s beard, which is the highlight of his face. Many crocheters use loop stitches or puff stitches to create a fluffy, realistic texture. Begin by shaping a semicircle to fit around Santa’s chin area and build up the volume as you go. For extra softness, you can use fuzzy yarn or even a touch of wool blend to give the beard a more natural flow.
When it comes to Santa’s suit, use the same bright red yarn as the hat, adding white cuffs and a trim for consistency. The belt can be crocheted separately using black yarn and then stitched onto the suit. Add a small buckle detail in yellow or gold yarn to complete the traditional Santa look.
Each small detail contributes to the charm of your Crochet Santa Claus. You can personalize his outfit by changing the shade of red or adding miniature accessories like mittens, boots, or even a tiny sack full of gifts. These little touches help make your Santa a standout piece in your holiday collection.
Once all the pieces are ready, assemble them carefully. Position the hat slightly tilted for a whimsical look and sew the beard neatly under the nose area. When you finally add his bright eyes and rosy cheeks with embroidery or blush, your Santa will come to life, ready to bring smiles to everyone who sees him.
Now that your Crochet Santa Claus – Free Pattern is complete, it’s time to showcase it. This handcrafted decoration can become a centerpiece of your Christmas décor, adding warmth and personality to any setting. Depending on the size of your project, your Santa can serve as a tree ornament, a mantelpiece display, or even part of a festive table centerpiece.
If you’ve created a smaller version, attach a loop at the top of Santa’s hat using a piece of yarn or ribbon. This makes it easy to hang him on the Christmas tree or use him as a charming gift tag decoration. For larger versions, you can place him on a shelf or near the fireplace, surrounded by other handmade crochet pieces like snowflakes or mini stockings.
Crocheted Santas also make heartfelt gifts. Imagine giving someone a handmade Crochet Santa Claus instead of a store-bought item—it instantly adds meaning and emotional value. You can even personalize it by embroidering the recipient’s initials on Santa’s hat or belt. Handmade gifts like these become keepsakes that families cherish for years.
If you love themed decorations, consider making a set of Santas in different sizes. You could create a “Santa family” with varied expressions or accessories, giving your Christmas display a fun and cohesive look. Add crochet elves, reindeer, or snowmen to complete your holiday scene.
Storage is another consideration for those who plan to reuse their Crochet Santa Claus each year. Store it in a cool, dry place inside a sealed container to protect it from dust and humidity. With proper care, your handmade Santa will last for many Christmases to come.
Most importantly, enjoy the creative process. The beauty of crocheting lies in the love and patience you put into every stitch. Displaying your Crochet Santa Claus during the holidays reminds you of the joy that comes from crafting something by hand.
Creating a perfect Crochet Santa Claus – Free Pattern isn’t just about following the steps—it’s about adding your personality to the project. Here are a few creative tips and variations to make your Santa truly one-of-a-kind.
Experiment with different yarn types. A mix of matte and shiny yarns can give Santa’s outfit more depth and realism. For example, use a sparkly white yarn for the beard and hat trim to create a snow-like shimmer.
You can also play with size. Using thinner yarn and a smaller hook will produce a tiny Santa perfect for ornaments, while thicker yarn will make a plush version that’s perfect for cuddling. Adjusting your gauge gives you flexibility to create multiple sizes of the same pattern.
If you’re comfortable with embroidery, consider adding fine details such as eyebrows, eyelashes, or even a tiny mustache. These facial features can give your Santa extra character. A small stitch of pink thread can add a cute blush effect on his cheeks.
Another creative touch is to crochet accessories for your Santa. You could make a mini gift bag, a candy cane, or a reindeer friend to go along with him. These small additions make your Crochet Santa Claus part of a bigger festive story.
Before finishing, make sure all pieces are firmly sewn together. Use invisible stitches to maintain a clean look, and double-check that no stuffing shows through. Taking time with the finishing details ensures that your project looks polished and professional.
Finally, step back and admire your work. Every handmade Crochet Santa Claus carries its own story, representing your dedication, creativity, and love for the art of crochet.
1. What skill level is needed for the Crochet Santa Claus – Free Pattern?
This project is suitable for beginners with basic crochet knowledge, as it mainly uses single crochet, increase, and decrease stitches.
2. What type of yarn works best for making a Crochet Santa Claus?
Acrylic yarn is ideal because it’s affordable, easy to work with, and holds shape well. You can also use cotton yarn for a firmer finish.
3. How long does it take to complete a Crochet Santa Claus?
Depending on your speed and experience, it may take between 6 to 10 hours to complete, including assembly and detailing.
4. Can I wash my Crochet Santa Claus?
Yes, but it’s best to hand wash gently with mild detergent and air dry to preserve its shape and color.
5. Is it possible to make the Crochet Santa Claus in different colors?
Absolutely! You can experiment with modern colors like burgundy, gold, or even pastel tones for a fun twist on the traditional red and white Santa.
6. Can I turn the Crochet Santa Claus into a keychain or ornament?
Yes, by using smaller yarn and adding a loop, your mini Santa can become a lovely keychain or holiday ornament.
Creating a Crochet Santa Claus – Free Pattern is more than just a holiday project—it’s an expression of creativity and joy. From the first stitch to the final assembly, every part of this process connects you to the warmth of the Christmas season. Whether you craft one for yourself or as a gift, your handmade Santa will bring smiles and festive cheer to everyone who sees it.
We hope this guide has inspired you to start your own Crochet Santa Claus. Share your experiences, thoughts, and suggestions in the comments—your creativity can inspire others to embrace the beauty of handmade holiday crafts.


