
Crochet Multi-Purpose Blouse, Shawl, Runner Model

The Snowman Wind Spinner – Crochet Pattern brings the joy of winter and the warmth of handmade crafts together in one delightful project. This festive crochet piece captures the cheerful spirit of the season while giving your outdoor or indoor décor a touch of movement and whimsy.
Whether you’re decorating your porch, garden, or even your Christmas tree, this Snowman Wind Spinner will bring smiles to everyone who sees it. Handmade ornaments like this one are always special, especially when created with love and care, and this pattern offers a fun way to express your creativity.
Crocheting a Snowman Wind Spinner is an enjoyable experience for both beginners and experienced crafters. It’s a project that doesn’t take too long to finish, but the result looks impressive and festive.
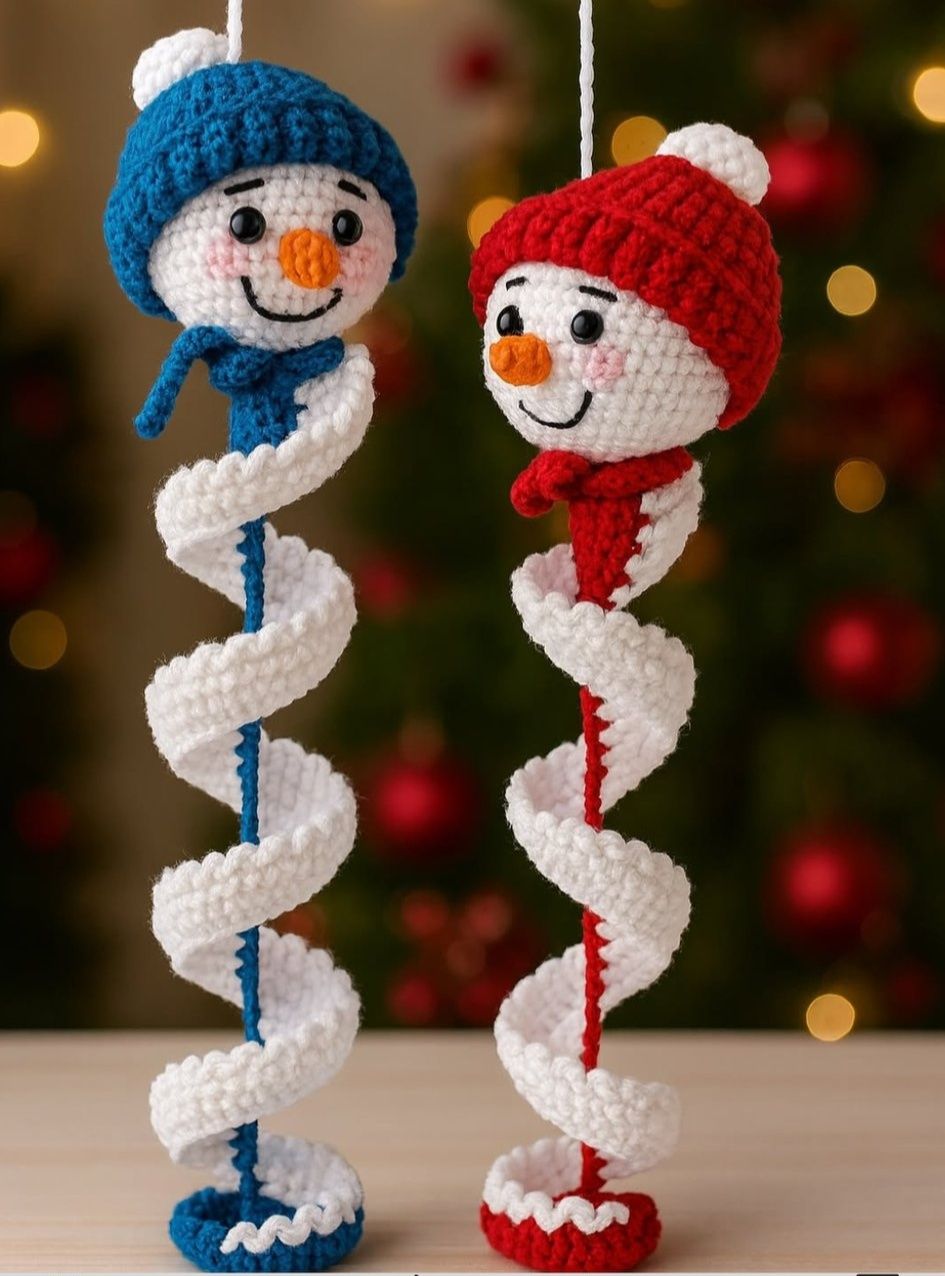
You’ll love seeing your little snowman come to life as you add each detail — from the round head and cheerful face to the scarf and twirling spiral body. The best part? This pattern can be made using leftover yarns from your stash, making it a budget-friendly and eco-conscious craft.
What makes the Snowman Wind Spinner – Crochet Pattern so appealing is its versatility. You can hang it outside to spin in the winter breeze, or you can use it as part of your Christmas decorations indoors.
Its simple design allows for plenty of creativity; you can personalize your snowman by changing the hat color, adding buttons, or even stitching a small smile to match your style. Every spinner will have its own personality, making each one truly unique.
To start your Snowman Wind Spinner – Crochet Pattern, gather a few basic crochet supplies. You’ll need yarn in classic winter shades — white for the snowman’s body, black for the hat, orange for the nose, and red or blue for the scarf. Acrylic yarn is a great choice since it’s durable and weather-resistant, especially if you plan to hang your spinner outdoors. You’ll also need a crochet hook that matches your yarn weight, a yarn needle for sewing, and some stuffing for the snowman’s head.
One of the advantages of this project is that it uses minimal materials. A small amount of yarn in each color goes a long way. If you have leftover skeins from previous crochet projects, this is the perfect opportunity to use them. This helps reduce waste and makes your Snowman Wind Spinner a sustainable project — something that aligns perfectly with today’s crafting values.
You might also consider adding optional details such as buttons, small beads for eyes, or even a little piece of felt for the carrot nose. A sturdy piece of clear fishing line or decorative string will allow you to hang the spinner easily. If you plan to use it outdoors, be sure to secure the pieces well and choose weather-friendly materials.
In terms of crochet skills, this project requires basic stitches like chain, single crochet, increase, and decrease. These are all beginner-friendly, making the pattern accessible to anyone with a basic understanding of crochet. The spiral section, which gives the spinner its unique twirling effect, is simply created by gradually increasing and then decreasing stitches to form the twist.
The overall assembly of the snowman is straightforward. You’ll crochet the head and hat separately, create the spiral body, and then attach the pieces together. Adding the scarf gives it a cozy look, and when it catches the wind, your snowman will spin gracefully, spreading joy wherever it hangs.
Don’t rush the process. Part of the magic of crochet lies in taking your time, enjoying each stitch, and watching your creation come to life. With the Snowman Wind Spinner – Crochet Pattern, you’re not just making a decoration — you’re crafting a small piece of winter happiness.
Let’s dive into the process of creating your Snowman Wind Spinner. Start by crocheting the snowman’s head. Use white yarn and work in the round to create a small sphere. You’ll begin with a magic ring and gradually increase until you reach the desired size. Stuff the head lightly with fiberfill before closing it. Add two black stitches or small safety eyes for the eyes and an embroidered orange nose to form the classic snowman look.
Next, make the hat using black yarn. You can crochet a small cylinder shape with a flat circle brim, or you can design it as a beanie depending on your preference. This is your chance to get creative — maybe add a tiny pom-pom on top or a stripe of color to match your holiday theme. Attach the hat securely to the head using a yarn needle.
For the body, you’ll crochet a long spiral strip that will form the spinning section. This is what gives the Snowman Wind Spinner – Crochet Pattern its charm. Begin with a chain and then work rows of increases on one side while keeping the other side even. As you crochet, the strip will naturally start to curl. This spiral effect is what creates the motion when the wind blows.
After finishing the spiral, attach one end to the bottom of the snowman’s head. Make sure it’s centered and secure. Then, add the scarf by crocheting a small chain in a contrasting color and wrapping it around the neck. This little accessory adds a cozy and cheerful touch to your snowman.
Once your snowman is fully assembled, use a strong string or fishing line to hang it. Hold it up and give it a gentle spin — you’ll see how beautifully it twirls! If you want, you can make multiple Snowman Wind Spinners in different colors to create a playful winter display.
This pattern can easily be adjusted for different sizes. Make a mini version for indoor decoration or a larger one for your porch. That flexibility makes it one of the most enjoyable holiday crafts you can try this season.
One of the joys of crocheting the Snowman Wind Spinner is that you can customize it to suit your personal taste. While the classic snowman colors work beautifully, there’s no reason you can’t experiment with new ideas. You could use glitter yarn for a sparkly snow effect or pastel shades for a softer winter theme.
Add extra embellishments to make your spinner stand out. Tiny crochet snowflakes, buttons, or even small bows can enhance your snowman’s look. You might also stitch a little smile or rosy cheeks with pink yarn to give your snowman a friendly, animated appearance.
For a more festive touch, you could attach small bells or beads that jingle as the spinner moves in the wind. This creates a delightful sound effect, perfect for holiday decorations. You can also make a family of Snowman Wind Spinners, each with different accessories or expressions.
If you’re using your spinner indoors, consider hanging it near a window where sunlight can catch it. The movement and brightness will add charm to any room. Outdoors, hang it from a porch roof, tree branch, or garden hook to create a playful winter scene.
This pattern also makes a thoughtful handmade gift. Imagine giving a friend or neighbor a Snowman Wind Spinner you made yourself — it’s a personal and meaningful gesture that spreads holiday cheer.
Lastly, don’t be afraid to experiment. The beauty of crochet is that every project can be adapted. The Snowman Wind Spinner – Crochet Pattern is a foundation for creativity — make it your own and enjoy the process.
After spending time crafting your Snowman Wind Spinner, you’ll want it to last for many seasons. To ensure durability, use tightly wound stitches and secure all ends well. Acrylic yarn is a top choice for outdoor projects since it resists fading and moisture better than natural fibers like cotton.
If your spinner gets dirty, gently hand wash it in cool water with mild soap and let it air dry. Avoid wringing it out or using heat, as that could distort the shape of the spiral or the snowman’s head.
When storing it after the holidays, keep it in a cool, dry place. You can lay it flat or hang it to prevent tangling. If you notice the spiral losing some shape over time, lightly mist it with water and twist it again while it dries to restore the curl.
To make your spinner more resistant to the elements, consider applying a light waterproof spray — especially if it will hang outdoors for weeks. This extra protection helps maintain color and texture.
For beginners, patience is key. Take your time learning the spiral technique, and don’t worry if your first spinner isn’t perfect. Each one you make will look better than the last. The Snowman Wind Spinner is as much about enjoying the creative process as it is about the final product.
Most importantly, have fun. Crochet projects like this one are not just crafts — they’re small expressions of joy that bring warmth and life to your home.
1. What skill level is needed for the Snowman Wind Spinner – Crochet Pattern?
This pattern is beginner-friendly. If you know how to crochet basic stitches such as single crochet, increase, and decrease, you can easily make it.
2. How long does it take to make a Snowman Wind Spinner?
Depending on your crochet speed, it usually takes about two to three hours to complete.
3. Can I use cotton yarn instead of acrylic?
Yes, but acrylic is preferred for outdoor use since it’s more resistant to weather changes.
4. How can I make the spinner twist more?
Ensure your spiral section has consistent tension and enough length. The longer the spiral, the more movement you’ll get.
5. Can I personalize my Snowman Wind Spinner?
Absolutely! Add scarves, buttons, or even small lights for a unique touch.
6. Is it safe to leave the spinner outdoors all winter?
Yes, if you use durable yarn and secure it properly. However, bring it indoors during heavy storms to extend its lifespan.
The Snowman Wind Spinner – Crochet Pattern is a delightful way to combine your love of crochet with the festive spirit of winter. It’s fun, creative, and suitable for all skill levels. Throughout this guide, you’ve learned how to gather materials, crochet the main parts, customize your snowman, and care for your finished piece. Handmade crafts like this one remind us of the simple joys of creativity and sharing.
If you enjoyed this tutorial, share your thoughts below. Tell us how your Snowman Wind Spinner turned out and what creative touches you added. Your feedback and ideas inspire others in the crochet community to keep crafting and spreading joy!


