
Pie Carrier Sewing Pattern

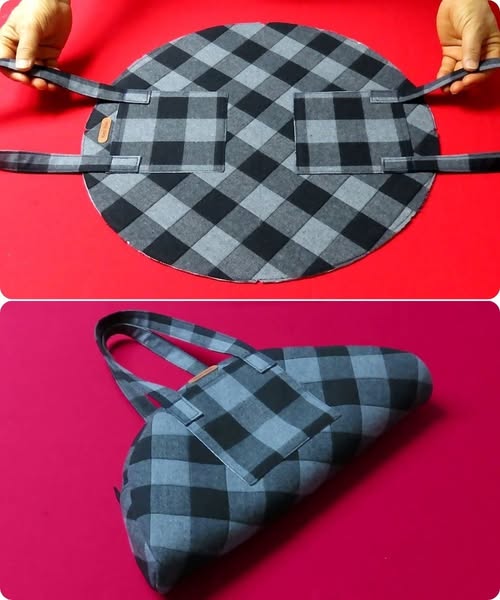
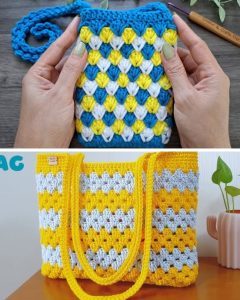
Learning How to Easily Make a Cute Boston Bag Using DIY Circles is a fun and rewarding way to create a stylish accessory with your own hands. This project allows you to combine simple crochet or sewing techniques with creative design, transforming circular motifs into a practical and chic bag.
Whether you are a beginner exploring DIY crafts or an experienced maker looking for a new challenge, this guide provides step-by-step instructions to make a personalized Boston bag that stands out.
The beauty of this project lies in its versatility. By using DIY circles, you can customize the size, colors, and textures of your bag, making each creation unique. These circular motifs can be crocheted, knitted, or even made from fabric patches, offering endless possibilities for pattern combinations.
Learning How to Easily Make a Cute Boston Bag Using DIY Circles ensures that you can adapt the technique for different occasions, from casual outings to special events.
In addition to being visually appealing, this Boston bag is functional and durable. Its structured design, reinforced base, and sturdy handles make it suitable for daily use, while the decorative circles add a playful and artistic touch.
With proper planning and materials, following How to Easily Make a Cute Boston Bag Using DIY Circles will result in a bag that is both practical and fashionable, reflecting your personal style.
To start How to Easily Make a Cute Boston Bag Using DIY Circles, it is important to gather the right materials. For crocheted circles, you will need yarn in your chosen colors, a crochet hook that matches your yarn weight, scissors, and a yarn needle. For fabric circles, select coordinating fabrics, a rotary cutter, and sewing pins to ensure accurate assembly.
A sturdy base fabric or interfacing is recommended to provide stability to the Boston bag. This helps maintain the shape of the bag while supporting the weight of items placed inside. Choose materials that are both durable and lightweight for maximum comfort.
Handles are an essential part of the design. You can use pre-made handles from a craft store, crochet your own, or create fabric straps. Securely attaching the handles to the bag is crucial for longevity and ease of use.
Optional embellishments, such as buttons, beads, or appliqué, can enhance the visual appeal of your DIY circles. These details allow you to add a personal touch, turning a simple bag into a statement accessory. Planning your colors and embellishments in advance will help the project flow more smoothly.
Tools such as a sewing machine, tape measure, and pins are also helpful to maintain accuracy while assembling the bag. A flat work surface ensures that the pieces align correctly during construction.
Finally, take time to read through the entire How to Easily Make a Cute Boston Bag Using DIY Circles guide before beginning. Understanding the sequence of creating, assembling, and finishing the circles and bag components will save time and reduce errors, making the process more enjoyable.
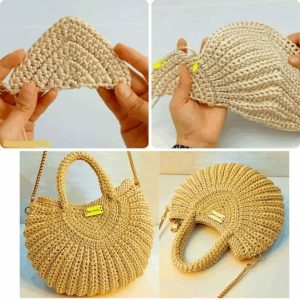
The first step in How to Easily Make a Cute Boston Bag Using DIY Circles is to create your circular motifs. For crochet circles, begin with a magic ring and gradually increase stitches to achieve the desired diameter. Keep your tension consistent to ensure uniformity among all circles.
Once the circles are complete, arrange them on a flat surface to plan the layout. Mixing colors, sizes, and textures creates a visually dynamic bag. Take a photo of your arrangement for reference during assembly.
Sew or crochet the circles together carefully. Ensure the edges align neatly, as this affects the overall shape of the bag. Reinforce the seams where necessary to maintain durability.
Attach the circular assembly to the bag’s base fabric. Pin the pieces securely before stitching to prevent shifting. This step ensures that your DIY circles integrate seamlessly with the bag structure.
Next, create or attach the handles. Measure the placement carefully to balance the weight and appearance of the bag. Securely sew the handles to prevent them from pulling loose during use.
Finally, add any embellishments, such as decorative buttons, tassels, or embroidery. These finishing touches elevate the aesthetic and make your How to Easily Make a Cute Boston Bag Using DIY Circles truly unique and eye-catching.
One of the joys of How to Easily Make a Cute Boston Bag Using DIY Circles is its versatility. You can experiment with different color combinations, creating a bag that matches your wardrobe or mood. Soft pastels give a playful vibe, while bold, contrasting colors create a statement piece.
Mixing textures adds depth to your DIY circles. Use a combination of cotton, wool, or textured yarn to give the bag a dynamic appearance. Fabric circles can include patterned prints, such as florals or geometrics, for a unique visual effect.
You can also vary the sizes of circles. Large circles can serve as the base and sides of the bag, while smaller ones create decorative accents. This flexibility allows you to customize the bag’s shape and style.
Consider seasonal themes. Bright, cheerful colors work well for spring and summer, while muted tones are ideal for fall and winter. You could even create holiday-themed bags using festive yarns or fabrics for special occasions.
Another variation is adding pockets inside the bag. This practical modification enhances usability without compromising the design. Pockets can be made from fabric or small crochet squares, blending seamlessly with the bag’s aesthetic.
Finally, experiment with different closures. Zippers, magnetic snaps, or buttons can be added to secure your bag’s contents. Each closure type gives a distinct style, so you can tailor the How to Easily Make a Cute Boston Bag Using DIY Circles to your personal preference.
After completing your How to Easily Make a Cute Boston Bag Using DIY Circles, finishing touches make a big difference. Trim any loose threads and check that all seams and handles are securely fastened.
If using yarn, lightly block the bag to smooth any uneven stitches. This helps the circles maintain their shape and gives the bag a polished look. Fabric circles can be pressed with a warm iron to achieve crisp edges.
Adding a lining enhances durability and gives a professional finish. Choose a fabric that complements your circles and sew it neatly inside the bag. Lining also helps the bag maintain its shape over time.
Consider adding reinforcement to the base if you plan to carry heavier items. A sturdy piece of cardboard or interfacing sewn into the bottom provides extra support without adding bulk.
For decoration, you can sew on embellishments like beads, buttons, or small patches. These elements add personality and make your How to Easily Make a Cute Boston Bag Using DIY Circles truly one-of-a-kind.
Proper care ensures your bag lasts. Hand wash or gently machine wash, depending on the materials used, and reshape while drying. This keeps the colors vibrant and the circles intact.
1. Can beginners make this bag?
Yes, the How to Easily Make a Cute Boston Bag Using DIY Circles project is suitable for beginners who are comfortable with basic crochet or sewing skills.
2. What materials work best for DIY circles?
Cotton, wool, acrylic yarns, or fabric scraps are ideal for creating durable and attractive circles.
3. How long does it take to complete the bag?
Completion time varies by skill level and bag size, typically ranging from 6 to 15 hours.
4. Can I customize the size of the bag?
Absolutely. Adjust the circle size and number of motifs to make the bag smaller or larger.
5. How do I secure the handles?
Sew them firmly onto reinforced areas or use extra stitching to ensure durability.
6. Can the bag be machine washed?
Depending on the yarn or fabric, gentle hand washing or a delicate machine cycle is recommended to maintain shape and color.
Learning How to Easily Make a Cute Boston Bag Using DIY Circles provides a creative and satisfying DIY project. You have learned how to gather materials, create and assemble circular motifs, and finish the bag with care and personalization.
This technique encourages experimentation with colors, textures, and embellishments, resulting in a unique accessory that is both functional and stylish. Handmade bags like this highlight creativity and craftsmanship, making them wonderful gifts or personal treasures.
Share your thoughts and experiences! Leave a comment with suggestions or feedback, as your input inspires future projects and supports our vibrant DIY community.


