
Crochet Multi-Purpose Blouse, Shawl, Runner Model

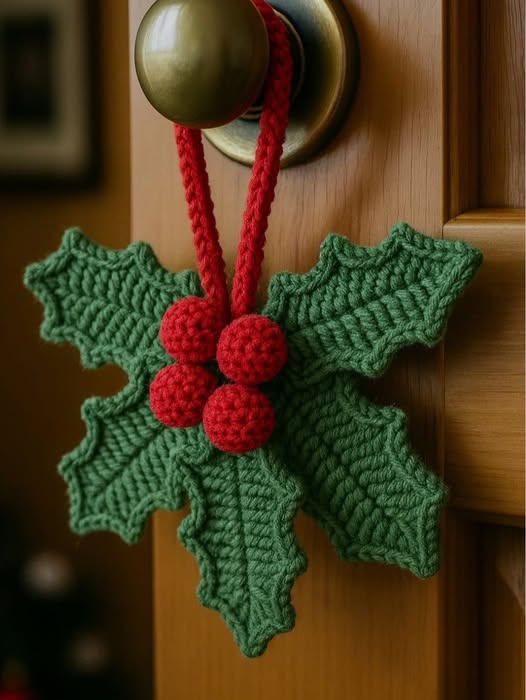
The Santa Claus Ornament – Crochet Pattern is the perfect project to bring holiday cheer and handmade warmth to your Christmas decorations. There’s something magical about creating your own festive ornaments, especially when they capture the joyful spirit of Santa himself.
This crochet pattern allows you to craft a cute and detailed Santa Claus ornament that looks beautiful hanging on your Christmas tree, adorning a wreath, or even as a thoughtful handmade gift tag. Whether you’re a beginner or an experienced crocheter, this project will fill your home with creativity and the essence of the season.
Crocheting your own Santa Claus Ornament not only adds a personal touch to your decorations but also creates lasting memories. Each stitch reflects the care, patience, and love that go into handmade crafts.
You can make several ornaments in different color variations to decorate your tree or share with friends and family. This small, joyful project is an excellent way to use leftover yarns and transform them into something truly special.
The Santa Claus Ornament – Crochet Pattern combines basic crochet techniques with simple assembly steps, resulting in a delightful decoration that captures Santa’s signature charm—his red suit, fluffy white beard, and rosy cheeks.
It’s also a great way to unwind and connect with the holiday spirit. With just a few materials and a bit of creativity, you can make a timeless ornament that will become part of your family’s Christmas traditions year after year.
Before starting your Santa Claus Ornament – Crochet Pattern, it’s important to gather the right materials to ensure the best results. You don’t need much to make this ornament, but having quality supplies can make a big difference in how your Santa turns out.
You’ll need medium-weight yarn in the classic Santa colors: red for his hat and suit, white for the beard and trim, beige or light peach for the face, and a bit of black and gold for the eyes and belt. You can choose acrylic yarn for durability and shine, or cotton yarn for a more traditional matte finish.
A 2.5 mm or 3 mm crochet hook works best for creating tight stitches so your ornament keeps its shape. You’ll also need a yarn needle for sewing parts together, a small amount of fiberfill for stuffing, and scissors. For a bit of extra sparkle, you can add a thin strand of gold thread when crocheting the hat or edging.
Safety eyes can be used for the Santa face, but embroidery thread works just as well if you prefer a softer, handmade look. A small loop made from yarn or ribbon will serve as the hanger for your ornament.
Before you begin, organize your materials and find a cozy spot to work. Crocheting small pieces like this one requires focus, good lighting, and a comfortable environment. Once you have everything ready, you’re set to start creating your adorable Santa Claus Ornament that will spread Christmas cheer wherever it hangs.
The Santa Claus Ornament – Crochet Pattern is made in small sections that come together to create the final festive figure. Each piece is simple and quick to make, so even if you’re new to amigurumi-style crochet, you’ll find this project enjoyable and rewarding.
Start with the head using beige or light peach yarn. Work in continuous rounds to form a small ball shape, stuffing it lightly with fiberfill as you go. The face should be smooth and firm enough to hold the embroidered or safety eyes later on.
Next, create the iconic Santa hat. Use red yarn and begin with a magic ring, increasing gradually to form the base and then tapering to a point. Once the hat shape is complete, add a fluffy white brim and a small pom-pom at the tip. Attach it slightly tilted for extra charm—this small detail makes your Santa Claus Ornament look playful and full of life.
The beard is one of Santa’s most recognizable features. Use white yarn and make several loops or textured stitches to give it volume. You can attach it directly under the hat’s brim, making sure it frames the face neatly. Don’t forget to add a little pink blush to the cheeks for a warm, jolly expression.
After finishing the face and hat, crochet a small red body if you want your Santa to have a full figure. Some crafters prefer to make just the head and hat as a minimalist version. For the full ornament, create a round body with a black belt and golden buckle detail.
Finally, assemble all parts using your yarn needle. Sew the hat to the head, attach the beard securely, and make sure everything is positioned symmetrically. Add the loop on top, and your Santa Claus Ornament is ready to hang on your Christmas tree or to be gifted to someone special.
One of the joys of the Santa Claus Ornament – Crochet Pattern is that it’s highly customizable. You can personalize it in countless ways to suit your home’s holiday decor or to make it unique for gift-giving.
Experiment with different yarn textures. Using sparkly or metallic yarn adds a festive shine, while velvet or plush yarn creates a soft, luxurious look. You can also change Santa’s outfit color—try green, blue, or gold variations for a modern or playful twist.
For a rustic style, use natural tones like cream and brown and add wooden buttons or twine details. This gives your Santa Claus Ornament a cozy farmhouse aesthetic that pairs beautifully with traditional holiday themes.
You can also add accessories such as a mini sack, candy cane, or tiny crochet gifts for Santa to hold. These small embellishments make your ornament stand out and give it a storytelling touch.
If you’re making multiple ornaments, consider creating a set with different expressions. One Santa could be winking, another laughing, and another with eyes closed as if chuckling. This makes them even more endearing as a collection.
Adding a bit of fragrance is another lovely touch—place a drop of cinnamon or pine essential oil on the stuffing before closing the ornament. Every time you pass by your tree, the scent will remind you of Christmas joy and the warmth of handmade creations.
When making your Santa Claus Ornament – Crochet Pattern, paying attention to small details will elevate the final result and make your creation look neat and professional. Here are some valuable tips to help you along the way.
Keep your tension consistent throughout. Tight stitches are key to creating well-shaped ornaments that hold their form. If your stitches are too loose, the stuffing may show through, so adjust your hook size if necessary.
Always stuff the head and body gradually. Add a small amount of fiberfill at a time, shaping it with your fingers to avoid lumps. Proper stuffing helps your ornament keep its round shape and prevents sagging over time.
Use stitch markers when working in rounds to keep track of where each row starts and ends. This will make counting much easier and prevent uneven shapes.
Take your time sewing the pieces together. The alignment of the hat, beard, and facial features determines how cute your Santa Claus Ornament will look. A few extra minutes spent on precise assembly can make a big difference.
Don’t forget to weave in yarn ends securely and hide them inside the ornament. Clean finishing gives your crochet work a professional appearance.
Finally, store your Santa Claus Ornament properly when the holidays are over. Keep it in a cool, dry place inside a fabric pouch or box to protect it from dust and moisture. That way, you can enjoy your handmade Santa for many Christmases to come.
1. Is the Santa Claus Ornament suitable for beginners?
Yes! The Santa Claus Ornament – Crochet Pattern uses basic stitches such as single crochet, increase, and decrease. It’s perfect for beginners who want to learn amigurumi techniques on a small, fun project.
2. How long does it take to make one ornament?
It usually takes about two to three hours to complete one ornament, depending on your crochet speed and experience level.
3. What type of yarn works best for this project?
Acrylic or cotton yarn works great. Acrylic gives a shiny festive look, while cotton provides a more classic matte texture.
4. Can I make the ornament bigger or smaller?
Absolutely. You can adjust the size by using a different hook and yarn weight. Thicker yarn and a larger hook will create a bigger ornament.
5. Can children help with this project?
Older children can help stuff the ornament or choose colors. However, small parts like safety eyes should be handled by adults.
6. Can I sell my finished ornaments?
Yes, you may sell your handmade Santa Claus Ornament as long as you don’t resell or distribute the original pattern. Handmade sellers often find these ornaments popular during the holiday season.
The Santa Claus Ornament – Crochet Pattern is more than just a festive decoration—it’s a celebration of creativity, craftsmanship, and the joy of handmade traditions. With just a few supplies and some time, you can create a delightful ornament that adds warmth and personality to your Christmas decor. From his jolly hat to his fluffy beard, every detail captures the spirit of Santa and the magic of the holidays.
Crocheting your own ornaments brings a personal touch that store-bought decorations simply can’t match. Each piece becomes a cherished memory, crafted with love and care. Whether you make one or an entire collection, your Santa Claus Ornament will surely become a favorite part of your family’s festive traditions.
If you enjoyed this tutorial, leave a comment below with your thoughts and suggestions. I’d love to hear how your Santa Claus Ornament turned out and what creative touches you added to make it your own!


