
Crochet Multi-Purpose Blouse, Shawl, Runner Model

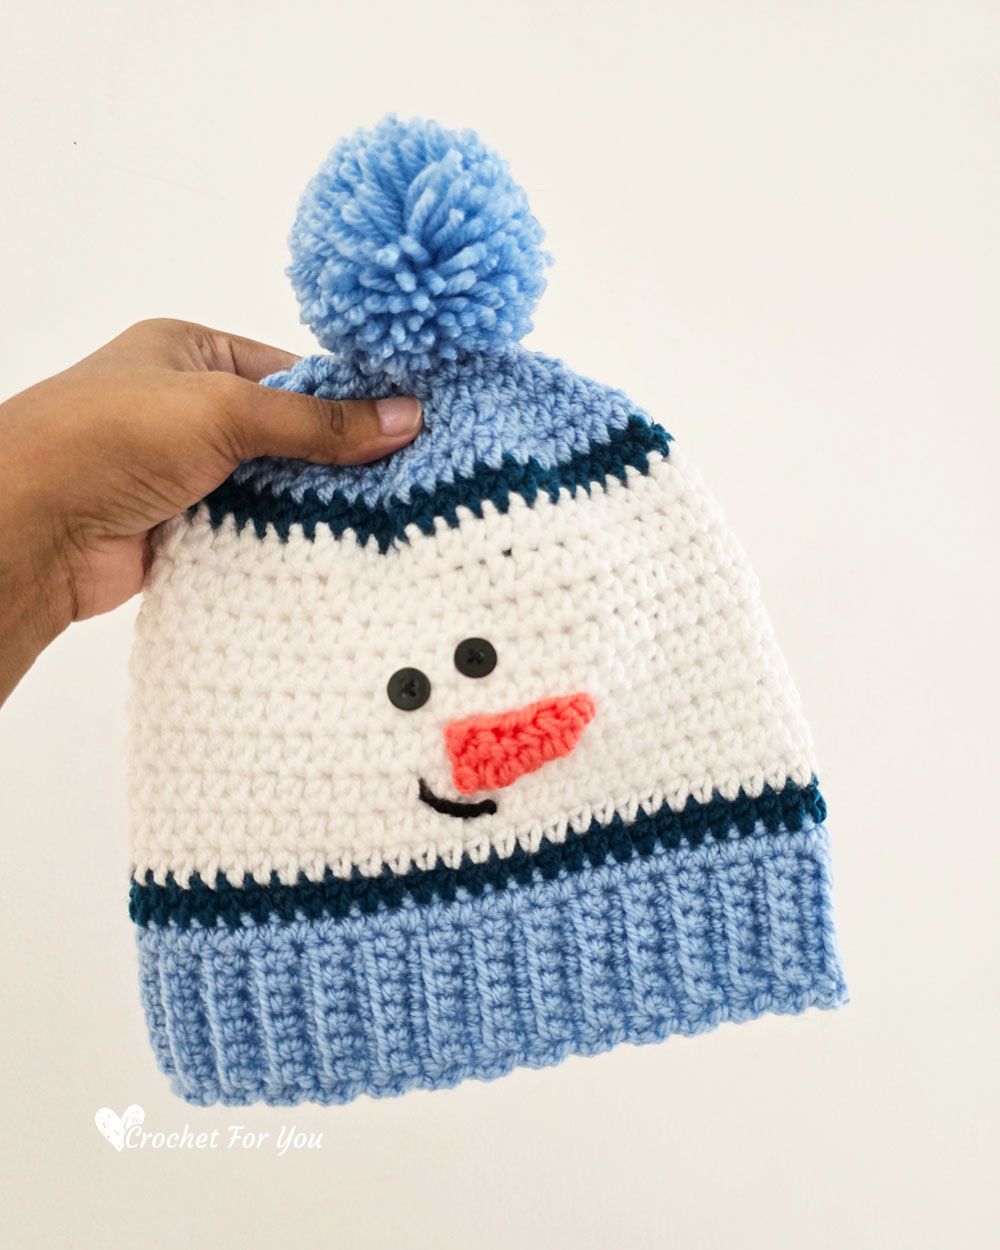
When the winter chill starts to fill the air, there’s nothing cozier and more cheerful than creating your own Crochet Snowman Hat – Free Pattern. This adorable project combines warmth, comfort, and a touch of festive fun that makes it perfect for the season.
Whether you’re making it for kids, adults, or as a charming handmade gift, this crochet pattern is both enjoyable and practical. The snowman design adds a whimsical winter touch, making it a favorite for holiday photos, family gatherings, or just staying snug during cold days.
Creating a Crochet Snowman Hat is a wonderful way to celebrate the creativity of crochet and the joy of handmade crafts. It’s a beginner-friendly pattern that uses basic stitches, allowing crafters of all skill levels to join in.
You can play with colors, add embellishments like buttons or scarves, and make your snowman hat truly one of a kind. It’s the perfect project to bring some handmade magic into your winter wardrobe or gift collection.
This article will walk you through everything you need to know to make your own Crochet Snowman Hat. From choosing the right yarn and hook size to shaping the hat and adding final details, every step will be explained in a simple and encouraging way.
By the end, you’ll not only have a cozy accessory but also a cute, handcrafted piece of winter art that reflects your personality and creativity.
Before starting your Crochet Snowman Hat, it’s important to gather the right materials. Choosing quality yarn and tools will make the crocheting process smoother and the final result more comfortable and durable.
Start with medium-weight yarn, which is ideal for hats because it provides warmth without being too bulky. For the base of your snowman, white yarn works best, giving that snowy and cheerful appearance. You’ll also need small amounts of black yarn for the eyes and mouth, and orange yarn for the carrot-shaped nose. Optional colors like red, green, or blue can be used for a festive hatband or scarf around the snowman’s neck.
A 5mm or 5.5mm crochet hook is typically suitable for this pattern, depending on your tension. If you crochet tightly, go up a size; if you crochet loosely, use a smaller hook. Other materials you’ll need include a yarn needle for sewing pieces together, scissors, and a stitch marker to help keep track of rounds.
Before you begin crocheting, take a few minutes to test your gauge. This helps ensure your hat will fit properly. Make a small swatch and measure your stitches per inch, adjusting your hook size if necessary. Taking this extra step can prevent your hat from being too large or too small.
Finally, decide on the size you’ll make—baby, child, or adult. The Crochet Snowman Hat – Free Pattern can be easily adapted for any age by adjusting the number of stitches and rounds. With your materials prepared and your plan in place, you’re ready to bring your snowman hat to life!
Begin the Crochet Snowman Hat by creating a magic ring, which forms the top of the hat. Work a series of double crochets into the ring, gradually increasing with each round. This will create the rounded shape of the snowman’s head. Continue increasing until the crown reaches the desired diameter, then crochet evenly around to form the body of the hat.
Once the base is complete, it’s time to add personality! For the snowman’s face, use black yarn to create small circles for eyes. You can crochet them separately and sew them on or embroider them directly onto the hat. The mouth can be made with small black stitches in a curved shape to give your snowman a friendly smile.
The most recognizable feature—the carrot nose—can be crocheted separately using orange yarn. Create a small cone shape by starting with a few stitches and decreasing as you go. Once done, attach it securely to the center of the face. This simple detail instantly transforms the hat into a joyful snowman design.
If you’d like to add a scarf, use contrasting yarn and crochet a long chain that wraps around the hat near the base. You can secure it with a few stitches and let the ends dangle to give a playful, realistic effect. For an extra festive touch, consider adding a colorful hatband or pom-pom on top.
Remember to check your stitch count as you go, ensuring symmetry and smooth shaping. Even tension and consistent stitches will make your Crochet Snowman Hat look neat and professional. After completing all parts, weave in any loose ends carefully using a yarn needle.
Your snowman hat is now taking shape! You can stop here for a simple version or continue adding more decorations, like buttons, ribbons, or sparkly yarn, to make your creation truly unique.
One of the best things about making a Crochet Snowman Hat is how customizable it is. You can make each snowman unique by changing small details or adding creative accessories.
Try using different yarn textures to give your snowman more character. Fluffy yarns can create a soft, snowy look, while standard acrylic yarn provides clean stitch definition. You could even combine both to create a mix of textures that stand out beautifully.
Play with color combinations to personalize each hat. Instead of the traditional red and green, use pastel blues, silvers, or golds for a more modern winter look. Kids especially love bright, playful colors—try a pink or turquoise snowman hat for a fun twist.
You can also turn this pattern into a family project. Crochet matching snowman hats for each family member, adjusting the size for everyone. It makes for adorable family photos during the holidays!
For a touch of whimsy, add accessories to your snowman. A small crochet bow tie, earmuffs, or even a mini top hat stitched onto the side can make your design extra special. Using safety eyes instead of yarn eyes can also give a more polished, toy-like look.
If you enjoy amigurumi, you can crochet small snowmen as matching companions to your hats. These mini snowmen can hang as keychains or Christmas ornaments, making your winter crochet theme complete.
Every snowman you make will have its own personality, so don’t hesitate to experiment. The joy of crafting your Crochet Snowman Hat lies in making it reflect your creativity and holiday spirit.
After completing your Crochet Snowman Hat, it’s important to finish it properly for the best results. Start by blocking the hat lightly to help it hold its shape. Gently shape it while damp and let it air dry flat. This step ensures the stitches even out and the hat fits comfortably.
If you’ve added embellishments like buttons or ribbons, make sure they’re securely sewn to avoid coming loose during wear. Safety is especially important for children’s hats, so double-knot threads and avoid small detachable parts for younger kids.
To make your snowman hat even cozier, you can line it with soft fleece fabric. This helps keep warmth in and adds extra comfort against the skin. Simply sew the lining inside the hat using small, hidden stitches.
When storing your Crochet Snowman Hat, keep it in a cool, dry place. Avoid hanging it by the top or stretching it out, as this can distort the shape. Fold it gently and place it in a drawer or storage box during off-seasons.
Washing should be done carefully to preserve the shape and color. Hand wash your hat with mild detergent and cold water, then reshape it and let it air dry. Avoid wringing or machine drying, as that could damage the fibers and embellishments.
With proper care, your crochet hat will last for many winters, becoming a cherished handmade piece you can use or gift year after year.
1. Is the Crochet Snowman Hat suitable for beginners?
Yes! The pattern uses basic stitches such as chain, single crochet, and double crochet. It’s an excellent project for beginners to practice while making something festive.
2. How long does it take to make a Crochet Snowman Hat?
It depends on your skill level, but most people can complete one within a few hours to a day. Adding decorations may take a little extra time.
3. Can I make this pattern in different sizes?
Absolutely. You can adjust the number of rounds and stitches to create baby, child, or adult sizes. The Crochet Snowman Hat is very flexible in design.
4. What kind of yarn should I use?
Acrylic or cotton-blend medium-weight yarns work best. They’re durable, warm, and easy to care for—perfect for hats.
5. Can I wash the Crochet Snowman Hat in a machine?
It’s better to hand wash your hat to maintain its shape, especially if it includes decorations or stitched-on features.
6. How can I make my snowman hat more festive?
Try adding embellishments like a colorful scarf, pom-poms, or sparkly yarn accents. These small touches make your hat even more fun and holiday-ready.
Making your own Crochet Snowman Hat – Free Pattern is not only a creative project but also a heartwarming experience that brings joy to your winter season. From selecting materials to finishing the last stitch, each step allows you to express your personality and love for handmade crafts. This charming hat combines practicality with festive spirit, making it a perfect winter accessory or thoughtful handmade gift.
You’ve now learned how to create your hat, customize it with creative details, and care for it properly. Now it’s time to pick up your hook, choose your favorite yarn, and start crocheting your very own snowman hat. Don’t forget to share your experience—leave your honest opinion and suggestions below to inspire others who are ready to embark on their crochet journey!


