
Crochet Multi-Purpose Blouse, Shawl, Runner Model

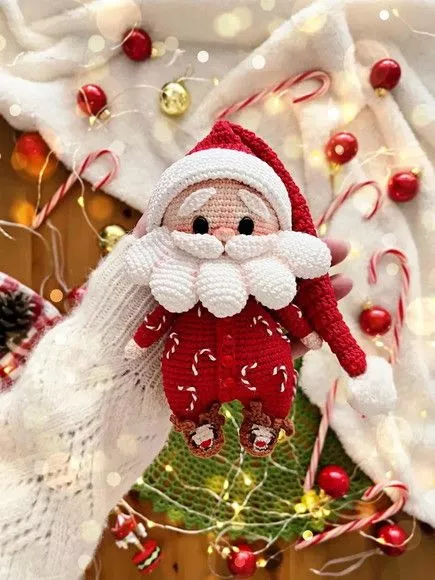
Crochet Christmas Doll Tutorial is the perfect holiday project for anyone who loves creating handmade gifts and decorations. Making your own Christmas doll through crochet is a heartwarming experience that brings creativity and joy to the festive season.
Whether you’re crafting for your home, gifting a loved one, or simply exploring new crochet techniques, this Crochet Christmas Doll Tutorial will guide you through every step. It’s a fun and rewarding project suitable for both beginners and experienced crocheters who want to add a personal touch to their Christmas décor.
There’s something truly magical about crafting a Christmas doll with your own hands. Each stitch carries warmth, love, and care, turning yarn into a unique keepsake that lasts for years.
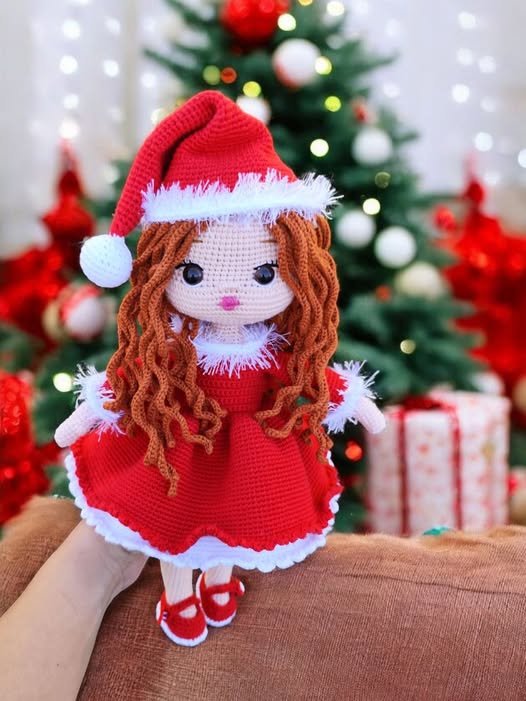
The Crochet Christmas Doll Tutorial not only teaches you how to make a charming decoration but also allows you to express your creativity through color choices, accessories, and styling. Dolls can be dressed as Santa, elves, angels, or even winter fairies, depending on your imagination.
One of the best things about this project is its versatility. You can use leftover yarn from previous creations or choose new shades that match your holiday palette. From traditional reds and greens to shimmering metallic tones, your Crochet Christmas Doll Tutorial can reflect your personal style and Christmas spirit. Once completed, these adorable dolls make wonderful gifts, stocking stuffers, or centerpieces for your festive table.
Before starting your Crochet Christmas Doll Tutorial, it’s essential to gather all the materials you’ll need. The main supply is yarn, and cotton or acrylic yarns are both excellent choices. Cotton offers a smooth finish and good stitch definition, while acrylic provides warmth and flexibility. Choose soft, medium-weight yarns in your preferred Christmas colors like red, white, green, and gold.
You’ll also need a crochet hook that matches your yarn thickness. A 3.5mm to 4mm hook is ideal for creating neat and firm stitches that hold the doll’s shape. Make sure to have a yarn needle for sewing parts together, scissors for cutting yarn, and some stitch markers to keep track of your rounds.
Stuffing is another key material for your Crochet Christmas Doll Tutorial. Polyester fiberfill is the most commonly used option—it’s lightweight, soft, and easy to shape. For a more eco-friendly choice, you can use cotton stuffing or even small fabric scraps. Just make sure it gives your doll a smooth, plump appearance.
Safety eyes or small black beads are perfect for creating expressive faces. You can also embroider the eyes and mouth using black and red yarn if you prefer a softer, all-yarn look. Tiny accessories such as ribbons, bells, or miniature hats can add an extra layer of charm to your Crochet Christmas Doll Tutorial.
Finally, prepare a little bit of blush or fabric paint if you’d like to give your doll rosy cheeks. These small details bring the doll to life and make it more festive. Having all your materials ready before you begin ensures a smooth, enjoyable crochet experience from start to finish.
To begin your Crochet Christmas Doll Tutorial, start with the head. Use a skin-toned yarn and create a magic ring, working single crochets in a spiral. Gradually increase stitches until the circle reaches the desired diameter for the head, usually around 2–3 inches. Then continue crocheting evenly for several rows to build the round shape before decreasing to close it. Stuff the head firmly but gently as you go to maintain a smooth surface.
Next, move on to the body. Switch to your main clothing color—perhaps red for Santa or green for an elf. Begin with a small round base and gradually increase stitches to form the torso. Keep the shape slightly tapered toward the top to create a natural silhouette. As you continue, remember to stuff the body lightly before sealing it. The Crochet Christmas Doll Tutorial allows flexibility here; you can make the body longer or shorter depending on your doll’s design.
For the arms, crochet two small tubes starting with a magic ring and a few rounds of single crochet. These should be slightly thinner than the body. Once completed, attach them securely to the sides. Adding white cuffs or mittens can make the arms look more festive and detailed.
Now it’s time to make the legs. Similar to the arms, crochet two small cylindrical shapes in matching or contrasting colors. For example, if you’re making Santa, red legs with black boots would look wonderful. The Crochet Christmas Doll Tutorial lets you experiment with creative combinations to bring your character to life.
Don’t forget about the hair! You can crochet strands of yarn or sew loops directly onto the head. Golden, brown, or white yarn works beautifully, especially if you’re creating an angel or Mrs. Claus. Play with different styles—braids, curls, or even a tiny bun.
Lastly, create accessories such as a hat, scarf, or tiny gift bag. These small details are what make the Crochet Christmas Doll Tutorial so enjoyable. They allow you to personalize your doll and turn it into a one-of-a-kind decoration that radiates Christmas cheer.
The Crochet Christmas Doll Tutorial offers endless possibilities to express your creativity. One popular variation is the Santa doll. With a red outfit, black belt, and white trim, this design instantly brings the holiday spirit to life. You can even add a fluffy white beard using small loops of yarn for texture.
Another idea is to create a cute elf doll. Use green and red yarn, pointy shoes, and a hat with a jingle bell on top. Elves represent joy and playfulness, making them a fun addition to your Christmas collection.
You can also craft a Christmas angel doll. Use soft white or cream yarn, add small wings made of lace or yarn, and include a golden halo. The angel variation of the Crochet Christmas Doll Tutorial symbolizes peace and light, perfect for displaying near your tree or as a gift for someone special.
If you love winter themes, consider making a snow-themed doll. Use icy blues and whites, add a scarf, and embroider snowflakes on the outfit. This version captures the beauty of the season without being tied to any specific character.
You can even design a Mrs. Claus doll to accompany your Santa! Add a red dress, white apron, and gray hair bun. Together, they create an adorable holiday pair that’s sure to make everyone smile.
Lastly, personalize your dolls by crocheting initials, adding small buttons, or even giving each one a tiny prop—like a candy cane or a miniature gift box. The Crochet Christmas Doll Tutorial gives you full freedom to customize every detail according to your imagination.
To make your Crochet Christmas Doll Tutorial look polished and professional, focus on neat stitching. Maintaining consistent tension throughout your work ensures that the doll’s surface looks smooth and uniform. Uneven tension can cause lumps or gaps in the stuffing.
When sewing parts together, use invisible stitches or whip stitch for a seamless look. It’s best to attach limbs before closing the final round of the body so you can adjust placement easily. Always double-knot the ends securely and weave them in neatly to prevent unraveling.
Blocking your doll lightly can help refine its shape. Simply use a damp cloth and press gently over the crocheted areas. Avoid direct heat or soaking, as it might distort small features. This step helps your Crochet Christmas Doll Tutorial maintain its form beautifully.
Pay attention to facial details—embroider the eyes symmetrically and keep expressions soft and friendly. Small touches like rosy cheeks or eyelashes can make your doll more expressive.
If your doll is meant for children, avoid using small detachable parts like buttons or beads, as they can pose a choking hazard. Embroidered features are safer for kids and still look adorable.
Finally, take your time. Rushing through crochet projects can lead to uneven results. Enjoy the process of creation, and remember that handmade items are special precisely because they carry your personal touch.
1. Is the Crochet Christmas Doll Tutorial suitable for beginners?
Yes, this project is beginner-friendly. It uses basic stitches such as single crochet, increase, and decrease, making it perfect for learning and improving your skills.
2. What kind of yarn is best for this project?
Soft cotton or acrylic yarn works best. Cotton gives a smooth finish, while acrylic provides more stretch and color variety for your Crochet Christmas Doll Tutorial.
3. How long does it take to make one doll?
Depending on your speed and the level of detail, it usually takes 4 to 6 hours to complete a doll. Adding accessories may take a bit longer.
4. Can I make this doll as a gift?
Absolutely! Handmade dolls are thoughtful and cherished gifts for both children and adults during the holiday season.
5. Can I resize the doll?
Yes, you can adjust the hook size or yarn thickness to make a smaller or larger version of your doll without changing the overall pattern.
6. How do I clean my crochet doll?
Hand wash gently with mild soap and cold water. Let it air dry to keep the shape intact. Avoid machine washing, especially if you used embellishments.
The Crochet Christmas Doll Tutorial is a joyful project that blends creativity, craftsmanship, and the spirit of the season. It’s more than just a craft—it’s a way to create memories and share love through handmade gifts. Whether you choose to make a Santa, angel, or whimsical elf, each doll becomes a little piece of holiday magic that brightens every home.
If you enjoyed this tutorial, share your experience in the comments! I’d love to hear your honest opinion and see how your Crochet Christmas Doll Tutorial turned out. Your feedback inspires more creativity and keeps the joy of handmade crafts alive for everyone.


