
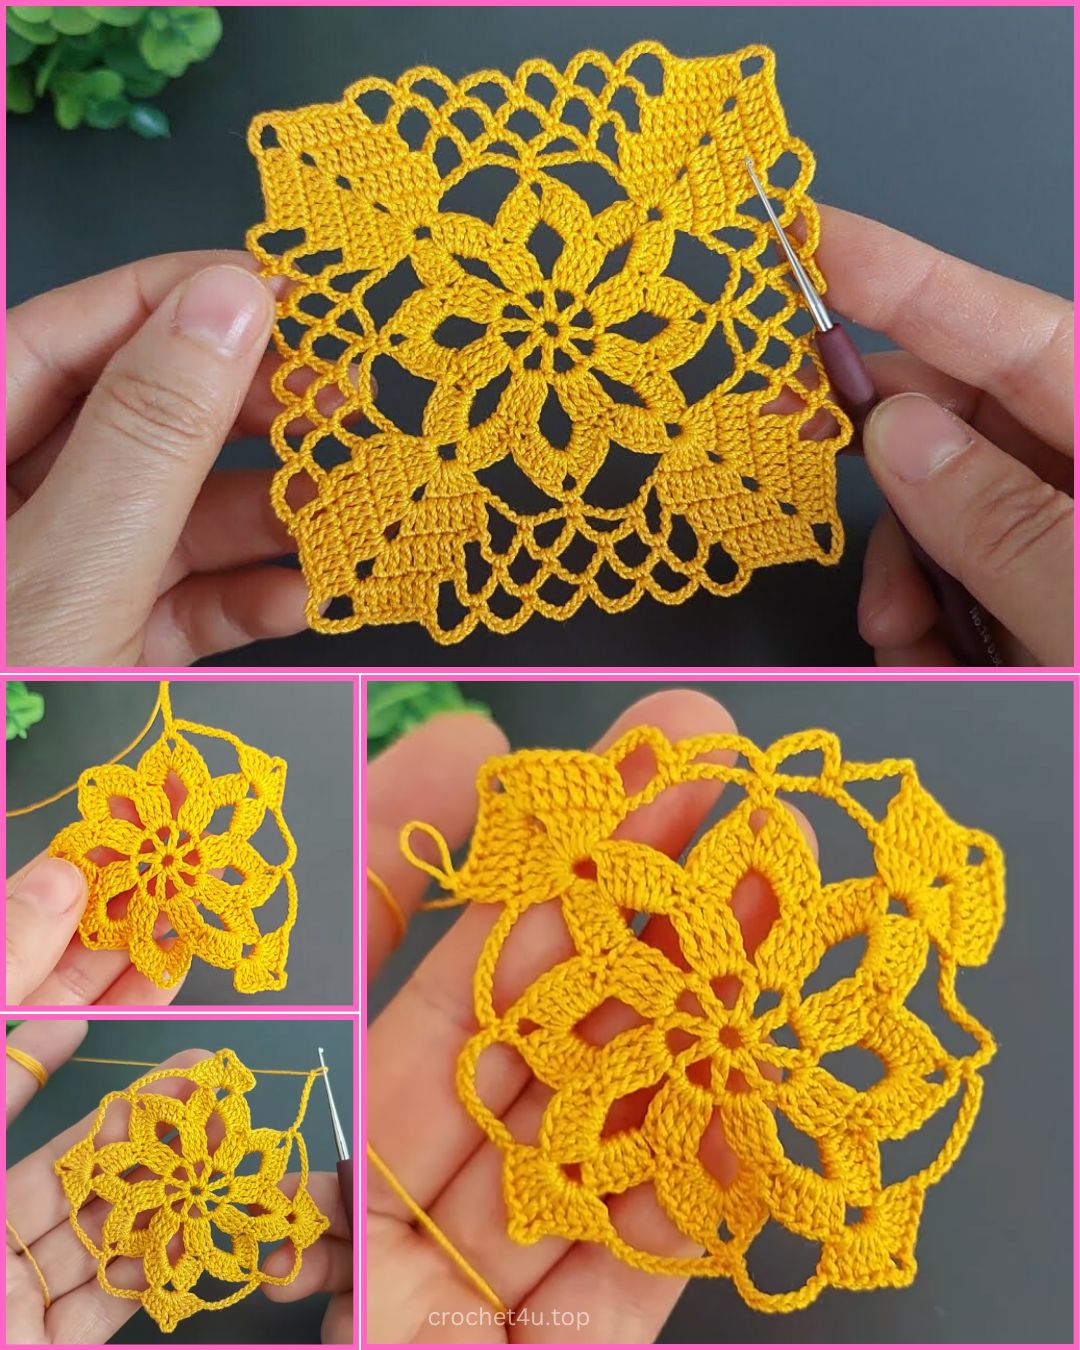
Crochet Multi-Purpose Blouse, Shawl, Runner Model

Learning how to make a Flat Crochet Circle is one of the most essential skills every crocheter should master. This Flat Crochet Circle – Step-by-Step Tutorial will guide you through each part of the process so that your circles lay perfectly flat without curling or ruffling.
Whether you’re creating a base for a coaster, rug, or amigurumi project, knowing how to keep your crochet circle even and smooth is a fundamental technique.
Crochet circles might seem simple at first glance, but achieving a flawless flat shape takes a bit of understanding and practice. Many beginners experience frustration when their circles start to wave or curl inward, but the good news is that with the right stitch placement and increase method, this problem can easily be avoided.
This Flat Crochet Circle – Step-by-Step Tutorial will help you understand the logic behind stitch counts, yarn tension, and hook sizes to achieve professional-looking results every time.
By the end of this tutorial, you’ll not only know how to crochet a perfectly flat circle but also how to adjust the pattern for any yarn weight or project type. This knowledge opens up endless creative possibilities—from dishcloths and coasters to hats and decorative mandalas.
So, grab your yarn and hook, and let’s begin this exciting journey through the art of the Flat Crochet Circle – Step-by-Step Tutorial.
Before diving into the stitches, you’ll need a few basic materials. The good news is that making a Flat Crochet Circle doesn’t require much—just your favorite yarn, a matching hook, scissors, and a yarn needle. The yarn weight you choose will determine the overall size and texture of your circle. For beginners, medium-weight cotton yarn is ideal because it gives clear stitch definition, making it easier to see your progress.
Your crochet hook size should match your yarn label recommendation. If your circle starts to curl upward, it could mean your hook is too small, creating tight stitches. Conversely, if your circle ruffles, you might be using too large of a hook. Adjusting the hook size slightly can make a big difference in keeping your Flat Crochet Circle even.
Choosing the right yarn color also helps when learning. Light or pastel shades make stitches more visible, which is especially useful when following this Step-by-Step Tutorial. Once you become more confident, you can experiment with multicolored or textured yarns for more artistic results.
You’ll also need good lighting and a comfortable surface to work on. Crocheting requires attention to detail, especially when counting stitches, so make sure your workspace supports your focus.
Lastly, remember to keep your tension consistent. Uneven tension can make your circle bumpy or uneven. Practicing a few test circles first helps you find the rhythm that works best for you before starting your final piece.
Let’s start crocheting! The Flat Crochet Circle – Step-by-Step Tutorial uses basic stitches that even beginners can follow. The technique builds on gradual increases in each round to maintain a flat surface.
Begin with a magic ring (or adjustable loop). This will be the center of your circle. Chain one (this doesn’t count as a stitch), and make six single crochets into the ring. Pull the tail to close the loop tightly. This forms your first round.
For round two, make two single crochets into each stitch around. You should now have twelve stitches. At this point, your circle should already start forming nicely. Slip stitch into the first stitch to close the round neatly.
Round three involves increasing evenly across the circle. Make one single crochet in the first stitch, then two single crochets in the next. Repeat this pattern around. You’ll end with eighteen stitches. This even increase keeps your circle flat and prevents curling.
Continue in this pattern for subsequent rounds, increasing the spacing between your double stitches each time. For example, in round four, you’ll make one single crochet in each of the next two stitches, then two in the next. The rule is simple: each new round increases the number of single crochets between your double stitches by one.
As your circle grows, count your stitches carefully to ensure accuracy. Missing or adding extra stitches unintentionally can cause your Flat Crochet Circle to warp. Counting at the end of each round ensures you stay on track.
By round ten, your circle will be noticeably larger and should lay completely flat. You can stop at any size or continue increasing for a bigger project. The same structure applies no matter how large you want your circle to be.
Even with the best Flat Crochet Circle – Step-by-Step Tutorial, sometimes issues happen. The most common problems are curling, ruffling, or uneven edges—but don’t worry, they’re easy to fix.
If your circle starts to curl upward like a bowl, you’re adding too few stitches per round. The solution is to increase more often. Go back one round, undo it, and add an extra increase or two in evenly spaced spots. This extra width helps your circle relax and lie flat again.
On the other hand, if your circle begins to ruffle or wave, it means you have too many stitches. In this case, reduce the number of increases. You can either skip one or two increases or make your stitches slightly tighter in the next round.
Uneven edges can also occur when your tension varies. To fix this, make sure your yarn glides smoothly through your fingers and that each stitch is pulled consistently. Relaxed, steady hands are key to a smooth Flat Crochet Circle.
Sometimes, circles warp because of the stitch you use. Single crochet tends to create denser, tighter circles, while double crochet can produce looser, more open ones. You can experiment with both to find the texture and flatness you prefer.
Lastly, blocking can help even out minor imperfections. Lightly dampen your crochet circle and pin it to a flat surface to dry. This process helps your project maintain its shape, especially for larger circles.
Once you’ve mastered this Flat Crochet Circle – Step-by-Step Tutorial, you can apply the technique to countless creative projects. A perfectly flat circle is a foundation for many crochet items, from simple coasters to beautiful rugs.
One of the easiest projects to start with is a set of crochet coasters. By using bright cotton yarn, you can create cheerful and practical items that protect your furniture while adding a pop of color to your home.
Flat crochet circles can also be transformed into placemats. Use thicker yarn or multiple strands held together to create a sturdy texture. These are great for seasonal decorations or handmade gifts.
For those interested in larger projects, rugs made from connected circles can create beautiful mosaic-style designs. This not only showcases your creativity but also allows you to use leftover yarn pieces from previous projects.
Another idea is to use your Flat Crochet Circle as a base for bags or baskets. The flat bottom provides stability, while the sides can be worked upward to form a functional container.
And finally, crocheted mandalas—a more decorative version of the flat circle—offer endless possibilities for color combinations and stitch patterns. These can be framed, hung on walls, or used as intricate table décor.
Why does my crochet circle curl up?
It usually curls because there aren’t enough increases in each round. Try adding an extra increase evenly spaced to help it lay flat.
Why does my crochet circle ruffle?
If it’s ruffling, you have too many increases. Reducing one or two increases per round should fix the issue.
What’s the best stitch for a flat crochet circle?
Single crochet provides the most stable and flat results, but you can also use half-double or double crochet depending on your project.
How do I keep track of my stitches?
Use a stitch marker to mark the beginning of each round. This helps ensure that your increases are evenly spaced.
Can I make larger circles using this pattern?
Yes, just continue increasing each round by the same logic—adding one more single crochet between your increases as the circle grows.
Can I use different yarns for this technique?
Absolutely. You can use any yarn weight, as long as you adjust your hook size accordingly. Thicker yarns will create larger circles faster.
This Flat Crochet Circle – Step-by-Step Tutorial has guided you through every stage of creating a perfect, even crochet circle. You’ve learned about choosing the right materials, controlling tension, increasing stitches properly, and troubleshooting common issues. Whether you use this skill to make coasters, rugs, or mandalas, the technique will serve you across countless projects.
Remember, every crocheter develops their own rhythm and style, so don’t worry if your first few circles aren’t perfect. The more you practice, the more precise and consistent your results will become. Enjoy the process, experiment with colors and textures, and most importantly—have fun creating.
Now that you’ve completed this Flat Crochet Circle – Step-by-Step Tutorial, we’d love to hear from you! Share your honest opinion, experiences, or any tips you discovered while crocheting your own circles. Your feedback helps other makers and keeps the crochet community growing with creativity and inspiration.


