
Crochet Multi-Purpose Blouse, Shawl, Runner Model

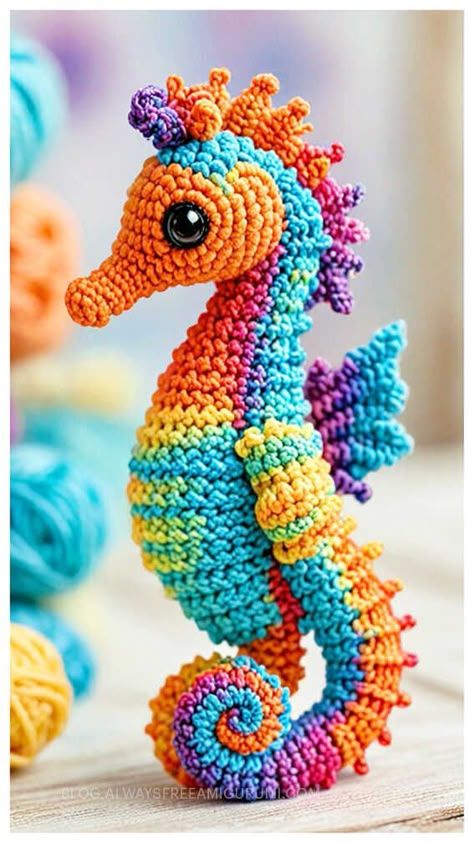
If you are looking for a charming and whimsical crochet project to brighten up your day, the Amigurumi Seahorse Crochet Free Pattern is the perfect choice. This adorable sea creature brings a touch of ocean magic into your home while being a fun and relaxing project to make.
Whether you are a beginner or an experienced crocheter, this pattern is easy to follow and can be customized with different colors and yarn textures. In this article, you will learn everything you need to create your own crochet seahorse step by step, using techniques that make your handmade creation come to life.
The Amigurumi Seahorse Crochet Free Pattern allows you to explore creativity while mastering key amigurumi skills like shaping, color changing, and assembling. The seahorse’s elegant curves and delicate fins make it an exciting piece to work on, especially for those who love making sea-themed crochet toys.
It’s a perfect project for baby mobiles, ocean-themed nurseries, or simply as a cute decorative piece for your collection. Using soft yarns and vibrant colors, you can transform a few basic stitches into a delightful sea companion that everyone will adore.
Crocheting an Amigurumi Seahorse Crochet Free Pattern is also a rewarding way to practice patience and attention to detail. Each small section, from the snout to the curled tail, helps improve your stitch control and 3D shaping techniques.
Plus, this project requires minimal materials, making it an affordable and accessible way to enjoy the art of amigurumi. As you crochet, you’ll not only be crafting a toy but also creating a handmade symbol of tranquility and creativity that reflects the peaceful beauty of ocean life.
Before you begin, it’s essential to gather all the necessary materials for your Amigurumi Seahorse Crochet Free Pattern. The right supplies will help you achieve clean stitches, smooth curves, and a well-defined shape that brings your seahorse to life.
Start with the yarn. The best choice is lightweight cotton or acrylic yarn, typically category 2 or 3, depending on your desired size. Cotton yarn provides a neat, firm texture that’s perfect for detailed amigurumi designs, while acrylic yarn gives a softer, fluffier look. Choose bright oceanic colors such as turquoise, coral, or lavender to capture the marine vibe of your project.
Next, select a suitable crochet hook. For most amigurumi patterns, a smaller hook (2.0mm to 2.5mm) is recommended to ensure tight stitches that prevent stuffing from showing through. If you crochet loosely, you can go one size smaller for an even firmer finish.
You’ll also need stuffing material, such as polyester fiberfill, to give your seahorse its shape and structure. Make sure to stuff it evenly to avoid lumps and maintain the smooth curves of the body. Use a small stick or the back of a crochet hook to push the stuffing into narrow areas like the tail and snout.
Don’t forget to gather safety eyes or black embroidery thread for the facial details. Safety eyes are ideal if you want a realistic look, while embroidered eyes create a softer, baby-safe option.
Finally, have your basic tools on hand—scissors, stitch markers, and a yarn needle for sewing the parts together. Being organized with your materials ensures your Amigurumi Seahorse Crochet Free Pattern process is stress-free and enjoyable.
Now that you have your materials ready, let’s dive into creating your Amigurumi Seahorse Crochet Free Pattern. This section will guide you through each part of the seahorse, from the head to the tail, with easy-to-follow steps that even beginners can master.
Start with the head. Using your chosen yarn color, create a magic ring and work single crochets in the round to form a small ball. Gradually increase your stitches to shape the top of the head, then begin decreasing to form the snout. The seahorse’s snout is a defining feature, so make sure your stitches are even and tight for a neat look.
Once the head is complete, continue to the body. The body is typically crocheted in one continuous piece, curving slightly to mimic the natural shape of a seahorse. As you go, remember to stuff lightly but consistently to maintain smoothness. You can use increases and decreases strategically to give the illusion of a gentle curve and a slender tail.
For the tail, continue crocheting in a spiral, gradually narrowing the circumference. The tail should be flexible enough to curl naturally, giving the seahorse its signature pose. If you want the tail to hold its curl, use a bit of wire inside before closing it off (optional for experienced crafters).
The fins are next. Crochet two small side fins using light, airy stitches like half-double or double crochet. Attach them symmetrically to the sides of the body. A small dorsal fin can also be added along the back for extra realism and texture.
Finally, embroider or attach the eyes and add a smile if desired. Once all parts are sewn and secured, your adorable Amigurumi Seahorse Crochet Free Pattern will be ready to charm everyone who sees it.
The beauty of the Amigurumi Seahorse Crochet Free Pattern lies in its versatility. You can personalize your seahorse in countless ways to make it truly one-of-a-kind.
Start by experimenting with colors. While traditional seahorses are muted in tone, your crochet version can be as imaginative as you want! Try pastel shades for a baby mobile or bold tropical hues for decorative collections. Adding a gradient yarn gives the body a smooth, ocean-like flow of color.
You can also play with textures. Mixing different yarn types, such as velvet or chenille, can make your seahorse extra soft and cuddly. A metallic or glitter yarn accent on the fins can give it a whimsical underwater shimmer that kids will love.
If you’re making your seahorse as part of a marine-themed set, pair it with other sea creatures like turtles, fish, or starfish. This can create a beautiful crochet ocean scene that can decorate nurseries or serve as toys.
Personal touches like tiny crocheted flowers, beads, or embroidery details can add even more personality. You could also give your seahorse a small bow or scarf to make it more playful.
Finally, size customization is easy! Using thicker yarn and a larger hook will make your seahorse bigger and perfect for hugging, while smaller yarn and a smaller hook will create a miniature collectible version. Each variation keeps the spirit of the Amigurumi Seahorse Crochet Free Pattern alive while letting your creativity shine.
Creating a perfect Amigurumi Seahorse Crochet Free Pattern requires a few practical tips to make your experience easier and your results more professional. These small details make a big difference in the final appearance and durability of your crochet piece.
First, always keep your tension consistent. Amigurumi relies on tight, even stitches to maintain shape and prevent stuffing from showing through. Practicing a few rounds before starting the main piece helps maintain control.
Second, use stitch markers to keep track of rounds. Since amigurumi is often worked in continuous spirals, it’s easy to lose count of your stitches without clear marking.
Another tip is to stuff your seahorse gradually as you go, instead of waiting until the end. This allows you to shape the body better and avoid uneven filling. Focus especially on the narrow parts, such as the tail, where stuffing can be tricky.
When assembling, sew the fins symmetrically and securely. Use invisible stitches so your joins look clean and professional. If you prefer, you can use a small dab of fabric glue to reinforce delicate attachments.
Also, consider blocking your finished seahorse lightly with steam or a damp cloth. This helps relax the fibers, giving your toy a polished and neat finish.
Lastly, take your time. Crocheting an amigurumi is not just about finishing quickly—it’s about enjoying the process. Each stitch contributes to the final adorable result of your Amigurumi Seahorse Crochet Free Pattern.
1. What type of yarn works best for amigurumi seahorses?
Cotton yarn is the best choice for firmness and stitch definition. Acrylic yarn is also great if you prefer a softer texture.
2. Can beginners make this seahorse pattern?
Yes! The Amigurumi Seahorse Crochet Free Pattern is beginner-friendly and uses simple stitches like single crochet, increase, and decrease.
3. How long does it take to complete one seahorse?
Depending on your skill level, it usually takes between 3 to 5 hours to finish one.
4. How do I make sure my seahorse holds its shape?
Keep your stitches tight, stuff evenly, and consider lightly stiffening the tail with wire or starch if you want it to curl naturally.
5. Can I make this pattern larger or smaller?
Absolutely! Use a thicker yarn and larger hook for a bigger seahorse or smaller materials for a mini version.
6. What kind of eyes should I use?
Safety eyes give a realistic finish, but embroidered eyes are safer for baby toys.
7. How should I clean my crochet seahorse?
Hand wash gently with mild soap and air dry. Avoid wringing or machine drying to preserve the shape.
8. Can I sell the seahorses I make?
Yes, handmade crochet items are popular at craft fairs and online shops, as long as you credit the pattern appropriately.
The Amigurumi Seahorse Crochet Free Pattern is a wonderful project that combines creativity, relaxation, and craftsmanship. Through simple stitches and a few materials, you can create a unique handmade toy that captures the elegance of marine life. Whether you gift it to a loved one, use it for decoration, or keep it as part of your crochet collection, each seahorse is a little piece of art made with love and care.
Now that you’ve learned all the steps and tips to create your own crochet seahorse, it’s time to get your yarn and hook ready. Try the pattern, explore color combinations, and most importantly, enjoy every moment of crafting. If you’ve made this project, I’d love to hear your thoughts—share your opinion and suggestions in the comments below!


