
Pie Carrier Sewing Pattern

Fall into a Quilt Along: Turkey is the perfect project to get you into the autumn spirit. This fun and creative quilt along is designed to help quilters of all levels make a charming turkey quilt block, inspired by the beauty of the fall season.
The project encourages quilters to “fall” into the rhythm of piecing, sewing, and quilting while celebrating the festive vibes of Thanksgiving and autumn. The Turkey Quilt Block is not just a seasonal decoration, but a fun way to add personal touches to your quilt collection or make unique gifts.
Whether you’re a seasoned quilter or a beginner, Fall into a Quilt Along: Turkey offers an easy, step-by-step guide that will take you through every phase of the project.
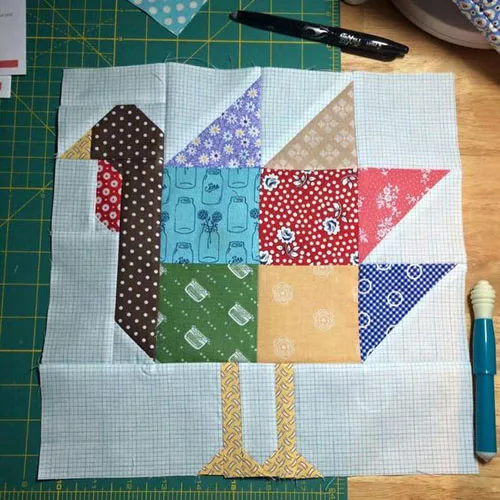
Image from google.
You’ll learn how to select the perfect fabrics, cut them with precision, and piece them together to create a delightful turkey block that will brighten any quilt.
Plus, you’ll also explore tips for quilting, binding, and adding finishing touches to ensure your turkey block is perfect and ready for display.
The journey of creating your very own Turkey Quilt Block starts with an exciting introduction to quilt-along challenges, and we’ll guide you through every step of the way. Let’s dive into the preparation and planning stage, where you’ll gather materials and get organized for the fun ahead!
Before you begin the Fall into a Quilt Along: Turkey, it’s essential to gather the necessary materials to make the process easier and more enjoyable. The key to a successful quilt-along is having the right fabrics and tools on hand. You’ll need fabric for the turkey’s feathers, body, and background, as well as batting for the quilt’s structure.
Start by selecting fabrics that represent the vibrant colors of autumn. Rich oranges, browns, yellows, and reds will bring the turkey to life, while a complementary neutral or warm background fabric will allow the colors to pop. It’s a good idea to mix and match fabrics that reflect the fall theme, creating contrast and interest in the design.
In addition to fabric, you’ll need a few key tools: a rotary cutter, quilting ruler, cutting mat, and pins. These tools will ensure accurate cutting and precise piecing. If you’re making multiple turkey blocks, a walking foot attachment for your sewing machine can help you sew through multiple layers of fabric with ease.
For quilting, you’ll need batting that’s appropriate for your quilt size. If you’re making a full quilt, a lightweight cotton batting is ideal, but for smaller blocks, a thinner batting may be preferable. Lastly, you’ll need a backing fabric that’s slightly larger than your quilt top. This will allow you to quilt the entire block or quilted section and then bind it later.
Once your materials are ready, you’re all set to begin the exciting process of creating your Turkey Quilt Block!
The first step in the Fall into a Quilt Along: Turkey is cutting your fabric into the correct pieces. Accurate cutting is essential to ensure your blocks fit together properly and the turkey design looks clean and sharp.
Start by measuring and cutting out the pieces for the turkey body, feathers, and background. For the body, you’ll need a fabric piece in a warm, rich brown or tan color. Cut it into a simple oval or rounded shape, depending on the pattern you’re following. The feathers of the turkey are where you can get creative. Choose various colors for the feathers—shades of orange, yellow, and red—cutting them into a rounded shape to mimic the look of turkey feathers.
Next, cut out the background fabric. The size of the background fabric will depend on the dimensions of your turkey block. For a typical quilt block, aim for a 12-inch square, but feel free to adjust the size based on your preferences. Make sure to leave extra fabric around the edges to account for seam allowances.
Once you’ve cut out all of your fabric pieces, press them with an iron to remove any wrinkles. This step ensures that your fabric lies flat and makes the sewing process smoother. It’s also important to organize the pieces by color or section—keeping your turkey’s body, feathers, and background fabric separate will make the piecing process easier.
With all the fabric prepared and neatly pressed, you’re ready to move on to the fun part: piecing your Turkey Quilt Block!
Now comes the exciting part of the Fall into a Quilt Along: Turkey—piecing the fabric together! This step is where the turkey design starts to come to life. The process involves sewing the fabric pieces together to form the turkey’s body, feathers, and background.
Begin by sewing the turkey’s body to the background fabric. Align the edges and sew along the seam, ensuring the fabric pieces are securely attached. Once the body is in place, start adding the feathers around the turkey’s body. You can arrange the feathers in a fan-like shape, or follow a more traditional pattern, depending on the design you’re using.
Take your time to ensure the feathers are sewn neatly and in the right order. Press each section as you go to prevent fabric from shifting or becoming bunched up. This will help keep your seams crisp and your block looking polished. If the pattern requires additional piecing for the tail feathers, work through them in stages, attaching them to the turkey’s body as you move along.
After the turkey body and feathers are pieced together, check the alignment of all sections. Make sure the seams are neat, and the fabric pieces are laying flat. You may need to trim the block edges slightly to ensure everything fits within the block size. Once everything is in place, press the entire block one final time to set the seams.
Your Turkey Quilt Block should now be fully pieced together and ready for quilting!
With your Turkey Quilt Block pieced together, the next step is quilting and finishing your block. This is where you can add your personal touch to the design, making the turkey block truly your own.
Start by layering the quilt top with batting and backing fabric. Pin or baste the layers together to keep everything in place while you quilt. For quilting, you can use a simple straight stitch along the seams or create a more intricate design by adding quilting lines that mimic the curves of the turkey’s feathers. Free-motion quilting is also a great option if you want to add texture and dimension to your block.
Once you’ve finished quilting the turkey block, trim the edges and prepare the block for binding. To bind the quilt, cut strips of fabric about 2.5 inches wide. Fold them in half, aligning the raw edges with the edges of the block. Sew the binding in place, mitering the corners for a professional finish. Be sure to press the binding as you go to ensure smooth, crisp edges.
After the binding is attached, give your turkey block one final press. Now, your Turkey Quilt Block is ready to be displayed or incorporated into a larger quilt. You can also use it as a standalone wall hanging or pillow cover to add some festive charm to your home.
1. What is a quilt-along?
A quilt-along is a community event where quilters work on a specific quilt project together, following a pattern and timeline. It’s a great way to learn new techniques and connect with others who share your quilting passion.
2. How do I choose the right fabrics for my turkey block?
When choosing fabrics for the Turkey Quilt Block, consider using rich autumn colors like orange, red, brown, and yellow. Choose a neutral background fabric that complements these colors, and make sure to mix and match patterns and solids for a more dynamic design.
3. Can I make a smaller turkey block?
Yes, you can scale down the size of your turkey block. Just be sure to adjust the fabric pieces accordingly and account for smaller seam allowances when piecing and quilting.
4. Do I need to quilt the entire quilt before adding the binding?
If you’re creating a larger quilt with multiple blocks, it’s typically best to quilt the blocks first before adding the binding. For smaller projects, you can quilt and bind each block individually.
5. How do I quilt around the turkey design?
For quilting around the Turkey Quilt Block, you can use a simple straight stitch along the seams of the block, or you can add more detailed quilting around the turkey’s body and feathers to create texture.
6. Can I use different colors for the turkey block?
Absolutely! While traditional turkey blocks feature warm autumn tones, feel free to experiment with other color schemes to match your personal style or the theme of your quilt.
Join our VIP broadcast list and gain access to exclusive patterns, all for free. As a VIP member, you’ll receive the best patterns daily, delivered directly to your device. ✨📱 It’s a unique opportunity to stay up-to-date with the latest trends and designs, curated just for you. Don’t miss out on enhancing your projects and discovering new inspirations with the best patterns every day! 🎨🔝
In this Fall into a Quilt Along: Turkey tutorial, we’ve walked you through the steps to create a charming turkey quilt block, from selecting fabrics to piecing and quilting. Whether you’re making a full quilt or a single block, this project allows you to express your creativity and enjoy the festive fall season.
We hope this guide has inspired you to start your own turkey block quilt-along! If you have any questions or suggestions, please leave a comment below. We’d love to hear your thoughts and any tips you might have for fellow quilters! Happy quilting!


