
Pie Carrier Sewing Pattern

The Christmas Tree Block – Tutorial is a fun and festive project that will add charm to your holiday decorations. Crocheting a Christmas tree block can be a rewarding craft, and it’s the perfect way to create a unique and personalized addition to your seasonal decor.
Whether you’re making a single block for a festive throw pillow or a collection of blocks to create a larger quilt, this project is a great way to celebrate the season.
Crochet enthusiasts will find that the Christmas Tree Block pattern is simple to follow, making it an ideal choice for beginners.
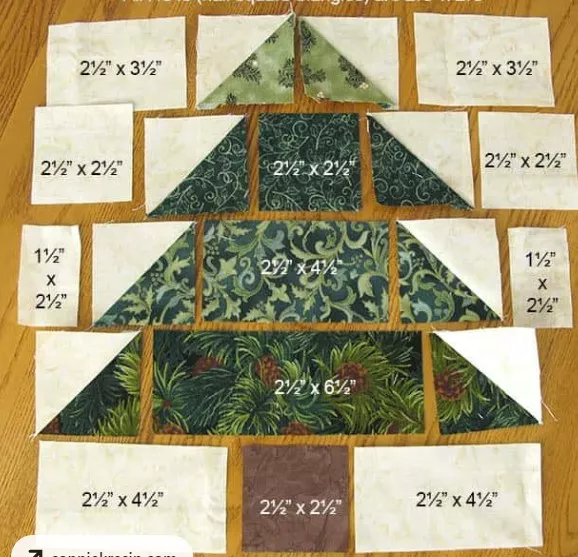
Image from google.
The bright colors and cheery design bring a bit of holiday magic into your home, and it’s a wonderful gift idea for friends and family.
Additionally, the tutorial can be customized to suit any skill level by adjusting the colors and techniques used.
In this guide, we will walk you through the steps to create this beautiful block, providing tips along the way to ensure your project turns out as perfect as the holiday season itself.
No matter how you choose to use your Christmas Tree Block, the pattern is versatile and can be made into ornaments, coasters, blankets, and even wall hangings.
The best part? You can easily incorporate various textures and patterns into your blocks to give them a personalized touch. Ready to dive into this festive crochet tutorial? Let’s get started!
Before you begin, you’ll need to gather a few essential materials for your Christmas Tree Block – Tutorial. The great thing about this project is that it uses basic crochet supplies that most crafters already have in their stash. Here’s what you’ll need:
The first essential material is yarn. For a traditional look, you might choose green yarn for the tree itself, with brown yarn for the tree trunk. You can opt for any yarn weight you prefer, but for a sturdy block, worsted weight yarn works best. You’ll also need a crochet hook that matches your yarn choice; typically, a 5mm hook will work well for most worsted weight yarns.
Next, you’ll need a tapestry needle to weave in ends, which is a crucial step in finishing your project neatly. If you’re planning to add embellishments like sequins, beads, or tiny buttons for decorations on your tree, make sure to have those on hand as well. Some crafters also choose to use sparkling yarn or metallic threads to add an extra touch of festivity to the design.
Finally, don’t forget to have some stuffing if you plan to turn your Christmas tree block into a 3D decoration or a small pillow. This will give your project a plush feel and enhance its overall appearance. Once you’ve gathered these materials, you’ll be ready to start the project!
The key to successfully crocheting a Christmas Tree Block lies in understanding the pattern and following it step by step. The pattern is simple to learn, even for beginners, and involves a combination of basic crochet stitches such as chain, slip stitch, single crochet, and double crochet.
Start by creating a foundation chain that will form the base of your tree block. This chain will determine the size of the block, so adjust the number of chains depending on how large you want the final block to be. Once your foundation chain is ready, you’ll work in rows to form the triangular shape of the tree.
As you work your way through the pattern, you’ll increase stitches to create the triangular outline of the tree. After that, you will add layers to form the “branches” of the tree. The stitches used to build the tree’s layers will vary depending on the pattern, but most Christmas tree block patterns use a combination of single crochet and double crochet to achieve the desired texture.
Once the tree itself is completed, you’ll crochet the trunk, often using a simple single crochet stitch in a brown color to resemble a tree’s trunk. Finally, you’ll finish the block by adding decorations and any additional details you’d like, such as stars or garlands.
The Christmas Tree Block is designed to be adaptable. You can modify it by incorporating your favorite colors, making it a truly unique addition to your holiday décor.
One of the most fun parts of the Christmas Tree Block – Tutorial is decorating your tree. This is where you can get creative and personalize your block with fun and festive touches. The pattern itself leaves plenty of room for additional embellishments, so let your imagination run wild!
Start by adding a star to the top of the tree. A small, simple crochet star works wonderfully for this. You can either make it using yellow or gold yarn for a classic look or experiment with sparkly yarn to give the star some extra shimmer. Secure it to the top of the tree with a few stitches.
Next, consider adding garlands or tinsel to your tree block. You can achieve this by crocheting thin chains or using a beaded yarn to create a sparkling effect. Another option is to sew tiny buttons, beads, or sequins along the tree to mimic ornaments. These decorations can be placed randomly on the tree, or you can follow a pattern if you prefer symmetry.
For even more personalization, you could add tiny crocheted gifts under the tree. Little crochet packages made from colored yarns can be stitched around the base of the tree block, making your tree look extra festive.
If you want a more textured look, consider using small pompoms to represent ornaments. These can be sewn onto the tree to create a fun, 3D effect. You can also add a crocheted ribbon bow at the base of the trunk for extra decoration.
Remember that the sky’s the limit when it comes to decorating your Christmas Tree Block. Whether you choose to keep it simple or go all out with embellishments, it’s the details that will make your block stand out as a holiday masterpiece.
Once your Christmas Tree Block is fully crocheted and decorated, it’s time to finish and assemble your project. Depending on how you plan to use the block, there are a few different steps to complete.
First, make sure to weave in all the ends using a tapestry needle. This step is important for giving your block a neat and professional finish. Carefully weave in any loose yarns from your stitches and cut off any excess yarn.
If you’re planning to make your Christmas tree block into a quilt or a blanket, you’ll need to stitch multiple blocks together. You can join the blocks using a whip stitch or slip stitch, depending on your preference. For a seamless look, try to match the yarn color to avoid visible seams.
If you’re turning the block into a pillow or stuffed ornament, use a whip stitch to sew the sides of the block together, leaving an opening for stuffing. Fill it with fiberfill or other stuffing material until it’s nice and plump. Then, close the opening with a few more whip stitches.
For an added touch of elegance, consider blocking your finished block. Blocking helps to even out the edges and shape, ensuring that your Christmas Tree Block is perfectly square and crisp. Once your block is assembled, it’s ready to be displayed as part of your holiday décor!
1. What crochet stitches are used in a Christmas Tree Block?
A Christmas Tree Block typically uses basic stitches like single crochet, double crochet, and chain stitches. The pattern may vary, but these are the main stitches that help create the tree’s shape and texture.
2. How can I make my Christmas Tree Block more colorful?
You can make your Christmas Tree Block more colorful by incorporating various yarn colors for the tree, trunk, and decorations. Try using multi-colored yarn for the tree or adding additional details like colorful ornaments and garlands.
3. Can I make a larger Christmas Tree Block?
Yes! Simply increase the number of foundation chains at the start of your pattern, and add more rows to make the block larger. You can also combine multiple blocks to create larger pieces like blankets or wall hangings.
4. What kind of yarn is best for a Christmas Tree Block?
For the Christmas Tree Block, worsted weight yarn is often recommended because it’s sturdy and holds its shape well. You can also use sparkly or metallic yarn to add extra holiday flair to your design.
5. Can I make a Christmas Tree Block into an ornament?
Absolutely! You can turn your Christmas Tree Block into a small ornament by stuffing it lightly and adding a hook or ribbon for hanging. It’s a perfect addition to your tree!
Join our VIP broadcast list and gain access to exclusive patterns, all for free. As a VIP member, you’ll receive the best patterns daily, delivered directly to your device. ✨📱 It’s a unique opportunity to stay up-to-date with the latest trends and designs, curated just for you. Don’t miss out on enhancing your projects and discovering new inspirations with the best patterns every day! 🎨🔝
In this Christmas Tree Block – Tutorial, we’ve explored how to create a festive and fun crochet Christmas tree block.
From gathering materials and understanding the basic pattern to adding personal decorations and finishing touches, this project is perfect for adding a homemade touch to your holiday season. Whether you choose to create a quilt, a pillow, or a wall hanging, the possibilities are endless.
Feel free to leave a comment below with your thoughts or suggestions, and we’d love to hear how you plan to use your Christmas Tree Block!


