
Pie Carrier Sewing Pattern

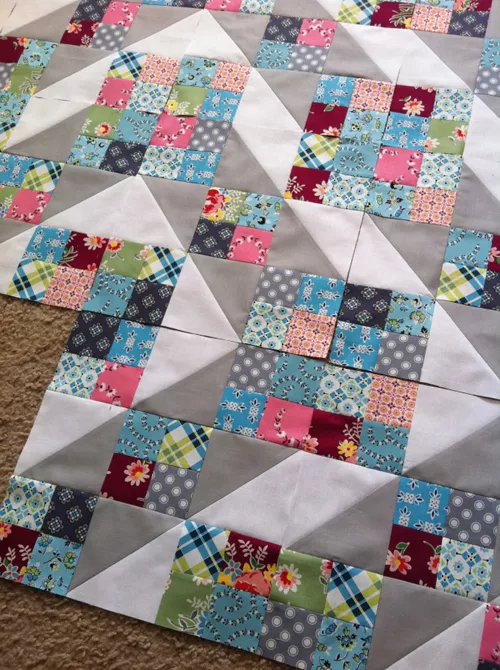
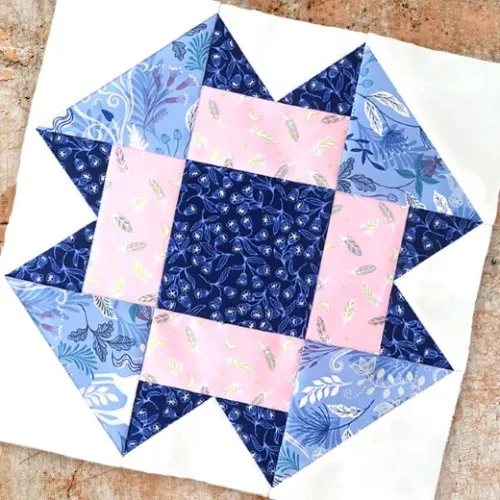
The Jacob’s Ladder Block – Quilt Tutorial is a timeless guide for quilters, featuring a classic design that has been cherished for generations.
This versatile and visually striking pattern uses a combination of squares and half-square triangles to create a lattice-like structure resembling steps on a ladder.
Whether you’re a beginner or an experienced quilter, this block offers endless possibilities for creative expression.
This tutorial will walk you through each step of crafting the Jacob’s Ladder Quilt Block. With its symmetrical layout and bold geometric shapes, this pattern is perfect for full quilts, wall hangings, or even accent pieces like table runners. Plus, it’s a fantastic way to use fabric scraps or experiment with color schemes.
The Jacob’s Ladder Block is steeped in history and carries a rich symbolic meaning. The interconnected shapes are thought to represent the biblical story of Jacob’s dream, making it a meaningful addition to any quilt collection. Let’s dive into this comprehensive tutorial and learn how to bring this traditional design to life.
The Jacob’s Ladder Quilt Block is a classic design characterized by its clean lines and balanced symmetry. Its timeless appeal makes it a popular choice for both modern and traditional quilts.
The block’s name comes from the biblical tale of Jacob’s dream, symbolizing a ladder connecting heaven and earth. This historical connection adds a layer of meaning to your quilting project.
The pattern is constructed using simple geometric shapes—squares and half-square triangles (HSTs)—which combine to form a striking lattice effect.
The straightforward piecing process makes this block accessible to beginners, while advanced quilters can experiment with intricate layouts and color combinations.
By playing with color placement and fabric patterns, you can create entirely unique designs. The block works well in traditional two-tone schemes or bold, modern palettes.
The Jacob’s Ladder block can be used in a variety of layouts, from traditional grid patterns to diagonal or cascading arrangements.
This pattern is a fantastic way to use up fabric scraps, allowing you to incorporate a variety of textures and colors into your quilt.
Fabric selection is key to the success of your Jacob’s Ladder Quilt Block. Here’s how to make the best choices to bring your design to life.
Choose two contrasting colors or fabrics for the squares and triangles. High contrast ensures the ladder effect stands out.
For a traditional look, opt for a classic two-tone scheme, such as black and white or blue and cream.
Experiment with bold and vibrant colors for a contemporary twist. Bright solids or modern prints can give this classic block a fresh look.
This pattern is ideal for scrap quilting. Mix and match prints and solids to create a dynamic and textured effect.
Select a neutral background fabric to let the Jacob’s Ladder design take center stage. Whites, grays, or light pastels work well.
Before cutting your fabric, lay out your chosen pieces to see how the colors and patterns interact. Adjust as needed for a harmonious composition.
Ready to start sewing? Follow this step-by-step guide to create your Jacob’s Ladder Quilt Block.
Begin by cutting your fabrics into squares and triangles as specified by your block size. Use a rotary cutter and ruler for precision.
Pair two squares of contrasting fabrics, sew along the diagonal, and cut to create HSTs. Press the seams open for a flat finish.
Lay out your HSTs and squares to form the Jacob’s Ladder pattern. Take care to align the shapes correctly for a seamless design.
Sew the pieces together row by row. Press the seams in alternating directions to reduce bulk and ensure easy assembly.
Sew the rows together to complete the block. Pay attention to seam alignment for a polished look.
Trim the edges of your block to the desired size. This ensures uniformity when combining multiple blocks in a quilt.
Once your Jacob’s Ladder Quilt Block is complete, it’s time to think about how to use it in a quilt or other project.
Decide on a layout that complements your design. Traditional grid patterns, diagonal placements, or cascading arrangements all work beautifully.
Frame your blocks with borders to add definition and bring the quilt to its final size. Choose fabrics that complement your block colors.
Quilt through the layers using straight-line stitching or free-motion quilting to enhance the ladder design.
Finish your quilt with a binding that ties the design together. Use a bold or coordinating fabric for a striking edge.
If not making a full quilt, use your blocks in smaller projects like pillows, table runners, or tote bags.
Display your finished quilt proudly, knowing you’ve created a piece steeped in history and artistry.
Q: Is the Jacob’s Ladder block suitable for beginners?
A: Yes, the simple geometric shapes and straightforward assembly make it ideal for beginners.
Q: What fabrics work best for this pattern?
A: High-contrast fabrics in two-tone or multi-color schemes work best to highlight the ladder design.
Q: Can I make this block using pre-cuts?
A: Absolutely! Pre-cuts like charm squares or layer cakes can save time and simplify the cutting process.
Q: How can I arrange the blocks in a quilt?
A: Traditional grids, cascading layouts, and diagonal arrangements all work well for this block.
Q: What size should my finished block be?
A: The size depends on your project. Common sizes range from 6 to 12 inches, but you can adjust as needed.
Q: Can I use this block in non-quilt projects?
A: Yes, Jacob’s Ladder blocks can be incorporated into pillows, table runners, tote bags, and more.
Join our VIP broadcast list and gain access to exclusive patterns, all for free. As a VIP member, you’ll receive the best patterns daily, delivered directly to your device. ✨📱 It’s a unique opportunity to stay up-to-date with the latest trends and designs, curated just for you. Don’t miss out on enhancing your projects and discovering new inspirations with the best patterns every day! 🎨🔝
The Jacob’s Ladder Block – Quilt Tutorial is a fantastic project that combines history, symbolism, and creativity. By following this guide, you can create a quilt block that’s both beautiful and meaningful.
We’d love to hear your thoughts and see your creations! Share your feedback and suggestions in the comments below. Happy quilting!


