
Pie Carrier Sewing Pattern

The Falling Leaves Quilt Block – TUTORIAL is an excellent project for quilters who love nature-inspired designs. This pattern mimics the beauty of autumn leaves falling gracefully, creating a quilt block that’s both seasonal and timeless.
Whether you’re crafting a cozy quilt for fall decor or a thoughtful gift, this design adds warmth and charm to any project.
This tutorial will guide you through the process of creating the Falling Leaves Quilt Block. From fabric selection to sewing tips, you’ll learn everything you need to bring this beautiful pattern to life.
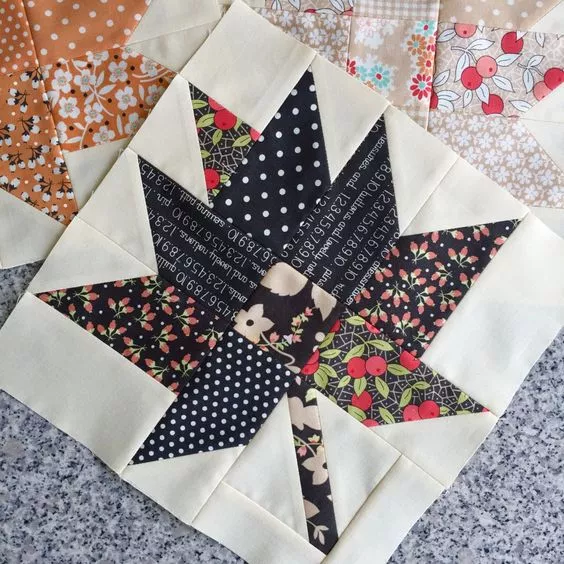
Image from google.
Even if you’re new to quilting, this pattern is beginner-friendly and perfect for experimenting with different fabrics and colors.
With its versatility and aesthetic appeal, the Falling Leaves quilt block can be adapted for various projects, including full quilts, table runners, and wall hangings. Let’s dive into this step-by-step guide and explore how to make this lovely quilt block.
The Falling Leaves Quilt Block is a representation of leaves in motion, creating a dynamic and textured look. Its simple construction and elegant design make it a popular choice among quilters.
The design takes inspiration from the natural movement of falling leaves, incorporating curved and pointed shapes to capture the essence of autumn.
This pattern is ideal for fall-themed quilts but can also be adapted for any season by changing the color palette.
The Falling Leaves block can be used as a central feature or repeated throughout a quilt. Its adaptable layout allows for endless creative possibilities.
Despite its intricate appearance, the block uses basic quilting techniques, making it accessible for quilters of all skill levels.
This pattern is perfect for using up small fabric scraps, allowing for a unique and colorful finished product.
The Falling Leaves Quilt Block combines traditional quilting elements with a fresh, modern twist, making it a timeless addition to any project.
Choosing the right fabrics is essential for creating a stunning Falling Leaves Quilt Block. Here’s how to make thoughtful selections that bring your design to life.
For a classic look, opt for earthy tones such as oranges, yellows, reds, and browns to mimic autumn leaves. For a modern twist, experiment with bright or pastel colors.
Select a neutral background fabric to make the leaves stand out. Whites, creams, or light grays work well for most color schemes.
This pattern is ideal for using up fabric scraps. Mix and match prints and solids to add texture and depth to your design.
Adapt your fabric choices to different seasons. For example, green tones for spring, or icy blues and silvers for winter-themed quilts.
Pre-cut fabric packs like charm squares or jelly rolls can save time and ensure coordinated colors for your project.
Lay out your chosen fabrics together before cutting to see how they interact. This step helps ensure a cohesive and visually appealing design.
Now that you have your fabrics ready, it’s time to start sewing. Follow this detailed guide to construct your Falling Leaves Quilt Block.
Begin by cutting your fabrics into the required shapes, such as squares, rectangles, and triangles. Precision in cutting ensures accurate piecing later.
Assemble your fabric pieces to create the leaf shapes. Use half-square triangles (HSTs) or curved piecing techniques to achieve the desired look.
Add a fabric strip to represent the stem of the leaf. Ensure it aligns properly with the leaf’s center for a realistic effect.
Join the leaf sections together to form a complete block. Press your seams carefully to maintain a flat and polished appearance.
Trim the edges of your block to ensure a uniform size. Accurate trimming helps with assembly when combining multiple blocks.
If making a quilt, repeat the process for additional blocks. Consistency in construction ensures a cohesive final product.
Once your Falling Leaves Quilt Block is complete, it’s time to incorporate it into your desired project. Here’s how to finish your quilt with style.
Experiment with different layouts to find a composition that highlights the movement of the leaves. Offset placements add a dynamic touch.
Frame your blocks with borders to give the quilt a finished look. Use coordinating fabrics to tie the design together.
Quilt through the layers to add texture and secure them. Straight-line quilting or free-motion leaves complement this pattern well.
Complete your quilt with a fabric binding that complements your blocks. A patterned or contrasting binding can add visual interest.
If not making a full quilt, use your Falling Leaves blocks for smaller projects like pillows, table runners, or wall hangings.
Display or gift your finished piece with pride. The timeless design ensures it will be appreciated for years to come.
Q: Is the Falling Leaves Quilt Block suitable for beginners?
A: Yes, this block uses simple shapes and techniques, making it ideal for beginners.
Q: How much fabric do I need for a single block?
A: For one block, you’ll need a small amount of fabric for the leaves and stem, plus a larger piece for the background.
Q: Can I use this block in seasonal quilts?
A: Absolutely! This block is perfect for seasonal projects and can be adapted for different times of the year.
Q: What’s the best way to arrange multiple blocks?
A: Experiment with layouts such as rows, staggered placement, or even random positioning for a natural look.
Q: Do I need special tools for this pattern?
A: Basic quilting tools like a rotary cutter, ruler, and sewing machine are sufficient. Optional tools like HST rulers can simplify the process.
Q: How can I make my leaves more dynamic?
A: Use a mix of solid and patterned fabrics and play with color gradients for added depth and movement.
Join our VIP broadcast list and gain access to exclusive patterns, all for free. As a VIP member, you’ll receive the best patterns daily, delivered directly to your device. ✨📱 It’s a unique opportunity to stay up-to-date with the latest trends and designs, curated just for you. Don’t miss out on enhancing your projects and discovering new inspirations with the best patterns every day! 🎨🔝
The Falling Leaves Quilt Block – TUTORIAL offers a beautiful and versatile design for quilters of all levels. By following this guide, you can create a quilt block that captures the essence of falling leaves in a unique and personalized way.
We hope this tutorial inspires your next quilting project! Share your experiences and suggestions in the comments below. Your feedback helps us create content tailored to your quilting journey. Happy quilting!


