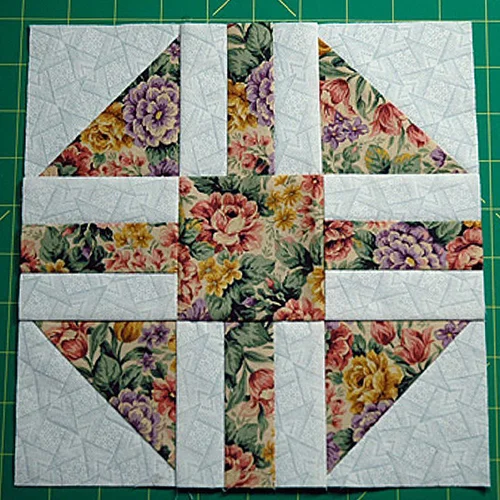
The Paths & Stiles Quilt Block is a classic and beautiful quilt design that combines geometric shapes and intricate patterns. This block is a favorite among quilters for its versatility and timeless appeal.
In this article, we’ll explore how to create your very own Paths & Stiles Quilt Block using this easy-to-follow free pattern. Whether you’re a beginner or an experienced quilter, this pattern will guide you through the process step by step.
Advertising
Creating quilt blocks like the Paths & Stiles Quilt Block is an enjoyable way to enhance your quilting skills and add new designs to your quilt collection. The great thing about this block is that it can be made in various sizes, making it perfect for any project, from small table runners to large bed quilts.
Image from google.
Throughout this article, you’ll learn the materials you need, the steps to create the block, and how to piece the blocks together for your quilt. Let’s dive in and discover how to bring the Paths & Stiles Quilt Block to life!
Whether you’re looking to make a single block or several to create a full quilt, the Paths & Stiles Quilt Block will be a beautiful addition to your quilting repertoire.
With its clean lines and geometric design, this block is both modern and traditional, giving you endless possibilities for customizing your quilts.
Advertising
Materials Needed for the Paths & Stiles Quilt Block
Before starting any quilting project, it’s essential to have the right materials. For the Paths & Stiles Quilt Block, here’s a list of what you’ll need:
Fabric: Choose your fabric colors for the quilt block. For the Paths & Stiles Quilt Block, you will need a combination of fabrics for the paths, stiles, and background. You can go for solid colors or experiment with patterned fabrics for a unique effect.
Quilt Batting: This is the middle layer of the quilt that provides softness and warmth. Select a batting that suits your quilt’s desired thickness.
Quilt Backing: The backing fabric is needed to finish off your quilt. It will serve as the final layer once the quilt blocks are pieced together.
Quilt Ruler and Rotary Cutter: These tools will help you precisely cut your fabric into squares and strips for the block design.
Needles and Thread: Select the appropriate needles for piecing your quilt, and use high-quality quilting thread to ensure a sturdy finish.
Iron and Ironing Board: Pressing your fabric pieces as you go is crucial for neat seams and accurate piecing.
Make sure you measure your fabric carefully and cut it to the proper size to avoid any mistakes later in the process.
How to Create the Paths & Stiles Quilt Block
Now that you have all your materials, it’s time to start creating the Paths & Stiles Quilt Block. Follow these steps to ensure your block turns out perfectly:
Cut Your Fabric Pieces: Start by cutting your fabric into squares and strips. For the Paths & Stiles Quilt Block, you will need to cut both background squares and strips for the paths and stiles. Ensure all pieces are accurately measured.
Arrange Your Pieces: Lay out your fabric pieces according to the pattern. The Paths & Stiles Quilt Block features a grid-like layout with horizontal and vertical paths. Arrange the squares in a way that reflects the final design, so you can visualize the placement before sewing.
Sew the Paths and Stiles Together: Begin by sewing the strips of fabric for the paths and stiles together. Use a quarter-inch seam allowance for accuracy. Take your time with each seam, and press them as you go to ensure flatness and precision.
Attach the Paths to the Background Squares: Once the paths and stiles are sewn together, it’s time to attach them to the background squares. This will create the grid design that gives the quilt block its structure.
Assemble the Block: After all the pieces are sewn together, arrange them into a single square. This will form your Paths & Stiles Quilt Block. Be sure to check the alignment and make any necessary adjustments.
Press the Block: Press the finished quilt block to set the seams and ensure the fabric is flat. This will help your block maintain its shape when you join it with other blocks later.
By following these steps carefully, you will have a perfect Paths & Stiles Quilt Block ready for your quilt.
Tips for Making the Perfect Paths & Stiles Quilt Block
Creating the perfect Paths & Stiles Quilt Block can take practice, but with these helpful tips, you’ll be well on your way:
Accurate Cutting: The key to making precise quilt blocks is cutting your fabric pieces accurately. Use a rotary cutter and quilt ruler to achieve clean, even cuts.
Use an Iron: Always press your seams as you go. Pressing ensures that your fabric pieces lie flat and helps create sharp, crisp seams.
Pin the Pieces Together: Use pins to hold your fabric pieces in place before sewing. This will keep everything aligned and prevent shifting as you stitch.
Match the Seams: When joining fabric pieces, make sure the seams line up perfectly. This will ensure that the paths and stiles align correctly.
Check the Block Size: Before finishing your block, double-check its size. The Paths & Stiles Quilt Block should be a perfect square with even edges.
Practice with Scraps: If you’re new to quilting, it’s a good idea to practice with scrap fabric before diving into your main project. This will help you become familiar with the process.
By following these tips, you’ll ensure that each Paths & Stiles Quilt Block you create is uniform and well-made.
Joining the Blocks Together
Once you have created several Paths & Stiles Quilt Blocks, it’s time to join them together to create your quilt. Here’s how you can piece them into a larger quilt:
Layout the Blocks: Arrange your blocks in the desired layout. You can play around with the arrangement to create a pattern that suits your style.
Sew the Blocks Together: Join the blocks by sewing them together along the edges. Make sure to align the seams as you sew to keep the design consistent.
Add the Quilt Borders: Once the blocks are joined, you can add borders around the entire quilt to finish it off. Choose a fabric that complements the colors of your blocks for a cohesive look.
Layer the Quilt: Once the quilt top is finished, place the quilt top, batting, and backing fabric together. Pin everything in place and prepare to quilt.
Quilt the Layers Together: You can quilt by hand or machine, depending on your preference. Quilting adds texture and dimension to your quilt, making it a beautiful finished piece.
Bind the Quilt: Finally, bind the edges of your quilt with fabric strips to create a clean, finished look.
By following these steps, you’ll have a stunning quilt made from your Paths & Stiles Quilt Blocks.
FAQ
How many blocks do I need for a full quilt? The number of blocks you need depends on the size of your quilt. A standard lap quilt may require around 30-40 blocks, while a queen-sized quilt could require 80-100 blocks.
Can I use different fabrics for the paths and stiles? Yes, you can use different fabrics for the paths and stiles to create a more colorful and varied quilt. Be sure to choose fabrics that complement each other.
Can I make a larger or smaller block? Yes, you can adjust the size of your block by changing the measurements of your fabric pieces. Just make sure to maintain the proportions of the pattern.
What is the best fabric for quilting? Cotton fabric is typically the best choice for quilting, as it is easy to work with and provides a stable finish. However, you can experiment with other fabric types for a unique look.
How do I avoid puckering in my quilt? To avoid puckering, make sure to keep an even tension on your fabric as you sew. Press each seam carefully and use a walking foot if you’re machine quilting.
Join our VIP broadcast list and gain access to exclusive patterns, all for free. As a VIP member, you’ll receive the best patterns daily, delivered directly to your device. ✨📱 It’s a unique opportunity to stay up-to-date with the latest trends and designs, curated just for you. Don’t miss out on enhancing your projects and discovering new inspirations with the best patterns every day! 🎨🔝
The Paths & Stiles Quilt Block is a versatile and stunning design that is perfect for both beginners and experienced quilters. By following the steps in this article, you can create beautiful quilt blocks for a variety of projects.
VIDEO TUTORIAL
Whether you’re making a quilt for a loved one or creating a stunning home decor piece, this pattern is sure to add elegance and style. We hope you enjoyed this tutorial! Please leave your thoughts, suggestions, and any questions in the comments below. Happy quilting!


