
Pie Carrier Sewing Pattern

Quilting is a timeless craft that allows for creativity and artistic expression. The Falling Star – Free Quilt Pattern is a beautiful and intricate design that captures the elegance of a starry night sky.
Whether you’re a beginner or an experienced quilter, this pattern offers a rewarding challenge that results in a stunning quilt perfect for any home.
The Falling Star – Free Quilt Pattern combines traditional techniques with a modern aesthetic, making it an excellent choice for those who appreciate both classic and contemporary quilt designs.
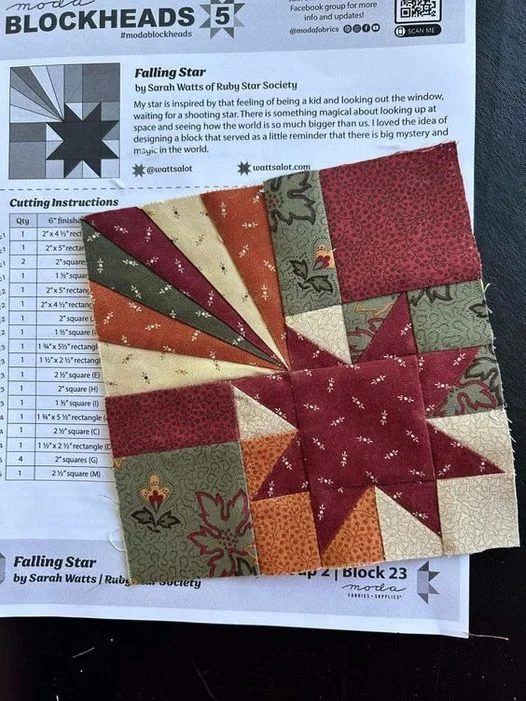
The geometric layout of the stars creates a dynamic visual effect, adding depth and movement to the final piece.
In this tutorial, we will guide you through the essential steps to create your own Falling Star – Free Quilt Pattern. From selecting the right fabrics to piecing and assembling the blocks, you’ll learn how to craft a quilt that will be cherished for years to come.
Choosing the right materials is the foundation of a successful quilt. The Falling Star – Free Quilt Pattern requires a combination of solid and patterned fabrics to create contrast and highlight the star shapes.
The right combination of fabrics will make your Falling Star – Free Quilt Pattern truly stand out, adding a personalized touch to your creation.
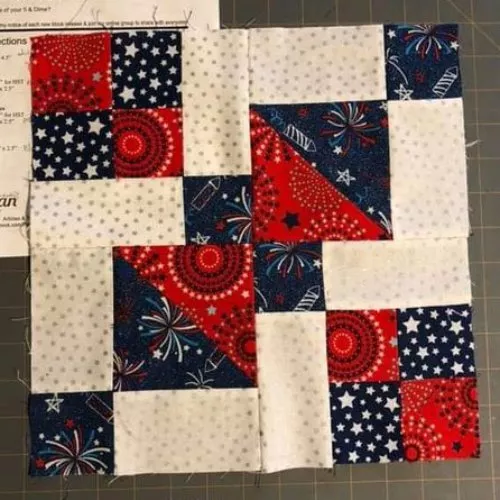
Once your materials are ready, it’s time to cut and assemble the quilt blocks. The Falling Star – Free Quilt Pattern involves precise cutting and careful alignment to ensure a flawless finish.
Taking your time during this step will ensure your Falling Star – Free Quilt Pattern turns out beautifully with clean and crisp lines.
Now that your blocks are complete, it’s time to assemble the quilt top. The Falling Star – Free Quilt Pattern consists of multiple blocks arranged in a structured layout.
This step brings your Falling Star – Free Quilt Pattern to life, setting the stage for quilting and finishing touches.
The final step is quilting and finishing your quilt to ensure durability and a professional appearance.
Your Falling Star – Free Quilt Pattern is now complete, ready to be displayed or gifted as a handmade treasure.
1. Is the Falling Star quilt pattern suitable for beginners? Yes! While some precision is required, beginners can follow the instructions carefully to create a beautiful quilt.
2. What size is the finished Falling Star quilt? The size depends on the number of blocks you use, but a standard quilt can range from lap-size to a full-sized bed quilt.
3. Can I use different colors for the stars? Absolutely! Customizing the colors allows you to personalize your quilt and match your decor.
4. How long does it take to complete the Falling Star quilt? The time required depends on your experience level, but on average, it takes a few weeks to complete.
5. Can I machine quilt this pattern? Yes! Machine quilting is a great way to secure the layers efficiently.
6. What is the best fabric choice for this quilt? High-quality cotton fabric is recommended for durability and ease of sewing.
Join our VIP broadcast list and gain access to exclusive patterns, all for free. As a VIP member, you’ll receive the best patterns daily, delivered directly to your device. ✨📱 It’s a unique opportunity to stay up-to-date with the latest trends and designs, curated just for you. Don’t miss out on enhancing your projects and discovering new inspirations with the best patterns every day! 🎨🔝
The Falling Star – Free Quilt Pattern is a stunning and rewarding project that showcases the beauty of quilting. By following this tutorial, you can create a masterpiece that reflects your creativity and skill. Whether you’re making it for yourself or as a heartfelt gift, this quilt pattern is sure to impress.
Have you tried making this quilt? Share your thoughts and experiences in the comments below! We’d love to hear your feedback and see your beautiful creations.


