
Pie Carrier Sewing Pattern

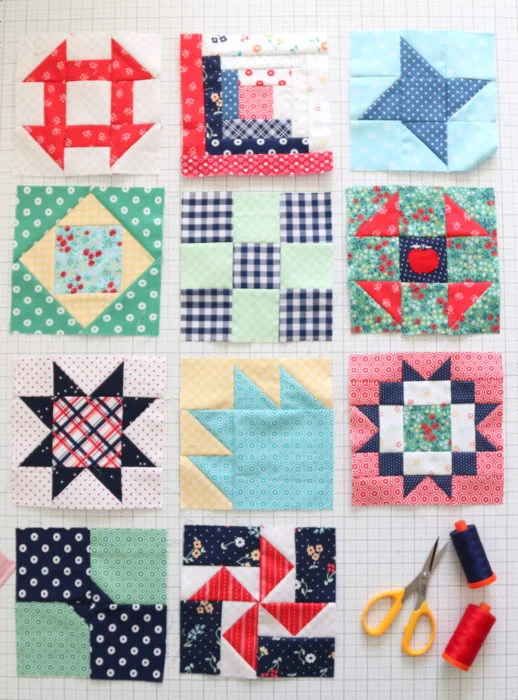
The Pinwheel Quilt Block Tutorial is a perfect guide for quilters of all levels who want to create a classic and visually striking quilt design. The pinwheel block is a timeless pattern that adds movement and charm to any quilt.
Whether you’re making a baby quilt, a decorative pillow, or a full-sized quilt, mastering the pinwheel block will enhance your quilting skills.
The pinwheel design consists of four half-square triangles arranged to create a spinning effect. This pattern is not only aesthetically pleasing but also a great way to practice precise piecing and color coordination. With a few simple steps, you can make beautiful pinwheel quilt blocks for your next project.
In this tutorial, we’ll walk you through everything you need to know to create the Pinwheel Quilt Block, including materials, step-by-step instructions, and finishing touches. Let’s get started!
Before you begin your Pinwheel Quilt Block, gather all the necessary materials and tools to ensure a smooth quilting process.
Choosing the right fabric is essential for a well-defined pinwheel pattern. Opt for two contrasting fabrics to make the design stand out. Cotton fabric is the best choice for precision piecing.
A rotary cutter and quilting ruler are must-have tools for cutting precise fabric pieces. Accurate cuts will help maintain symmetry in your pinwheel block.
A cutting mat is essential to protect your work surface and ensure straight, clean cuts when using a rotary cutter.
A sewing machine with a quarter-inch foot attachment will provide consistent seam allowances, which are crucial for achieving well-matched pinwheel points.
Lastly, use quality thread in a neutral color that blends well with your fabric choices. A fine, strong thread reduces bulk and enhances the durability of your quilt.
Once you have all your materials, it’s time to cut and prepare the fabric for your Pinwheel Quilt Block.
Begin by cutting fabric squares. To make a standard 6-inch pinwheel block, cut two squares from each fabric, measuring 4 inches each.
Pair one square of each fabric together, right sides facing. This will form the foundation for your half-square triangles (HSTs).
Using a fabric marker or chalk, draw a diagonal line from one corner to the opposite corner on the lighter fabric square.
Sew a quarter-inch seam on both sides of the drawn diagonal line. This technique helps create two identical HSTs without much waste.
Once sewn, use a rotary cutter to cut along the drawn diagonal line, separating the two halves.
Press the seams open or to one side, depending on your preference. Open seams reduce bulk, while side-pressed seams offer extra durability.
Now that you have four half-square triangles, it’s time to arrange them into the Pinwheel Quilt Block pattern.
Lay out the four HSTs in a 2×2 grid, ensuring the same fabric colors are diagonally opposite from each other.
Check the orientation of each triangle to make sure the pinwheel effect is visible. The seams should align to form a continuous spinning motion.
Sew the top two HSTs together, then the bottom two. Use a consistent quarter-inch seam allowance for accurate piecing.
Press the seams open or to one side. Open seams reduce bulk at the center intersection, making the final assembly smoother.
Join the top and bottom rows together, carefully aligning the center seam. Pinning at the center will help maintain precision.
Press the final seam, and your Pinwheel Quilt Block is complete! If needed, trim the block to ensure it measures the correct size.
Your Pinwheel Quilt Block is now ready, but there are a few finishing touches and creative ways to incorporate it into your quilt projects.
Consider adding a border around your pinwheel block to frame it beautifully. A solid color or coordinating print enhances the design.
Experiment with different pinwheel layouts in your quilt. Arranging blocks in alternating directions can create a unique visual effect.
Combine pinwheel blocks with other quilt patterns, such as checkerboard or flying geese, to add complexity and variety.
Quilt your finished block with straight-line stitching, free-motion quilting, or echo quilting to highlight the pinwheel design.
Use pinwheel blocks to create pillows, table runners, or even quilted wall hangings for a decorative touch in your home.
Lastly, always label your quilt with the date and a personal note. A handmade quilt is a cherished keepsake, and adding a signature label makes it even more special.
1. What is the best fabric for a pinwheel quilt block?
Cotton fabric is the best choice because it is easy to cut, sew, and press, ensuring precise seams and crisp pinwheel points.
2. Can I make pinwheel quilt blocks without a sewing machine?
Yes! You can sew pinwheel blocks by hand using a backstitch or running stitch, though it will take more time and precision.
3. How do I prevent my pinwheel points from getting lost?
Ensure accurate cutting and consistent seam allowances. Pressing seams open can also help reduce bulk at the center intersection.
4. Can I make pinwheel quilt blocks in different sizes?
Absolutely! Adjust the size of your starting fabric squares to make larger or smaller pinwheel blocks based on your project needs.
5. What quilting patterns complement pinwheel blocks?
Checkerboard, flying geese, and star patterns pair beautifully with pinwheel blocks to create dynamic and interesting quilt designs.
6. How do I make my pinwheel quilt block lay flat?
Press seams carefully, trim excess bulk at the intersections, and use starch if needed to keep fabric crisp and smooth.
Join our VIP broadcast list and gain access to exclusive patterns, all for free. As a VIP member, you’ll receive the best patterns daily, delivered directly to your device. ✨📱 It’s a unique opportunity to stay up-to-date with the latest trends and designs, curated just for you. Don’t miss out on enhancing your projects and discovering new inspirations with the best patterns every day! 🎨🔝
Creating a Pinwheel Quilt Block is a fun and rewarding experience that enhances your quilting skills. By following this tutorial, you’ve learned how to choose materials, cut fabric accurately, assemble the block, and add finishing touches. The pinwheel pattern is a versatile and timeless addition to any quilt project.
We’d love to hear from you! Leave a comment below sharing your experiences with making pinwheel quilt blocks, your favorite quilting techniques, or any suggestions for future tutorials. Happy quilting!


