
Pie Carrier Sewing Pattern

Cross My Mind Quilt – Tutorial: If you’ve been searching for a fun and creative quilting project that’s both visually stunning and beginner-friendly, look no further!
This quilt pattern combines simplicity with elegance, making it the perfect choice for quilters of all skill levels.
The “Cross My Mind Quilt” features a unique cross-inspired design that’s versatile, modern, and adaptable to various color schemes.
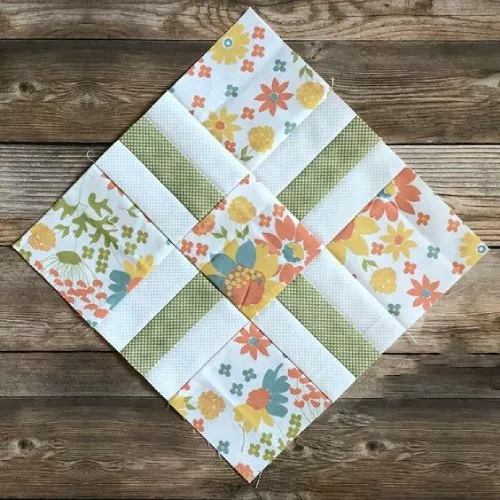
Image from google.
Whether you’re looking to add a cozy touch to your home or create a meaningful handmade gift, this project is sure to inspire.
Plus, with its straightforward construction, you’ll find it enjoyable to make while still offering a sense of accomplishment.
In this Cross My Mind Quilt – Tutorial, we’ll guide you step by step to ensure your quilt turns out beautifully.
Get ready to explore fabric selection, essential tools, and the quilting techniques you’ll need.
Follow along to learn everything from cutting your fabric to assembling the quilt top and finishing with professional touches. Let’s begin this exciting journey into quilting artistry!
Before starting the Cross My Mind Quilt – Tutorial, it’s essential to gather the right materials and tools to make your project a success. Here’s what you’ll need:
By gathering these materials and tools beforehand, you’ll set yourself up for a smooth and enjoyable quilting process. Each item plays a role in ensuring your quilt is both functional and beautiful.
In this section of the Cross My Mind Quilt – Tutorial, we’ll focus on cutting your fabric pieces and arranging them for the best results. Precision is key here, so take your time!
Proper preparation sets the stage for a successful quilting experience. Taking the time to plan and organize your fabric pieces will save you frustration later and make sewing more enjoyable.
Now it’s time to bring your design to life! Follow these steps in the Cross My Mind Quilt – Tutorial to sew your quilt top with ease.
With your quilt top assembled, you’re one step closer to completing your masterpiece. Each stitch brings you closer to a finished quilt you can be proud of.
The final steps of the Cross My Mind Quilt – Tutorial involve assembling the layers, quilting the design, and finishing with binding. These steps give your quilt structure and durability.
Congratulations! Your “Cross My Mind Quilt” is now complete. Take a moment to admire your work and share it with loved ones or use it to add warmth and charm to your home.
1. How long does it take to make the Cross My Mind Quilt?
The time required varies depending on your experience and available time. On average, it takes 10-15 hours from start to finish.
2. Can I make this quilt without a sewing machine?
While a sewing machine speeds up the process, you can hand-stitch the quilt top if you prefer traditional quilting methods.
3. What size is the Cross My Mind Quilt?
The size depends on your pattern and fabric cuts. It can be customized to fit as a lap quilt, twin bed quilt, or even larger.
4. How do I care for my finished quilt?
Machine wash on a gentle cycle with cold water and mild detergent. Lay flat or tumble dry on low.
5. Can I use scraps for this project?
Yes! This pattern is perfect for using up fabric scraps. Mixing and matching scraps creates a unique and colorful design.
6. Do I need a quilting foot for my sewing machine?
A quilting foot isn’t required but is highly recommended for even stitching and ease during the quilting process.
Join our VIP broadcast list and gain access to exclusive patterns, all for free. As a VIP member, you’ll receive the best patterns daily, delivered directly to your device. ✨📱 It’s a unique opportunity to stay up-to-date with the latest trends and designs, curated just for you. Don’t miss out on enhancing your projects and discovering new inspirations with the best patterns every day! 🎨🔝
This Cross My Mind Quilt – Tutorial has guided you through each step, from selecting materials to finishing with binding. By following this tutorial, you’ve created a quilt that’s not only functional but also a piece of art. We hope you found this project inspiring and rewarding.
Feel free to share your thoughts and suggestions in the comments. What did you enjoy most about this tutorial? Let us know how your quilt turned out. Happy quilting!


