
Pie Carrier Sewing Pattern

If you’re looking to add some fun and creativity to your quilt projects, My Scrappy Cross Roads Block – Tutorial is just what you need.
This tutorial will guide you step-by-step in making a beautiful, scrappy quilt block that can be used in various quilt designs. Whether you’re a beginner or an experienced quilter, this block offers a great way to showcase your fabric scraps and create something unique.
The design is perfect for a wide range of quilting projects, from bed quilts to wall hangings and everything in between.
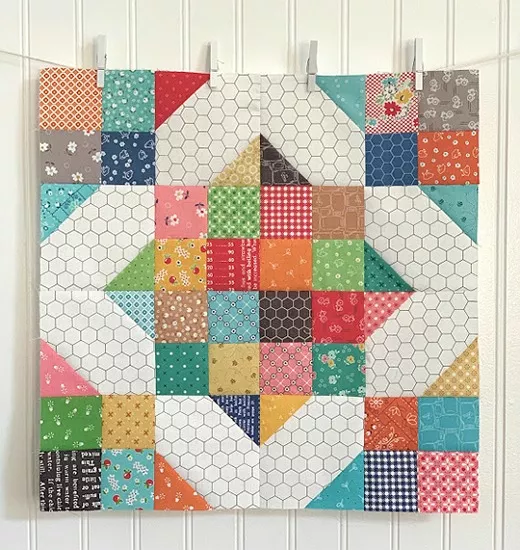
Image from google.
The scrappy Cross Roads block combines traditional quilting techniques with a modern twist, allowing you to create intricate patterns without needing to use a lot of matching fabrics.
The block is composed of simple, yet effective piecing techniques that make it both accessible and versatile. With just a few basic tools, you can start piecing this block and end up with a gorgeous, dynamic design for your next quilt.
In this tutorial, you will learn how to make My Scrappy Cross Roads Block, including the materials needed, a step-by-step guide to piecing, and tips on how to choose and cut fabrics for the most beautiful results. Let’s dive into the details of this fun and easy quilt block!
Before you start quilting, it’s essential to gather all the materials needed to create My Scrappy Cross Roads Block. Here is a list of the tools and supplies you will need to make this beautiful block.
The primary material you will need is fabric. Since this block is scrappy, you can use leftover fabric scraps from previous projects, or you can pick up some new fat quarters in colors and patterns that complement each other. The beauty of a scrappy block is the freedom it gives you to mix different fabrics, so feel free to experiment with various colors and prints.
Next, you will need a rotary cutter, cutting mat, and ruler for cutting your fabric. A sharp rotary cutter will help you make clean, precise cuts, ensuring that your pieces fit together perfectly when you sew them. It’s also helpful to have a seam ripper on hand, in case you need to correct any mistakes along the way.
You’ll also need a sewing machine and thread. Use a high-quality thread in a neutral color that blends well with your fabric choices. The type of thread you choose can impact the durability of your block, so select a good quality cotton or polyester thread.
Lastly, a pressing iron will be invaluable for pressing your seams flat as you go. Pressing your seams helps the block maintain its shape and ensures that your quilt top looks neat and professional.
With these materials ready, you’re all set to start creating My Scrappy Cross Roads Block!
The first step in creating My Scrappy Cross Roads Block is cutting your fabric pieces. This is where the fun begins, as you can mix and match fabric scraps to create a unique and colorful design. Follow these steps to prepare your fabric pieces for piecing.
Start by cutting the background fabric. For this block, you will need a neutral fabric to act as the background. Choose a solid or a subtle print that complements the vibrant scraps you’ll be using. Cut the background fabric into squares, usually measuring 6.5 inches by 6.5 inches. This will form the base of your block.
Next, cut the scrappy pieces for the Cross Roads design. These will be the focal points of the block, and you can choose various fabrics for each piece. The general rule is to cut several small squares that will later be sewn together to form the larger sections of the block. For each scrappy section, you’ll need four squares, each measuring 3.5 inches by 3.5 inches. These squares will create the “cross” effect in the middle of your block.
It’s essential to cut accurately at this stage because the precision of your cuts will impact the overall look of the finished block. Be sure to double-check your measurements and ensure that all pieces are cut to the correct size before moving on to the piecing steps.
Once you’ve cut all the fabric pieces, you’re ready to begin sewing the scrappy Cross Roads block together.
Now that you’ve cut all your fabric pieces, it’s time to start piecing My Scrappy Cross Roads Block together. The piecing process is straightforward and easy to follow, even if you’re new to quilting.
Start by creating the center Cross Roads section. Take two of your 3.5-inch squares and sew them together to form a rectangle. Repeat this process with the other two sets of 3.5-inch squares. You should end up with three pairs of rectangles. Press the seams flat to ensure a neat finish.
Next, take the three rectangles and arrange them in a way that forms a cross. Place one rectangle horizontally and the other two vertically, with the vertical rectangles overlapping the horizontal one in the center. Once you have arranged the rectangles, sew them together to form the center of your block. Press the seams flat.
After completing the center section, you will sew the background fabric pieces to the sides of the Cross Roads center. Take the 6.5-inch background squares and sew one to the top, one to the bottom, and one to each side of the cross. This will complete the basic structure of your scrappy Cross Roads block.
Once all the pieces are sewn together, press the seams flat. Be sure to press the seams in the direction that allows the block to lay flat and avoid any puckering.
To make your My Scrappy Cross Roads Block even better, here are a few tips that will help ensure your block is perfect every time.
1. What is a scrappy quilt block?
A scrappy quilt block uses a variety of different fabric scraps, rather than matching fabrics, to create a colorful and unique design. It’s a great way to use leftover fabric from previous quilting projects.
2. Can I use any fabric for my scrappy block?
Yes! The beauty of a scrappy block is that you can mix and match any fabrics you like. However, for a cohesive look, it’s helpful to choose fabrics that complement each other in terms of color and pattern.
3. How do I make sure my quilt block is the right size?
Accurate cutting and consistent seam allowances are crucial. Be sure to measure your pieces before and after sewing to ensure that everything aligns correctly.
4. How many pieces do I need to make one scrappy Cross Roads block?
For one My Scrappy Cross Roads Block, you’ll need 4 fabric squares for the Cross Roads center, 4 fabric squares for the background, and additional fabric for trimming the block to the correct size.
5. How do I join multiple scrappy blocks together?
Once your blocks are finished, sew them together in rows, matching the edges and pressing the seams flat. You can join the rows to complete your quilt top.
6. Can I use different block sizes for a scrappy quilt?
Yes, you can vary the size of your blocks to create a more dynamic design. However, keep in mind that all the blocks should be the same size if you want them to fit together properly.
Join our VIP broadcast list and gain access to exclusive patterns, all for free. As a VIP member, you’ll receive the best patterns daily, delivered directly to your device. ✨📱 It’s a unique opportunity to stay up-to-date with the latest trends and designs, curated just for you. Don’t miss out on enhancing your projects and discovering new inspirations with the best patterns every day! 🎨🔝
In this My Scrappy Cross Roads Block – Tutorial, you’ve learned how to create a beautiful, scrappy quilt block using a combination of simple techniques and fabric scraps. By following the step-by-step guide, you can make a unique block that adds personality and charm to your quilt projects. Whether you’re creating a small wall hanging or a full-size quilt, this block offers endless possibilities for customization.
Remember to have fun with the fabric choices and experiment with different patterns and colors. Quilting is all about creativity and expressing yourself through fabric. We hope this tutorial has inspired you to create your own scrappy Cross Roads blocks and explore new quilting ideas.
If you’ve tried this tutorial, please share your thoughts and suggestions in the comments below. Your feedback is always appreciated, and we’d love to hear about your quilting projects! Happy quilting!


