
Pie Carrier Sewing Pattern

The Honeymoon Quilt Block – Tutorial is a delightful journey into the world of quilting, combining tradition, romance, and creativity into a single project.
Whether you’re just starting your quilting adventure or looking for a fresh, meaningful pattern to explore, this tutorial will walk you through everything you need to know.
Designed to be beginner-friendly yet visually impactful, the Honeymoon Quilt Block is a versatile pattern that works beautifully in a variety of settings and color combinations.
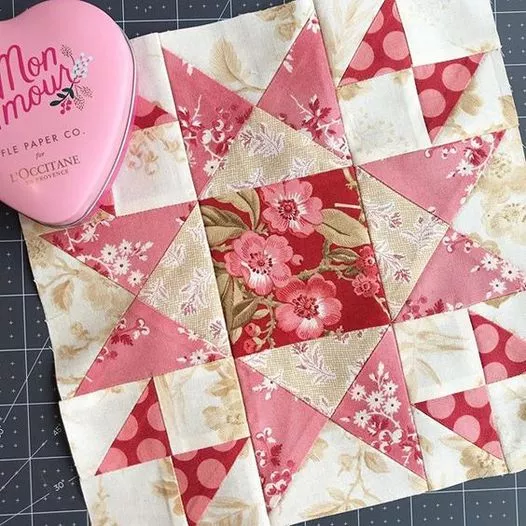
This block is named for its romantic vibe and the timeless charm it brings to any quilt. With its soft symmetry and subtle elegance, it captures the spirit of a peaceful, love-filled moment—much like a honeymoon itself.
And best of all, this The Honeymoon Quilt Block – Tutorial is completely free, offering step-by-step instructions so that anyone can enjoy the process from fabric selection to the final stitch.
In this article, we’ll walk you through four key steps: understanding the design and fabric selection, cutting and piecing the block, assembling the full quilt layout, and finishing techniques.
You’ll also find a helpful FAQ section at the end to guide you through common questions. Let’s get started with the first step in mastering this heartfelt quilting design.
The Honeymoon Quilt Block design is built around soft geometry—typically featuring squares and half-square triangles arranged in a symmetrical layout. This design emphasizes balance, giving a relaxing and romantic visual appeal.
The charm of this block lies in its simplicity. While it looks detailed and refined, it’s actually quite easy to put together with a little patience and precision. The repetitive nature of the block makes it perfect for creating an entire quilt with consistent beauty.
This pattern also gives quilters room for creativity. You can personalize the mood of your quilt through color choices. Soft pastels often give a dreamy, honeymoon-like atmosphere, while bold colors can bring modern flair to the same layout.
When preparing your materials, look for high-quality cotton fabrics. These are easier to cut and sew, and they hold their shape beautifully in the finished quilt. Coordinating fabrics or fabric bundles can be a great way to ensure a harmonious color palette.
Consider using tone-on-tone fabrics for subtle contrasts, or even batiks if you want a more luxurious texture. The block works wonderfully with both solids and small prints, offering flexibility depending on the overall look you want to achieve.
Don’t forget to pre-wash your fabrics. This helps prevent shrinking and color bleeding—especially important if you’re gifting or selling your finished quilt.
Cutting is the foundation of your quilt block’s success. For The Honeymoon Quilt Block, you’ll need a rotary cutter, self-healing mat, and a quilting ruler. Accurate measurements make all the difference in achieving those crisp, clean seams.
Start by cutting your squares and triangles according to the dimensions provided in your chosen version of the pattern. Remember to include seam allowances—usually 1/4 inch per side—so your blocks align correctly.
Lay out the pieces before sewing. Arranging them on a design wall or flat surface helps visualize how the block will look when finished. It’s also a good time to make any color changes before stitching begins.
When piecing the units, begin with the half-square triangles (HSTs). These are created by placing two squares right sides together, drawing a diagonal line, sewing 1/4 inch on each side, and then cutting along the line.
Press each seam after stitching. Many quilters prefer pressing to one side for strength, while others opt to press seams open for flatter results. Choose the method that suits your style and comfort.
Once all your units are ready, assemble them row by row. Join rows together to complete the block, checking for alignment and squaring as you go. A finished Honeymoon Quilt Block should lie flat and measure evenly across all sides.
Once you’ve created your first Honeymoon Quilt Block, the magic starts when you repeat it across your quilt top. This is where the romantic symmetry of the pattern really comes to life.
Determine the final size of your quilt—whether it’s a baby quilt, throw, or full-sized bedspread—then calculate how many blocks you’ll need. Most quilts use a simple grid layout, such as 4×5 blocks for a small throw.
When repeating the blocks, consider playing with color placement to create secondary patterns. For example, alternating the direction of blocks can form stars, diamonds, or even floral effects, depending on your palette.
Add sashing or cornerstones between blocks if you want to give each block breathing room. This can make the design feel lighter and give a more modern look. Borders can also be added to frame the quilt and add to its dimensions.
Use a design wall or large floor space to arrange all your blocks before sewing them together. This gives you a bird’s-eye view and lets you make adjustments to layout or balance.
Sew blocks into rows, then rows into the quilt top. Check frequently that your seams line up, and that the top is flat. This ensures the quilting process later on will be smooth and professional-looking.
Finishing your quilt involves layering, quilting, and binding. Start by preparing your quilt “sandwich”—the top, batting, and backing. Smooth out all wrinkles and secure with safety pins or basting spray.
Choose a quilting method that complements the block design. Straight-line quilting is elegant and beginner-friendly. If you’re more advanced, free-motion quilting can add swirling, romantic textures that mirror the “honeymoon” vibe.
Make sure your stitches are even and secure. Take your time and work in manageable sections, starting from the center of the quilt and moving outward to avoid puckering.
Trim any excess batting and backing fabric once quilting is complete. Then it’s time to attach the binding. A double-fold binding is durable and gives a polished finish. You can sew it by machine or hand-stitch it for a more classic look.
Add a quilt label to record your name, date, and perhaps even a message about your inspiration behind the quilt. This personal touch adds meaning and legacy to your project.
Finally, give your finished quilt a gentle press and admire the beauty you’ve created. Whether it becomes a cherished gift or a beloved keepsake, the Honeymoon Quilt Block design is sure to bring smiles and warmth.
What makes the Honeymoon Quilt Block unique?
Its romantic symmetry and versatile design make it special. It can evoke a dreamy, peaceful mood with the right fabric choices.
Is the Honeymoon Quilt Block suitable for beginners?
Yes! The pattern uses basic shapes like squares and triangles, making it an excellent choice for those new to quilting.
How many blocks do I need for a full quilt?
That depends on your desired quilt size. For a throw, 20 blocks (4×5) is common. For a queen-sized quilt, you might need 56 or more.
What kind of fabrics work best for this block?
High-quality cotton is ideal. Choose soft colors for a romantic feel or vibrant tones for a modern twist.
Can I make this block with scraps?
Absolutely! The Honeymoon Quilt Block is great for using up scrap fabric, especially if you’re going for a patchwork look.
How do I keep my quilt flat while quilting?
Start quilting from the center and work outward. Baste carefully and use even tension on your sewing machine.
Join our VIP broadcast list and gain access to exclusive patterns, all for free. As a VIP member, you’ll receive the best patterns daily, delivered directly to your device. ✨📱 It’s a unique opportunity to stay up-to-date with the latest trends and designs, curated just for you. Don’t miss out on enhancing your projects and discovering new inspirations with the best patterns every day! 🎨🔝
We hope this guide to The Honeymoon Quilt Block – Tutorial has inspired you to pick up your rotary cutter and dive into a new quilting project. From fabric selection to the final stitch, this block offers a rewarding and heartfelt experience that’s as comforting as it is beautiful. Whether you’re making a gift or a personal keepsake, this pattern provides endless possibilities for creativity.
If you enjoyed this tutorial, please leave a sincere comment below sharing your thoughts or any suggestions for future tutorials. Happy quilting!


