
Crochet Dragon Ornament - Free Pattern

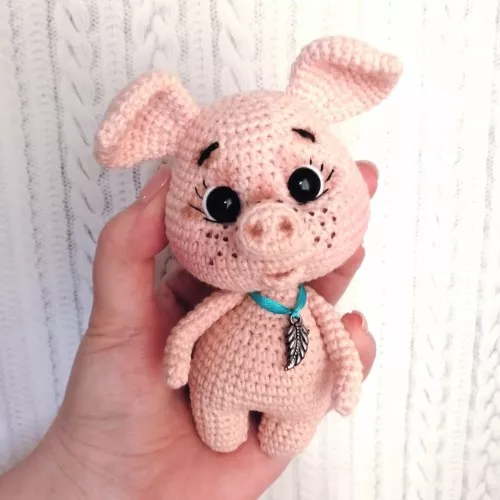
If you are looking for an adorable and beginner-friendly crochet project, this Cute Pig Amigurumi – Free Pattern is the perfect choice. This sweet little pig is not only a joy to make, but it’s also a lovely gift idea for children, animal lovers, or anyone who appreciates the charm of handmade items.
In this article, we’ll guide you through everything you need to know to create your very own crochet pig using this fun and easy pattern.
The Cute Pig Amigurumi – Free Pattern is designed to help you practice basic amigurumi techniques while crafting a finished product that’s both playful and functional. With its soft rounded body, tiny ears, curly tail, and friendly expression, this pig brings a smile to everyone’s face.
Whether you’re an experienced crocheter or just starting out, you’ll find this project satisfying and enjoyable.
Using only a few materials and simple stitches, you can complete this pig in just a few hours. Plus, the pattern is completely free, making it accessible to crafters of all levels.
Let’s dive into the step-by-step instructions and tips to help you get the most out of your Cute Pig Amigurumi – Free Pattern experience.
To begin your Cute Pig Amigurumi – Free Pattern, you’ll need a few basic materials. These items are typically easy to find at any craft store or online.
First, select a soft worsted weight yarn in pink or any color you prefer for your pig. Cotton yarn is a popular choice due to its durability and clean stitch definition. You will also need a small amount of black yarn or embroidery thread for the eyes and nostrils.
Next, choose an appropriately sized crochet hook. For most amigurumi projects, a smaller hook than recommended on the yarn label is ideal, as it helps create tight stitches that prevent stuffing from showing through.
You’ll need fiberfill stuffing to give your pig its shape. Use small amounts at a time and stuff firmly but not too tightly. This will help maintain a soft and squeezable form.
Other essentials include stitch markers to keep track of your rounds, a yarn needle for sewing parts together, and scissors. Optional extras like safety eyes or decorative accessories can personalize your pig.
Having all your tools ready before starting makes the process much smoother. With everything prepared, you’re ready to start crocheting your Cute Pig Amigurumi – Free Pattern.
The Cute Pig Amigurumi – Free Pattern mainly uses basic crochet stitches, which makes it accessible even for beginners. Let’s review the key stitches and techniques involved.
The most common stitch used in this pattern is the single crochet (sc). This stitch creates a tight and dense fabric that’s ideal for stuffed toys.
You’ll also use the magic ring (or magic circle) technique to start crocheting in the round. This allows for a seamless and adjustable start to your pig’s body and limbs.
Increasing and decreasing stitches are essential for shaping your pig. You’ll increase by making two single crochets in one stitch, and decrease by crocheting two stitches together.
You may also encounter slip stitches, especially when finishing off parts or joining rounds. These help to keep your work neat and secure.
Stitch markers are helpful for keeping track of rounds, especially as amigurumi is typically worked in continuous spirals. Be sure to move your marker up as you complete each round.
With these techniques in mind, you’ll be ready to tackle each section of the Cute Pig Amigurumi – Free Pattern with confidence.
Let’s walk through the steps for making your Cute Pig Amigurumi – Free Pattern. We’ll start with the main body and work our way through the details.
Begin with the body using a magic ring. Crochet in continuous rounds, increasing as needed to form a rounded shape. Once the desired width is achieved, continue with even rounds before decreasing to close the bottom.
Next, crochet the head. Similar to the body, begin with a magic ring and increase to form a sphere. Add safety eyes or embroider the face before stuffing and sewing it to the body.
Create the snout with a small circle, then add a couple of embroidered nostrils. Sew it to the front of the face, slightly below the eyes, for that iconic piggy look.
For the ears, crochet small semi-circular pieces. Sew them on top of the head, spaced evenly for a balanced appearance.
The legs and arms are simple cylindrical shapes. Make four and attach them to the body, ensuring symmetry for stability and cuteness.
Lastly, crochet a curly tail by making a chain and adding slip stitches or single crochets. Sew it to the back of the pig to complete your Cute Pig Amigurumi – Free Pattern.
Once you’ve completed your basic Cute Pig Amigurumi – Free Pattern, it’s time to have fun with customizations. Here are a few creative ideas.
Change the color of your yarn for a unique pig. Try pastel shades, bright tones, or even multicolored yarn for a whimsical twist.
Add accessories like a tiny bow tie, hat, or scarf. These small touches can give your pig personality and make it perfect for gift-giving.
Embroider a name or initials on the body to personalize it for a special recipient. It’s a sweet way to make your amigurumi more meaningful.
Use different eye styles. Safety eyes, buttons, or embroidered eyes all offer different expressions. Experiment to find the look you love.
Create a pig family by adjusting the size of your pattern. Use thicker yarn and a larger hook for a bigger pig, or go tiny with thread and a steel hook.
Make your pig part of a larger amigurumi collection. Pair it with other animals to create a farm-themed set or nursery décor.
Q: Is the Cute Pig Amigurumi – Free Pattern suitable for beginners? A: Yes, this pattern is ideal for beginners, using simple stitches like single crochet, increases, and decreases.
Q: How long does it take to complete the pig? A: On average, this project takes 3 to 5 hours, depending on your skill level and pace.
Q: What type of yarn should I use? A: Worsted weight cotton or acrylic yarn works best for durability and stitch definition.
Q: Can I wash the finished amigurumi? A: Yes, but it’s best to hand wash and air dry to maintain shape and softness.
Q: Are there printable instructions available? A: Some creators offer PDF downloads. Check the source of your pattern for this option.
Q: Can I sell the pigs I make from this pattern? A: Yes, as long as the pattern is free for personal use and the seller credits the original designer if required.
The Cute Pig Amigurumi – Free Pattern is a delightful and achievable project for crocheters of all skill levels. With clear instructions, simple stitches, and plenty of room for creativity, it’s easy to see why this pattern is so loved in the crochet community. Whether you’re crafting for fun, gifting, or even selling, this charming pig will win hearts.
We hope you enjoyed this tutorial and feel inspired to try it yourself. If you do, we’d love to hear your thoughts! Please leave a comment with your experience, suggestions, or photos of your finished pig. Happy crocheting!


