
Crochet Multi-Purpose Blouse, Shawl, Runner Model

Gingerbread man crochet – tutorial is a delightful craft project perfect for the holiday season. Whether you’re making ornaments for your Christmas tree or creating a fun gift, this crochet pattern brings the charm of the classic gingerbread man to life.
The process is simple and fun, making it suitable for crocheters of all skill levels. In this tutorial, we’ll guide you through the steps of creating your very own gingerbread man, from choosing the right yarn to adding the final touches.
Crocheting a gingerbread man can add a warm and whimsical touch to your holiday decorations or even become a special keepsake for family members.
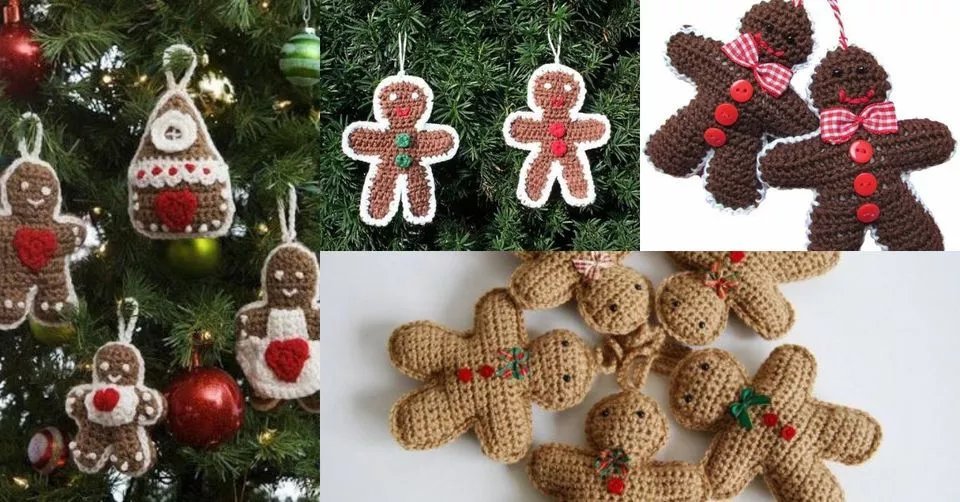
Image from google.
With its cute buttons, smiling face, and adorable shape, this project can easily be customized to reflect your personal style and preferences. Plus, crocheting during the holidays adds a cozy and creative element to your celebrations.
In this tutorial, we will cover the materials you need, the step-by-step process of making the gingerbread man, and helpful tips to ensure your project turns out perfect. Let’s get started and create a charming little gingerbread man together!
Before diving into the crochet process, it’s important to gather the materials needed to complete your gingerbread man crochet project.
Choose a medium-weight yarn (worsted weight) for the body. Brown is a classic choice for the gingerbread color, but feel free to experiment with other shades like beige or tan.
A 3.5mm or 4mm crochet hook works well for this project. The size of the hook will determine the tightness of your stitches, so choose one that is compatible with your yarn.
Use polyester fiberfill to stuff your gingerbread man, ensuring it holds its shape without being too stiff.
These are helpful for keeping track of the beginning of rounds, especially when working in a circular motion.
For a cute and secure look, you can add plastic safety eyes or embroider eyes with black yarn.
Red and white embroidery thread is ideal for adding buttons, a smile, or any other decorative features to the gingerbread man.
Now that you have your materials ready, let’s begin crocheting the body of the gingerbread man crochet.
To begin, create a magic ring with your brown yarn. This will form the foundation for the gingerbread man’s body. Make 6 single crochet (sc) stitches into the ring, and pull the tail to close the ring.
In the next round, increase by adding two single crochet stitches into each stitch from the previous round. This will start forming the rounded shape of the body.
Work in continuous rounds, increasing the stitches gradually to shape the body. Continue to follow the pattern until the body reaches your desired size.
For the legs, crochet two separate pieces, starting at the same point but working in the round. After creating the legs, attach them to the body by sewing them on securely.
Once the legs are attached, continue working upwards to form the torso. Ensure that you close the body shape with a neat seam when you reach the top.
Gently stuff the body with polyester fiberfill to give it a soft, plump shape. Don’t overstuff, as this can make it hard to sew the pieces together.
Now that the body is complete, let’s focus on adding the arms, buttons, and face to your gingerbread man crochet creation.
For the arms, crochet two small cylindrical shapes in the same way you created the body. Attach the arms securely on either side of the body, ensuring they are even.
Using white embroidery thread, stitch three small buttons down the front of the body. These can be made using simple French knots or a small button stitch.
With black embroidery thread, embroider two eyes and a smile. You can also add blush marks on the cheeks using a pink embroidery thread to make the gingerbread man extra cute.
For extra decoration, crochet tiny loops at the ends of the arms to resemble icing or add a ribbon design using white embroidery thread.
Optionally, you can crochet a small bow to place around the neck or add an additional scarf for a more personalized touch.
Once everything is stitched on, step back and inspect your work. Add any additional details or decorations to make your gingerbread man truly unique.
Here are some helpful tips to ensure your gingerbread man crochet project turns out beautifully.
Make sure your stitches are uniform throughout the project. If your stitches are too tight, the work may become too stiff, and if they’re too loose, the stuffing might show through.
Take your time when adding the embroidery details, as precision is key. Carefully stitch the buttons, eyes, and smile for a professional finish.
While brown is traditional, you can have fun with colors! Try using different shades of yarn for the body or even make the gingerbread man look like a character from your favorite holiday.
Stuff the body gently to avoid making it too hard. Leave some room for the body to be squishy but firm enough to maintain its shape.
When sewing parts together or adding details, a yarn needle will help you weave in loose ends more effectively.
Get creative and make your gingerbread man unique by adding personalized features such as a name, additional accessories, or changing the color scheme for a more modern twist.
Q: Can I use this pattern for making ornaments?
A: Yes, this pattern is perfect for creating gingerbread man ornaments for your Christmas tree or as festive gifts.
Q: Is this project suitable for beginners?
A: While it’s beginner-friendly, having some experience with basic crochet stitches will help. However, if you’re new to crochet, this project is still achievable with some patience and practice.
Q: How do I make the arms and legs less floppy?
A: Stuff the arms and legs lightly to ensure they have some firmness but aren’t overly stuffed. You can also attach them securely to the body with tight stitches.
Q: Can I use a different type of yarn for this project?
A: Absolutely! Just make sure the yarn is a similar thickness to the recommended medium-weight yarn for the best results.
Q: How do I attach safety eyes to my gingerbread man?
A: Simply place the safety eyes in the desired position on the face and secure them from the inside with the included washers. Be sure they are firmly attached to prevent them from falling off.
Q: How do I care for my crocheted gingerbread man?
A: Hand wash the gingerbread man gently with mild soap and cold water, then allow it to air dry.
Join our VIP broadcast list and gain access to exclusive patterns, all for free. As a VIP member, you’ll receive the best patterns daily, delivered directly to your device. ✨📱 It’s a unique opportunity to stay up-to-date with the latest trends and designs, curated just for you. Don’t miss out on enhancing your projects and discovering new inspirations with the best patterns every day! 🎨🔝
In this Gingerbread man crochet – tutorial, we’ve covered everything from choosing the right materials to adding the finishing touches. Crocheting a gingerbread man is a fun and creative way to celebrate the holiday season. Whether you’re making them as gifts, decorations, or simply as a personal project, these adorable gingerbread men are sure to bring joy to your home.
We’d love to hear your thoughts and see your creations! Feel free to leave a comment with your feedback or suggestions for future crochet tutorials. Happy crocheting!


