
Crochet Multi-Purpose Blouse, Shawl, Runner Model

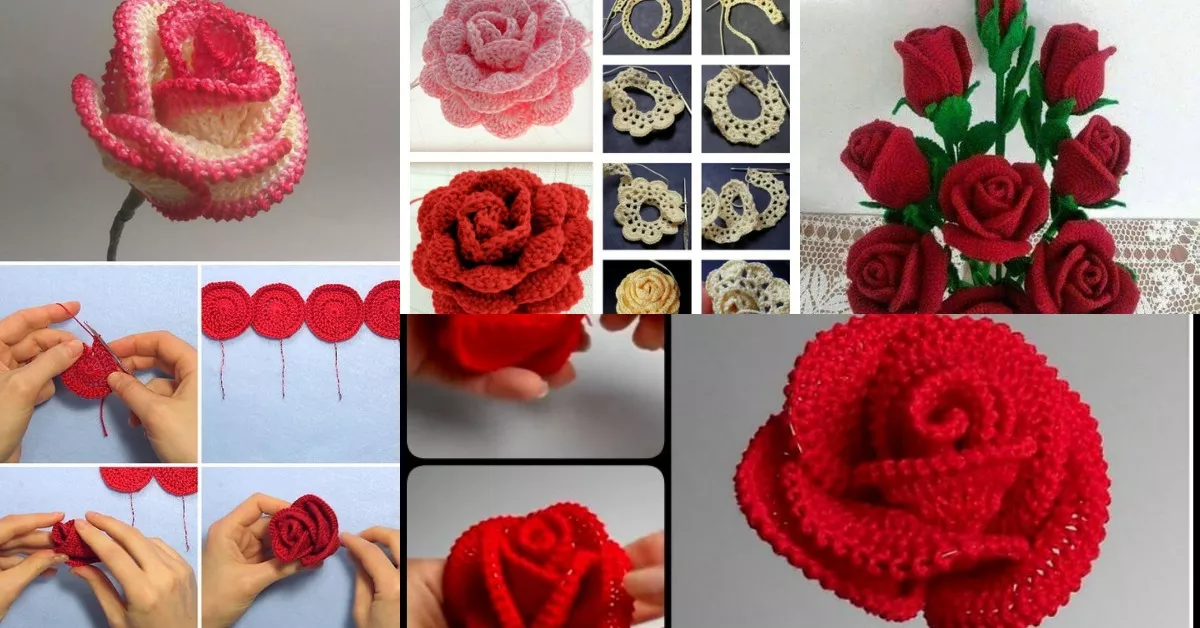
Crocheting roses is a beautiful and rewarding craft that allows you to create stunning, delicate flowers for various projects, from home décor to accessories.
How to crochet roses is a common question asked by crafters, whether they are beginners or experienced. In this tutorial, we’ll guide you through a free pattern, offering step-by-step instructions on how to make these lovely blooms with ease.
Learning how to crochet roses can open up a world of creative possibilities. Whether you want to add a personal touch to a scarf, create a decorative bouquet, or enhance a quilt, crocheted roses are versatile and elegant. In this article, we will break down the process and provide you with all the tools you need to master the craft.
Before we dive into the pattern, it’s essential to understand the basics of crocheting roses, including choosing the right yarn and crochet hook. This foundation will ensure that your roses are both beautiful and durable. Let’s explore the materials and basic stitches required before starting the pattern.
To begin crocheting roses, you’ll need to gather a few essential materials. The most important items include yarn, a crochet hook, and scissors. You can choose any type of yarn, but it’s best to go for a medium-weight yarn, like worsted weight, which works well for creating sturdy flowers. Select a crochet hook that matches the size of your yarn—usually, a 4mm or 5mm hook is ideal for this project.
Additionally, you may want to pick up a yarn needle for weaving in ends and a button or decorative embellishment to center your rose if desired. It’s also helpful to have stitch markers on hand, especially if you’re new to crocheting. These tools will make the process smoother and more enjoyable.
The next thing to keep in mind is the type of rose you want to create. There are various designs of crocheted roses, including simple, layered, and intricate ones. For beginners, it’s best to start with a basic rose pattern before attempting more complex designs.
Once you have your materials, you’re ready to move on to the actual process of crocheting your rose.
The first step in learning how to crochet roses is to create a foundation ring. This ring serves as the starting point for your rose petals. Begin by making a slip knot and chaining four. Then, connect the chain into a ring by slip stitching into the first chain. This forms a small circle that will serve as the base for your flower.
Next, work into the ring to create the first round of petals. Using double crochet stitches, work several into the ring, ensuring you have enough to form a full flower. Typically, you’ll want to crochet six to eight double crochet stitches into the ring, depending on the size you want for your rose. Once you have the right number of stitches, join the round with a slip stitch.
For the second round, chain three to start the petals. Then, create a combination of treble crochet and double crochet stitches into each space between the double crochet stitches from the first round. This will give the flower more volume and texture. After completing this round, you’ll see the shape of your rose beginning to form.
As you progress, continue adding layers of petals. You can experiment with different stitches to create more intricate layers, such as using half-double crochet or single crochet. Make sure to keep the petals even and consistent in size, as this will ensure your rose looks symmetrical.
Shaping the rose is where the magic happens. Once you’ve finished crocheting the petals, it’s time to form the flower into its final shape. Start by gently rolling the petals inward from the outside, creating a spiral effect. Use a yarn needle to secure the end of the yarn in place. This will help your rose maintain its shape while also ensuring that it doesn’t unravel.
For a more realistic look, you can add a decorative button or bead to the center of the flower. This will give your crocheted rose a polished, finished appearance. After securing the center, trim any excess yarn and weave in the ends with a yarn needle.
You can adjust the size of your rose by changing the number of stitches or rounds you use. If you prefer a larger rose, add more layers of petals, or use a thicker yarn. For a smaller rose, use fewer stitches and rounds.
Crocheting roses is not only a creative endeavor, but it’s also a relaxing process that allows you to unwind while creating something beautiful. Whether you’re making a single rose for a brooch or several to create a bouquet, the possibilities are endless!
To make your crocheted roses even more stunning, here are a few tips and tricks to enhance your project. First, experiment with different yarn colors to create roses in a variety of shades. From classic red roses to pastel pinks or even multicolored blooms, your creativity knows no bounds.
If you want to add extra texture and depth to your roses, consider using variegated yarn or yarn with metallic threads. This will give your flowers a unique and eye-catching appearance.
Another tip is to use a flower pattern template as a guide for creating more detailed petals. This can help you maintain consistency and symmetry, especially if you’re making multiple roses for a larger project like a quilt or garland.
If you plan to use your crocheted roses in accessories such as headbands, bags, or scarves, be sure to reinforce the base with a few extra stitches. This will ensure that the flower holds up well and lasts for a long time.
Finally, practice makes perfect! Don’t be discouraged if your first few roses aren’t as perfect as you hoped. The more you practice, the better your crocheted roses will become.
1. How long does it take to crochet a rose?
The time it takes to crochet a rose depends on your skill level and the complexity of the pattern. For beginners, it may take 30 to 45 minutes to complete a single rose. More intricate designs could take longer.
2. Can I crochet roses with different types of yarn?
Yes, you can use various types of yarn to crochet roses. The key is to match the yarn with an appropriate crochet hook size. Thicker yarns will result in larger flowers, while thinner yarns create more delicate blooms.
3. How can I make my crocheted roses more realistic?
To make your roses look more realistic, try adding a green crochet leaf or using a textured yarn. You can also add embellishments like beads or buttons to the center of the flower.
4. Can I crochet roses without a pattern?
Yes, you can crochet roses without a set pattern. However, it may be helpful to start with a basic guide to get familiar with the process. Once you understand the basic technique, you can experiment and create your own unique designs.
5. Are crocheted roses durable enough for everyday use?
Yes, crocheted roses can be durable, especially when made with sturdy yarn and properly shaped. If you use them as embellishments on accessories like bags or hats, they will last for a long time with proper care.
6. Can I wash crocheted roses?
Crocheted roses made with cotton yarn can usually be washed gently by hand or in a delicate cycle. Be sure to air dry them to maintain their shape.
In this tutorial, we’ve shown you how to crochet roses, providing a detailed step-by-step guide along with helpful tips to make your crochet flowers look beautiful and lasting. By using the techniques outlined here, you can create roses in various sizes, colors, and styles for any project. Remember to practice and experiment with different yarns and stitches to personalize your designs.
We’d love to hear your thoughts! Please leave a sincere opinion or share any suggestions for future tutorials. Happy crocheting!


