
Crochet Multi-Purpose Blouse, Shawl, Runner Model

The Easy Christmas Swirl Ball – Free Pattern is a fun and simple craft project that will add a festive touch to your holiday decorations.
Whether you’re looking to make ornaments for your Christmas tree or create a unique gift, this swirl ball pattern is perfect for anyone, from beginners to experienced crafters.
This easy-to-follow tutorial will guide you through creating your very own swirl balls, adding color, texture, and charm to your home this season.
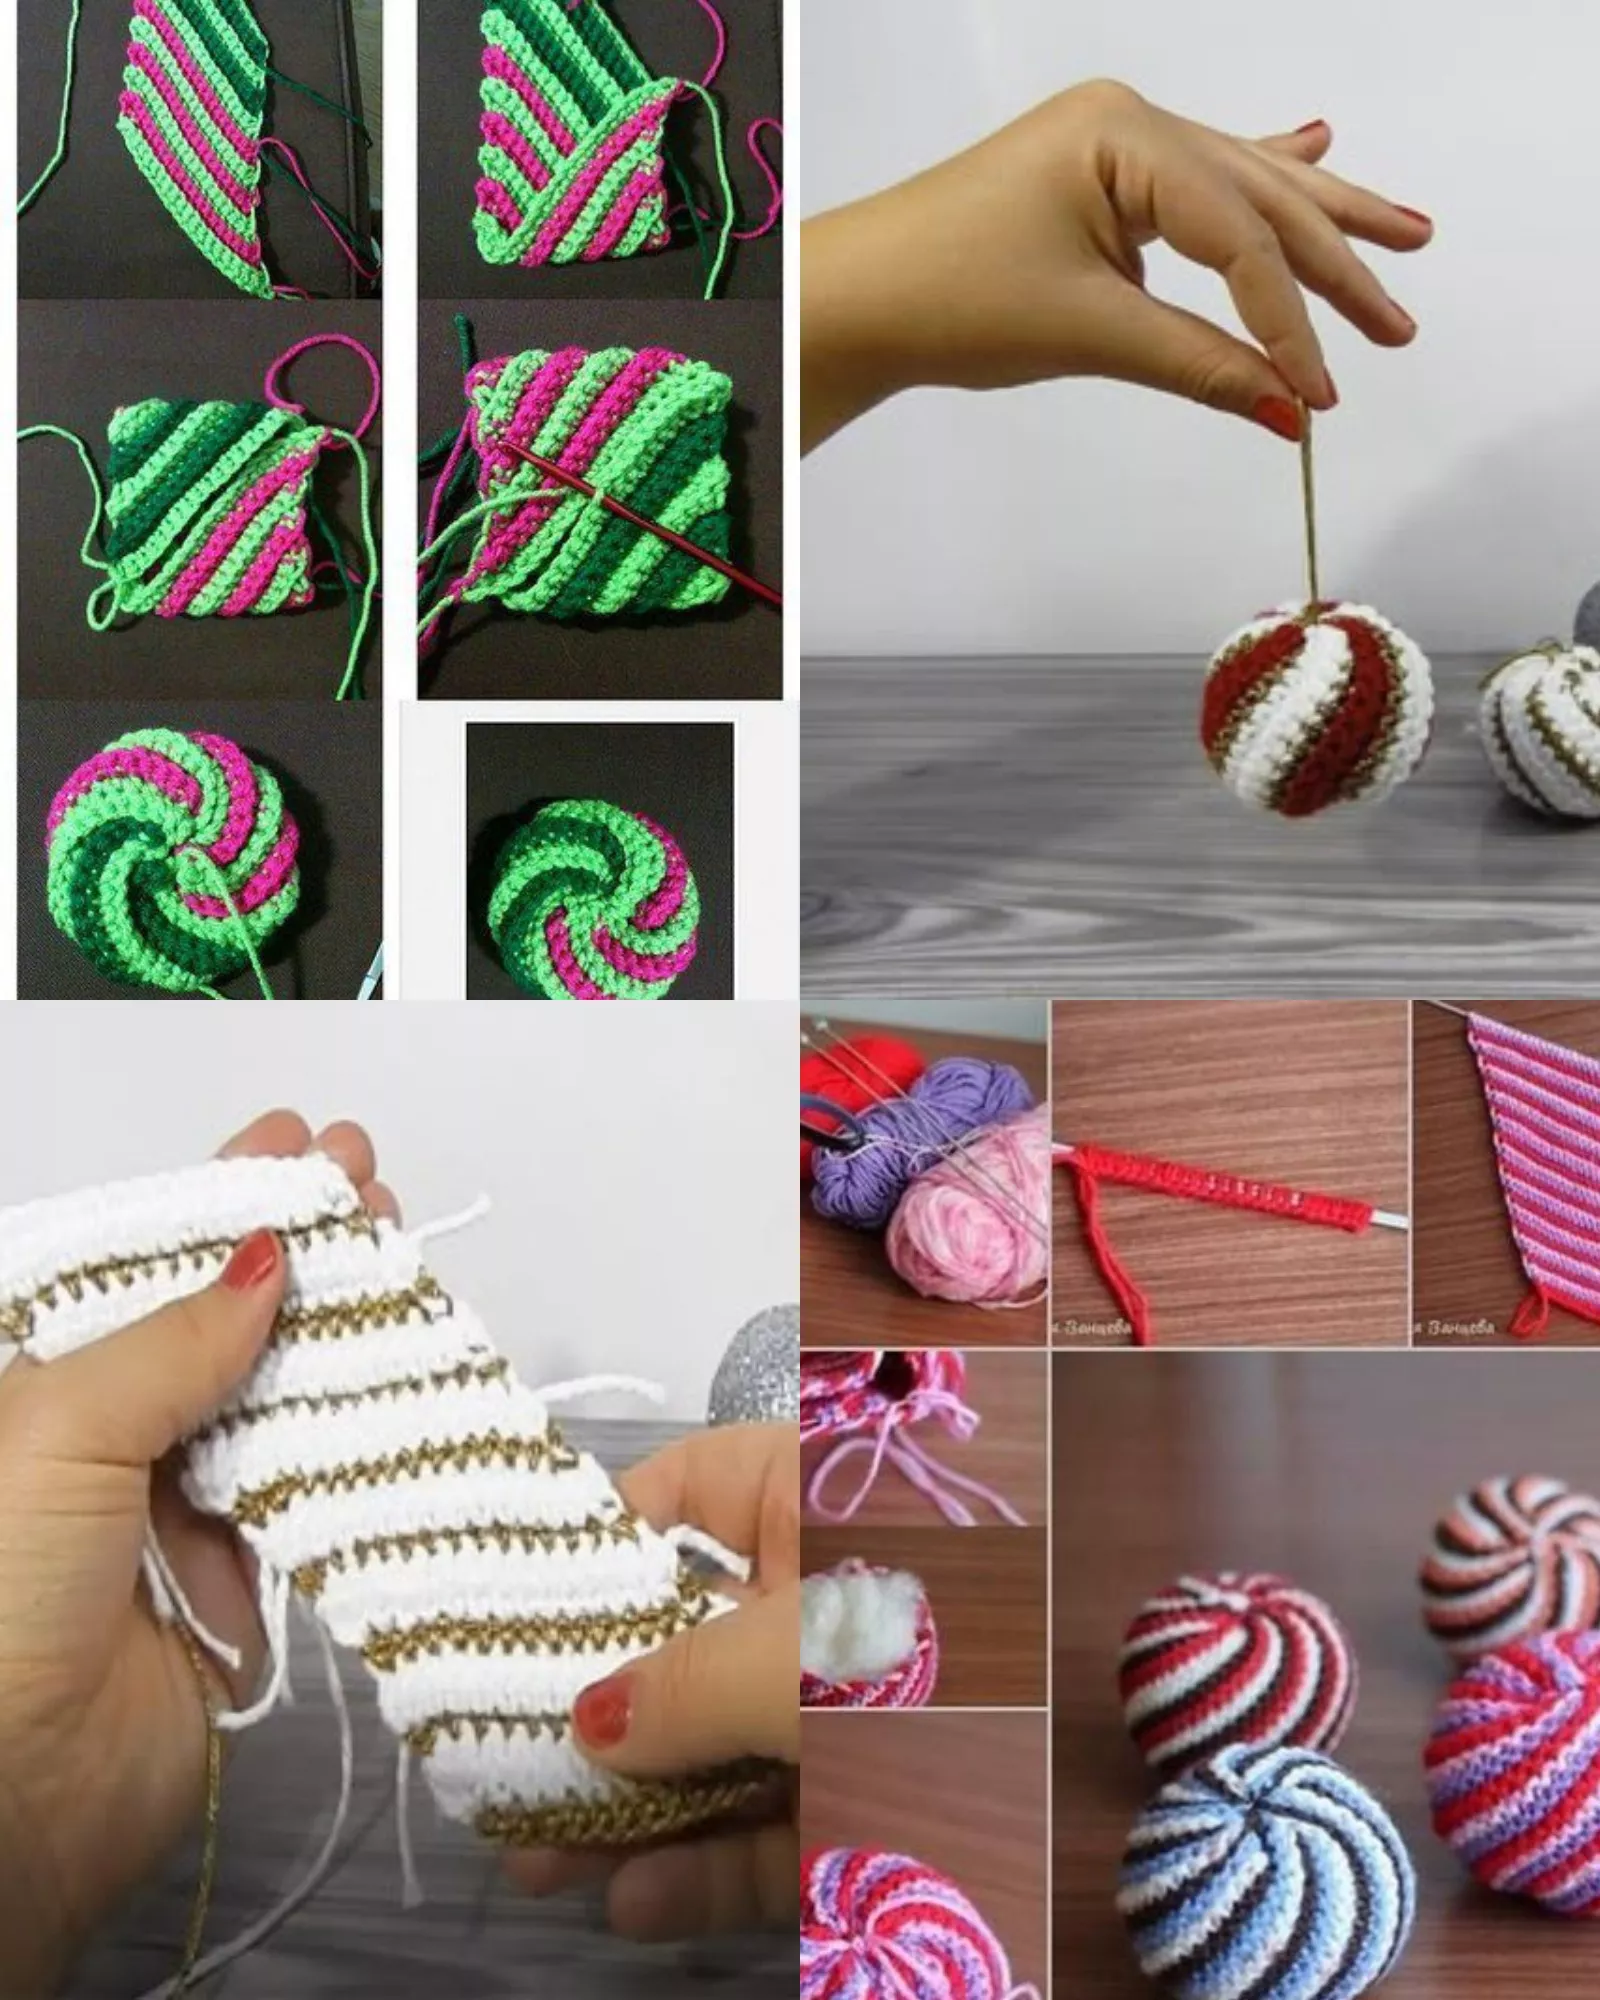
Image from google.
The beauty of the Easy Christmas Swirl Ball – Free Pattern is in its versatility. You can make these swirl balls in various colors to match your existing holiday décor, or mix and match different hues to create a more whimsical look.
The pattern uses simple techniques, making it perfect for a quick and enjoyable project. By following the steps provided, you will have beautiful handmade decorations that are sure to impress your family and friends.
In this guide, we will walk you through the process step-by-step, from gathering materials to finishing the last swirl. Let’s dive into making your Easy Christmas Swirl Ball and create a festive atmosphere for your home!
Before you start making your Easy Christmas Swirl Ball, it’s essential to gather all the materials you will need. The right tools will help you achieve the best results and ensure that the process goes smoothly.
To make your swirl ball, you’ll need yarn or thread. You can choose a vibrant red, green, or gold for a classic Christmas look, or experiment with pastel shades for a more modern style. The type of yarn you choose will also affect the final texture of your swirl ball. Opt for a soft wool yarn for a cozy look or a shiny metallic thread for a bit of sparkle.
You can use a styrofoam ball as the base for your swirl pattern. These are easy to work with and provide a sturdy base for wrapping the yarn. Alternatively, you can use a small piece of fabric to wrap around the ball if you prefer a more flexible option.
A hot glue gun is essential for securing your yarn to the base of the swirl ball. You will use it to attach the yarn at the beginning and end of each section, making sure it stays in place as you work.
Scissors are necessary to cut the yarn or thread to the desired length. Make sure your scissors are sharp for a clean cut, which will help your pieces stay neat and organized as you work.
If you want to add extra flair to your Easy Christmas Swirl Ball, consider using small decorations like glitter, sequins, or ribbons. These can be applied to the surface of the ball to give it more texture and shine. For a more traditional look, small bells or tiny ornaments can also be glued onto the swirl ball for added festive detail.
While not absolutely necessary, a measuring tape can help you keep track of the length of yarn you need for each section. This will ensure that your swirl ball is evenly covered and that you don’t run out of material halfway through the project.
Now that you have gathered your materials, it’s time to start creating your Easy Christmas Swirl Ball! Follow these simple steps to craft your own beautiful swirl ball decoration.
Start by taking your styrofoam ball and placing it on a flat surface. If you are using fabric, cut it into a circle large enough to cover the ball. You will need to wrap it tightly around the styrofoam ball, securing it with glue as you go.
Using your hot glue gun, place a small amount of glue on the top of the styrofoam ball. Begin by attaching the yarn to the glued spot, making sure to press it down gently so that it stays in place. You can use a contrasting color of yarn for the swirl effect to make it pop against the base color.
Once the yarn is secured, begin wrapping it around the ball in a spiral pattern. Keep the tension of the yarn even as you go, making sure it is not too tight or too loose. Continue wrapping the yarn around the ball in a consistent direction, creating a swirl effect.
To create a more intricate design, you can use multiple colors of yarn. After you’ve completed one full swirl, use the hot glue gun to attach a new color at the end of the previous section. Repeat the wrapping process, creating a layered swirl pattern. Feel free to experiment with different color combinations to make your ball even more unique.
As you wrap the yarn around the ball, continue to use the hot glue gun to secure the ends. Make sure the yarn is glued securely at the start and finish of each swirl to prevent it from unraveling.
Once you’ve covered the entire ball with your desired number of swirls, finish off by cutting the yarn to your desired length. Add a small dab of hot glue to the end to secure it, and press it gently against the ball. If you’re adding decorative elements like sequins or glitter, now is the time to glue them onto the surface of the ball for an extra festive touch.
While the basic Easy Christmas Swirl Ball pattern is lovely on its own, you can get even more creative by adding unique variations and features. Here are some ideas to help you personalize your swirl ball:
For a more elegant look, try adding ribbons to the swirls of your ball. You can attach the ribbon in between yarn swirls or use it to create a ribbon hanger for the top of the ball. Choose gold, silver, or even plaid ribbons to complement the yarn.
If you prefer larger decorations, make your swirl ball larger by using a bigger styrofoam ball. Simply follow the same steps and continue wrapping until the ball is fully covered. Larger swirl balls can be used as centerpieces or placed around the house for a fun touch.
For a more festive and eye-catching effect, use metallic yarn or glittery thread in the swirl pattern. This will make your Christmas swirl ball sparkle and catch the light, adding a dazzling effect to your holiday décor.
Consider making a set of Easy Christmas Swirl Balls in different sizes and colors. These can be used as a set of ornaments on your Christmas tree, or they can be displayed together as a centerpiece on your dining table. Having a collection of swirl balls will create a cohesive and joyful holiday atmosphere.
Instead of using a traditional styrofoam ball, you can experiment with other materials such as wooden balls or foam shapes. These will give your swirl ball a more rustic or natural look, depending on the materials you choose.
Get creative by adding other Christmas-themed decorations to your swirl ball. For example, you can use miniature pinecones, holly leaves, or small Christmas bells. These details will enhance the holiday spirit and give your swirl ball a more personalized touch.
If you’re new to crafting, the Easy Christmas Swirl Ball is an excellent project to start with. Here’s why:
The pattern uses straightforward techniques, making it accessible to anyone, even those who have never crafted before. With just a few basic supplies, you can create a stunning ornament that will impress your friends and family.
Unlike more complex projects, the swirl ball can be completed in a short amount of time. This makes it perfect for a last-minute gift or for adding a personal touch to your holiday decorations without taking up too much of your time.
Because the Easy Christmas Swirl Ball allows for so much customization, you can make each one unique. Whether you use different colors, textures, or decorations, there’s no limit to how you can personalize your swirl balls.
This craft is enjoyable for people of all ages. Kids can help wrap the yarn, and adults can take care of the more detailed work like adding decorations. It’s a wonderful family activity that will bring everyone together during the holiday season.
Crafting with yarn and simple supplies makes this an affordable project. You don’t need to spend much on materials, and you can create many swirl balls with just a small investment in yarn and glue.
Making swirl balls can become a cherished holiday tradition. You can make them each year, experimenting with new colors and designs, and create a collection that grows with your family.
Q: How do I secure the yarn to the ball?
A: Use a hot glue gun to attach the yarn to the ball. Apply a small amount of glue at the beginning of each swirl and press the yarn down firmly to ensure it stays in place.
Q: Can I use different colors of yarn?
A: Yes, using multiple colors for the swirls can create a beautiful effect. Feel free to experiment with different combinations to create a unique design.
Q: What size should the styrofoam ball be?
A: You can choose any size of styrofoam ball, depending on your preference. Smaller balls work well as tree ornaments, while larger ones can be used as table centerpieces.
Q: Can I add glitter to my swirl ball?
A: Yes! Adding glitter will make your swirl ball sparkle and shine. You can either sprinkle it onto the surface or glue it along with the yarn.
Q: How do I hang my swirl ball?
A: You can attach a ribbon or string to the top of your swirl ball for easy hanging. Simply glue it to the top and hang it on your tree or in any spot that needs a touch of holiday cheer.
Join our VIP broadcast list and gain access to exclusive patterns, all for free. As a VIP member, you’ll receive the best patterns daily, delivered directly to your device. ✨📱 It’s a unique opportunity to stay up-to-date with the latest trends and designs, curated just for you. Don’t miss out on enhancing your projects and discovering new inspirations with the best patterns every day! 🎨🔝
The Easy Christmas Swirl Ball – Free Pattern is a delightful craft that adds charm and joy to your holiday season. From gathering materials to adding creative touches, this project offers a simple yet beautiful way to personalize your decorations.
Whether you’re new to crafting or an experienced maker, this pattern is perfect for creating unique and festive swirl balls for your home.
Don’t forget to share your thoughts, questions, and suggestions in the comments below – we’d love to hear from you! Happy crafting!


