
Pie Carrier Sewing Pattern

The Black Magic Quilt Block is a captivating design that combines intricate geometry with bold contrasts to create a striking visual effect.
This tutorial will guide you step-by-step in creating this dramatic and timeless block, perfect for any quilting project. The Black Magic quilt block’s versatility allows you to experiment with various color schemes while maintaining its signature allure.
Whether you’re new to quilting or a seasoned pro, the Black Magic Quilt Block – Tutorial provides clear, easy-to-follow instructions to help you craft this mesmerizing design.
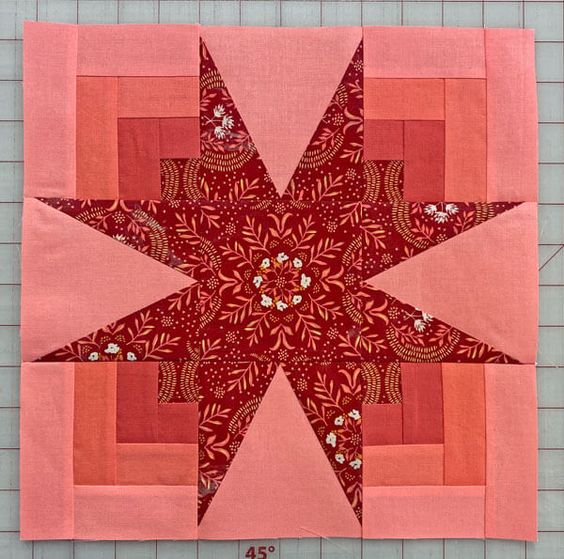
Image from google.
It’s a fantastic addition to both modern and traditional quilts, offering endless creative opportunities.
In this article, we will explore the materials you need, the steps to create the block, customization tips, and answers to frequently asked questions. By the end, you’ll have the confidence to tackle this unique quilt block and incorporate it into your quilting repertoire.
To successfully create the Black Magic Quilt Block, it’s essential to gather the right materials and tools. These items ensure precision and ease throughout the process.
Choose a combination of light and dark fabrics to highlight the contrast that defines the Black Magic design. Opt for solid colors or subtle patterns for maximum impact.
A sharp rotary cutter and a self-healing cutting mat are crucial for precise fabric cutting. These tools help achieve clean edges and consistent measurements.
A quilting ruler with clear markings is indispensable for accurate cuts. Consider using a square ruler for trimming the finished block.
A reliable sewing machine with a quarter-inch presser foot ensures even seam allowances, which are critical for this design.
Pressing fabric pieces as you sew is essential for achieving sharp, clean lines and ensuring the block lies flat.
Use pins or clips to secure fabric pieces before sewing. These prevent shifting during stitching, which is especially important for intricate patterns.
A washable fabric marker or chalk is useful for marking sewing lines, particularly when working with triangles or detailed sections.
Once you have these materials ready, you’re prepared to begin crafting your Black Magic Quilt Block.
The precision in cutting and preparing your fabric is vital for creating a clean and visually appealing Black Magic Quilt Block. Follow these steps to get started.
Pick high-contrast fabrics to emphasize the block’s dramatic effect. Black and white are classic choices, but feel free to experiment with vibrant or muted tones.
Cut your chosen fabrics into base squares. These will form the foundation of your quilt block and provide the necessary pieces for the design.
Using the base squares, mark diagonal lines and sew along both sides of the line to create half-square triangles (HSTs). Cut along the marked line and press the seams open.
Use your ruler to trim the HSTs to the desired size. This step ensures uniformity and precision in the final block.
Cut smaller pieces from your fabric to add detail and complete the intricate design of the Black Magic block.
Arrange all your pieces on a flat surface in the pattern of the Black Magic Quilt Block. This helps you visualize the final design and ensures all components are present before sewing.
With your fabric prepared, you’re ready to begin piecing the block together.
The assembly process for the Black Magic Quilt Block is where the magic truly happens. Follow these steps to bring your quilt block to life.
Sew the HSTs together in pairs, ensuring the dark and light sides alternate. Press seams to reduce bulk and maintain a smooth surface.
Piece together smaller triangles or squares to form secondary units that complement the main design. These will add depth and dimension to the block.
Lay out the units in rows according to the block’s pattern. Sew the rows together, paying close attention to seam alignment for a polished look.
After sewing each row, press the seams in alternating directions. This technique helps the rows nest together during assembly.
Join the rows to complete the block. Take your time to ensure all points and edges align neatly.
Once the block is assembled, trim any uneven edges to achieve the perfect square. This step ensures the block fits seamlessly with others in your quilt.
With the block pieced together, you can explore customization options to make it uniquely yours.
The Black Magic Quilt Block is highly adaptable, allowing you to personalize it to suit your style and project requirements. Here are some ideas to inspire your creativity.
Swap the traditional black-and-white palette for vibrant colors or muted shades to create a unique twist on this classic design.
Scale the block up or down to fit your project. Smaller blocks are ideal for intricate quilts, while larger ones make bold statements.
Pair the Black Magic block with complementary patterns, such as Starburst or Pinwheel blocks, for a dynamic quilt layout.
Incorporate decorative quilting stitches to enhance the block’s visual appeal. Geometric or free-motion designs work particularly well.
Frame the Black Magic block with borders or sashing to create a distinct focal point in your quilt.
Mix solids, prints, and textures to add depth and interest to the block. Experimenting with fabric types can elevate the overall design.
These customization options allow you to make the Black Magic Quilt Block a true reflection of your personal style.
Q: What makes the Black Magic Quilt Block unique?
A: The Black Magic block is known for its bold contrast and intricate geometric pattern, which creates a striking visual effect.
Q: Is this block suitable for beginners?
A: While the design involves precise cutting and piecing, beginners can achieve success with patience and careful attention to detail.
Q: What are the standard dimensions for this block?
A: The most common size is 12 inches, but the block can be scaled up or down to fit your project.
Q: How do I ensure precise points in the design?
A: Use a consistent quarter-inch seam allowance and press seams carefully. Trimming the units to the correct size also helps.
Q: Can I use scraps to create this block?
A: Yes, this block is perfect for using up fabric scraps, especially if they have contrasting colors.
Q: How do I incorporate this block into a full quilt?
A: Arrange multiple Black Magic blocks in a grid pattern, alternating orientations or adding sashing for visual interest.
Join our VIP broadcast list and gain access to exclusive patterns, all for free. As a VIP member, you’ll receive the best patterns daily, delivered directly to your device. ✨📱 It’s a unique opportunity to stay up-to-date with the latest trends and designs, curated just for you. Don’t miss out on enhancing your projects and discovering new inspirations with the best patterns every day! 🎨🔝
The Black Magic Quilt Block – Tutorial offers a detailed guide to creating this stunning and versatile quilt block. With its bold contrast and timeless appeal, the Black Magic block is a valuable addition to any quilter’s repertoire.
We hope this tutorial has inspired you to try your hand at this captivating design. Share your thoughts and suggestions in the comments below. Happy quilting!


