
Pie Carrier Sewing Pattern

The Jellied Lone Star Quilt – Tutorial is a fantastic project for quilters looking to enhance their skills with a stunning design that combines tradition with a modern twist.
This quilt pattern, featuring bold geometric shapes and a striking star formation, is ideal for quilters of all levels, from beginners to seasoned experts.
Whether you’re making the quilt for yourself or as a gift, the finished product is sure to be a conversation piece, with its vibrant colors and intricate design.
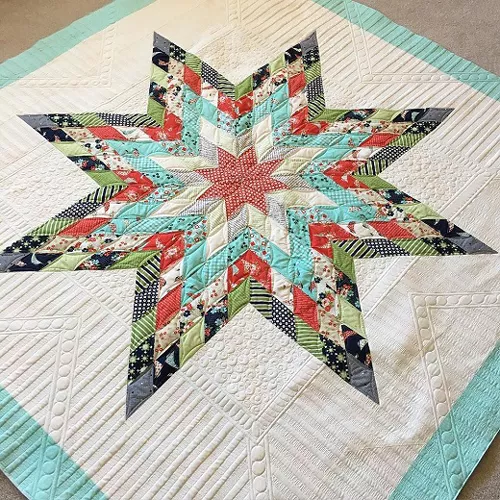
Image from google.
The Lone Star pattern is one of the most recognizable in the quilting world. This classic design features a central star surrounded by smaller pieced sections, creating a striking visual effect.
The Jellied Lone Star Quilt brings a new dimension to this traditional design, incorporating a jellied effect that adds texture and depth to the quilt. It’s a perfect way to bring a modern flair to a timeless pattern.
Throughout this tutorial, we’ll walk you through each step, from selecting fabrics to piecing the quilt together, ensuring that you can confidently create this beautiful quilt from start to finish.
By the end of this tutorial, you’ll be able to create a Jellied Lone Star Quilt that not only looks stunning but also showcases your skills as a quilter.
We’ll cover everything from the basic steps to some tips and tricks for making the quilting process smoother. Let’s dive into this step-by-step guide!
Before you start piecing together your Jellied Lone Star Quilt, it’s important to gather all the necessary materials and tools. Having everything in place will help streamline the process and ensure that you have the right equipment to complete the quilt with ease.
The first essential item is fabric. For the Jellied Lone Star Quilt, you’ll need a variety of fabrics in different colors and patterns. Typically, the central star uses a bold color, with complementary fabrics for the surrounding sections. Choose fabrics that contrast well with each other to allow the star to pop. Quilting cotton is recommended for its durability and ease of use, but feel free to experiment with other fabric types if you prefer.
You will also need a quilting ruler and rotary cutter to cut your fabric pieces accurately. A good-quality quilting ruler with a non-slip backing will ensure that your cuts are straight and precise. A rotary cutter is essential for cutting through multiple layers of fabric at once, making your work more efficient.
Other tools include a sewing machine, thread (preferably 100% cotton to match your fabric), and pins for holding the fabric pieces together. A quilting mat will also be useful for cutting the fabric safely and accurately. Finally, you’ll need a quilting needle and some batting for the quilt’s thickness.
Having these tools ready will set you up for success as you begin the Jellied Lone Star Quilt – Tutorial. Once you’ve gathered everything, you’ll be ready to dive into the piecing process!
Now that you have all your materials ready, it’s time to start cutting and piecing your fabrics together. The Jellied Lone Star Quilt features a star pattern that consists of various triangles and diamonds. Cutting these pieces accurately is crucial for achieving a clean, well-aligned quilt.
Begin by cutting your fabric into the necessary shapes. The Lone Star pattern typically requires you to cut diamonds, triangles, and squares from your chosen fabrics. Use your quilting ruler and rotary cutter to ensure that each piece is cut to the exact dimensions specified in the pattern.
Once all your pieces are cut, it’s time to start piecing them together. Begin with the central star, assembling the diamond shapes into the iconic star formation. The key to this step is precision; make sure the edges of each piece align perfectly to avoid any gaps or uneven seams.
As you work on the Jellied Lone Star Quilt, it’s a good idea to chain piece your triangles and diamonds. Chain piecing is a method where you sew multiple pieces together in one continuous chain, cutting them apart after sewing. This technique saves time and keeps your pieces organized.
After piecing together the central star, you’ll begin working on the surrounding sections. The quilt pattern will have various smaller blocks that surround the star, so take your time to piece them together carefully, ensuring the sections fit snugly against the star.
Once the entire star and surrounding blocks are pieced together, press all the seams. Pressing is an important step in quilting as it helps to set the stitches and create a smooth surface for the next stage.
With your star and surrounding sections pieced together, it’s time to assemble the entire quilt top. This step is crucial for bringing together all the hard work you’ve done with cutting and piecing the fabric. The Jellied Lone Star Quilt stands out because of its jellied effect, which adds a sense of depth and dimension to the quilt.
Start by laying out all the sections of the quilt top on a flat surface, arranging them according to the pattern. Carefully sew the sections together, making sure each seam is aligned perfectly. You’ll need to sew together long strips, and it’s important to maintain consistent seam allowances throughout.
The jellied effect is achieved by using fabric that contrasts well with the background. The quilt pattern may call for additional smaller pieced sections or appliqué work to enhance the jellied look. These pieces will create the appearance of “jelly” or “layers” within the quilt, adding texture and making the star pop.
As you add these elements, pay attention to the color placement. A good rule of thumb is to use lighter fabrics for the background and darker or more vibrant colors for the star and jellied accents. This contrast will help the star stand out against the rest of the quilt top.
Once all the pieces are sewn together and you’ve achieved the jellied effect, it’s time to prepare the quilt for quilting. This involves layering the quilt top with batting and backing fabric, which we’ll discuss in the next section.
Now that your quilt top is assembled, it’s time to move on to the quilting stage. This is where the quilt really starts to come to life, as you’ll be adding texture and definition to the design. The Jellied Lone Star Quilt can be quilted using a variety of techniques, but the most common methods are hand quilting or machine quilting.
If you’re machine quilting, start by basting the quilt layers together. Use pins or spray baste to hold the quilt top, batting, and backing fabric in place. It’s important to make sure the quilt is flat and smooth to prevent puckering during the quilting process.
Next, choose your quilting pattern. For the Jellied Lone Star Quilt, many quilters choose to quilt around the edges of the star to highlight its shape. You can also quilt along the seams to create a grid-like pattern or use free-motion quilting for a more organic look. Experiment with different patterns to see what best complements the design of your quilt.
After quilting, trim any excess fabric and batting around the edges of the quilt. Then, add the binding to finish off the quilt. Binding is the final step in the process, where you sew a fabric strip around the edges of the quilt to give it a polished, professional look.
Once the binding is attached, give the quilt a final press to smooth out any wrinkles. The finished quilt is now ready to be displayed, gifted, or used as a cozy addition to your home.
1. How do I create the jellied effect in the Lone Star Quilt?
The jellied effect is achieved by using contrasting fabrics around the star. This gives the illusion of depth, creating a layered look that makes the star stand out even more.
2. What is the best fabric to use for a Lone Star Quilt?
Quilting cotton is the best fabric for a Jellied Lone Star Quilt because it is durable and easy to work with. Choose fabrics with a variety of colors to create contrast between the star and background.
3. Can I make this quilt in a smaller size?
Yes, you can adjust the size of the Jellied Lone Star Quilt by changing the dimensions of the star and the surrounding blocks. Just make sure to adjust the fabric pieces accordingly.
4. What are the best techniques for quilting the Lone Star Quilt?
Machine quilting is popular for this pattern, but hand quilting can also add a personal touch. Use a pattern that complements the bold design of the star, such as echo quilting or straight lines.
5. How can I ensure my quilt top pieces fit together perfectly?
Accurate cutting is key to making sure your pieces fit together correctly. Use a quilting ruler and rotary cutter for precision, and sew with a consistent seam allowance.
6. Can I add embroidery or appliqué to the quilt?
Yes, you can add embroidery or appliqué to enhance the design. Just make sure that the additional details don’t overwhelm the central star.
Join our VIP broadcast list and gain access to exclusive patterns, all for free. As a VIP member, you’ll receive the best patterns daily, delivered directly to your device. ✨📱 It’s a unique opportunity to stay up-to-date with the latest trends and designs, curated just for you. Don’t miss out on enhancing your projects and discovering new inspirations with the best patterns every day! 🎨🔝
In this Jellied Lone Star Quilt – Tutorial, we’ve covered everything from gathering materials to quilting the finished top. The key to creating a stunning quilt lies in precision cutting, accurate piecing, and adding personal touches to the design. By following the steps outlined, you’ll be able to create a beautiful quilt that showcases your quilting skills and makes a statement in any room.
We’d love to hear your thoughts on this tutorial. Have you tried the Jellied Lone Star Quilt before? Share your experiences, suggestions, and any tips you’ve learned along the way in the comments below. Your feedback is valuable, and we look forward to hearing about your quilting journey!


