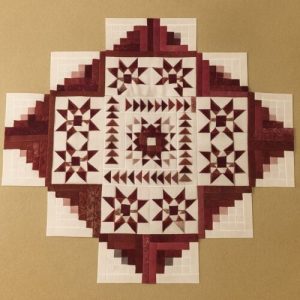
The Kite Flight Quilt is a beautifully dynamic quilt design that captures the essence of flight with its whimsical, geometric shapes.
Inspired by the soaring beauty of kites in the sky, this quilt pattern features a series of vibrant, flying kite shapes arranged across a backdrop of colorful, contrasting blocks.
Whether you’re a seasoned quilter or just beginning, the Kite Flight Quilt offers a unique opportunity to create a stunning piece that brings both challenge and beauty to your quilt collection.
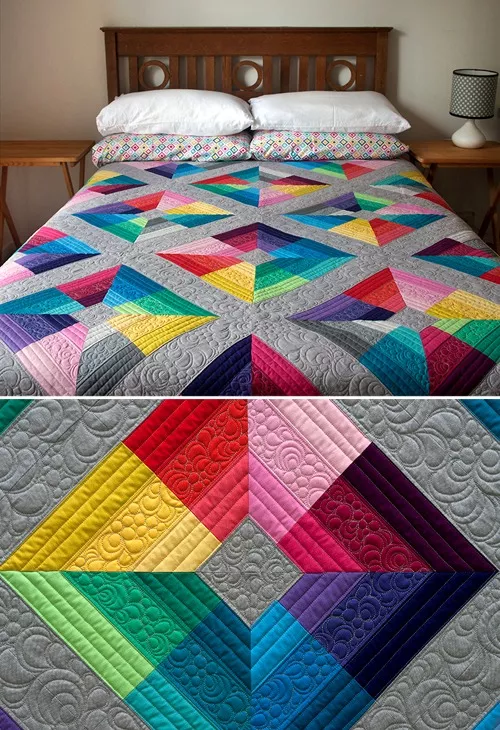
Image from google.
This free pattern gives you the step-by-step instructions to create your own Kite Flight Quilt, complete with tips for fabric choices, cutting instructions, and piecing techniques.
SEE MORE PATTERNS
n this tutorial, we’ll walk through everything you need to know to craft this beautiful quilt, from gathering materials to assembling the blocks and finishing the quilt top.
As you begin this project, remember that quilting is as much about personal expression as it is about technique.
The Kite Flight Quilt provides the perfect canvas to experiment with different colors and fabrics, whether you’re looking for something bold and modern or a more traditional, subdued palette. Let’s dive into the process of creating your own Kite Flight Quilt, step by step.
1. Materials and Tools for the Kite Flight Quilt
Before you start piecing your Kite Flight Quilt, it’s essential to gather the right materials and tools. Having everything ready will streamline the process, allowing you to focus on creating your beautiful quilt without any interruptions.
- Fabric: Start by selecting your fabric. For the Kite Flight Quilt, you’ll need a combination of solid and patterned fabrics. Choose vibrant, contrasting colors for the kite shapes to make them stand out against the background. Consider using quilting cotton as it’s durable and easy to work with.
- Rotary Cutter and Mat: A rotary cutter and cutting mat are crucial tools for this project. They provide precision when cutting your fabric into the required shapes, ensuring that the pieces fit together perfectly.
- Quilting Ruler: A quilting ruler will help you cut your fabric into accurate squares and triangles, which is essential for the clean lines that make up the Kite Flight Quilt design.
- Thread: Choose a strong cotton thread, preferably in a neutral color that will blend well with your fabric choices. A 50-weight thread works best for quilting.
- Sewing Machine: While it’s possible to hand-sew the quilt, using a sewing machine will make the process much faster and more efficient. If you don’t have one, hand-sewing is also a great option, especially for smaller projects.
- Pins or Clips: Use pins or quilt clips to hold the fabric pieces together as you sew. This will ensure your seams align properly and that the fabric doesn’t shift.
Having these materials prepared will set you up for success as you move forward with your Kite Flight Quilt project.
2. Cutting the Fabric for the Kite Flight Quilt
Accurate cutting is one of the most important steps in quilting, and for the Kite Flight Quilt, it’s essential that you cut each piece to the right size. Here’s how to get started with cutting your fabric pieces for this quilt.
- Cutting the Squares: Begin by cutting your fabric into squares. These will serve as the background for your kites. You’ll need several squares of equal size for the quilt blocks. Use a rotary cutter and quilting ruler to ensure each square is precisely measured.
- Cutting the Triangles for the Kites: The kite shapes in the quilt are formed using triangles. Cut fabric for your kites into large squares first, then cut each square diagonally to create two triangles. Be sure to measure carefully to ensure the triangles are symmetrical and fit together perfectly when sewn.
- Background Pieces: The background fabric, which surrounds each kite, should also be cut into squares. These need to fit with the kite triangles to create the overall design of the quilt.
- Checking for Accuracy: As you cut your fabric, always double-check the measurements. Even small discrepancies in size can cause problems when piecing the quilt together, so precision is key.
- Sorting Your Pieces: Once you’ve cut all your fabric, it’s helpful to sort your pieces into piles based on color and type (kite triangles and background squares). This will make the sewing process go much smoother.
- Pre-washing the Fabric: It’s a good idea to pre-wash your fabric to prevent any shrinkage after the quilt is finished. Washing the fabric will also help eliminate any dirt or chemicals that may have been on the fabric when it was manufactured.
With your fabric cut and sorted, you’re now ready to begin piecing the quilt together.
3. Assembling the Kite Flight Quilt Block
Assembling the Kite Flight Quilt involves piecing the fabric together in a way that forms the iconic kite shapes. This step-by-step process will guide you through creating each block for the quilt.
- Sewing the Kite Triangles: Start by aligning two triangles to form a kite shape. Make sure the edges are lined up perfectly, then pin or clip them in place. Sew along the edges using a quarter-inch seam allowance. Press the seam open with an iron.
- Adding the Background Squares: Next, sew the kite piece to the background square. This creates the full block with the kite in the center. Be careful to align the edges of the kite with the background fabric so that the block looks neat and even.
- Constructing Multiple Blocks: Repeat this process to create multiple kite blocks. Depending on the size of your quilt, you will need several blocks. Lay out your blocks on a flat surface to determine how many you’ll need to complete your quilt top.
- Aligning the Blocks: When you’ve pieced together all the blocks, arrange them in rows. You can experiment with different layouts to see how the blocks interact with each other. The Kite Flight Quilt can be arranged in several different ways, so feel free to get creative.
- Sewing the Blocks Together: Once you’re happy with the arrangement of the blocks, sew them together in rows. Use a quarter-inch seam allowance to ensure that the seams align perfectly. Press the seams as you go to keep the quilt top smooth.
- Joining the Rows: After you’ve sewn the rows, join them together to complete your quilt top. Carefully align the seams between the rows and sew them together. Press the seams once more to finish off your quilt top.
At this point, your Kite Flight Quilt blocks should be fully assembled and ready for quilting!
4. Quilting and Finishing Your Kite Flight Quilt
Once your quilt top is assembled, it’s time to move on to quilting and finishing the quilt. This step includes adding batting, quilting the layers together, and binding the edges to give your Kite Flight Quilt a professional finish.
- Choosing Batting: Select a batting material that suits your desired quilt thickness. Cotton batting is a popular choice because it’s breathable and has a nice, soft texture. Lay the batting underneath your quilt top, making sure it’s smooth and free of wrinkles.
- Basting the Quilt: Before quilting, you’ll need to baste the layers of the quilt together. You can use pins or quilt basting spray to hold the top, batting, and backing fabric in place. Be sure to baste carefully to avoid shifting during quilting.
- Quilting the Layers: Quilting can be done by hand or machine. If you’re using a sewing machine, choose a quilting stitch pattern that complements the design of the Kite Flight Quilt. You might opt for straight lines, free-motion quilting, or a combination of both.
- Trimming the Quilt: Once you’ve finished quilting, trim any excess batting and backing fabric around the edges of the quilt. This will give the quilt a neat, even appearance.
- Adding the Quilt Binding: The final step in finishing your Kite Flight Quilt is adding the binding. Cut strips of fabric to create a border for the quilt, and sew them around the edges. Fold the binding over to the back and hand-stitch it in place for a clean, polished finish.
- Final Pressing: Give your finished quilt a final press with an iron to remove any wrinkles and to set the binding in place. Your Kite Flight Quilt is now complete and ready to enjoy!
FAQ: Frequently Asked Questions
1. Can I make the Kite Flight Quilt without a sewing machine?
Yes, you can hand-sew the quilt if you prefer. While a sewing machine makes the process faster, hand-sewing allows you to enjoy a more personal, slower approach to quilting.
2. What fabrics should I use for the Kite Flight Quilt?
It’s best to use quilting cotton, as it is durable, easy to handle, and widely available in a variety of colors and patterns. You can mix solids and prints for a more dynamic look.
3. How many blocks do I need for a full-size quilt?
The number of blocks needed depends on the size of the quilt you want to make. Typically, for a full-size quilt, you will need around 12 to 20 blocks, depending on their size.
4. Can I customize the Kite Flight Quilt pattern?
Yes! Feel free to experiment with different colors, fabrics, and layouts. The Kite Flight Quilt pattern is versatile and can be adapted to suit your personal style.
5. What type of batting should I use for my quilt?
Cotton batting is a popular choice because it’s lightweight, breathable, and soft. However, you can also use polyester or wool batting, depending on the desired texture and warmth.
6. How do I care for my finished Kite Flight Quilt?
To care for your quilt, wash it in cold water on a gentle cycle and dry it on a low heat setting. Avoid harsh detergents to preserve the fabric’s color and quality.
Join our VIP broadcast list and gain access to exclusive patterns, all for free. As a VIP member, you’ll receive the best patterns daily, delivered directly to your device. ✨📱 It’s a unique opportunity to stay up-to-date with the latest trends and designs, curated just for you. Don’t miss out on enhancing your projects and discovering new inspirations with the best patterns every day! 🎨🔝
JOIN NOW
Conclusion
In this tutorial, we’ve walked through the entire process of creating a Kite Flight Quilt, from gathering materials and cutting fabric to assembling the blocks and finishing the quilt. By following these detailed steps, you can create a beautiful quilt that reflects the joy and freedom of flight. We hope this guide has inspired you to give the Kite Flight Quilt a try and make something truly special.
PATTERN HERE
If you have any feedback, questions, or suggestions, feel free to leave a comment below. We’d love to hear your thoughts on this project and any ideas for future tutorials. Happy quilting!


