
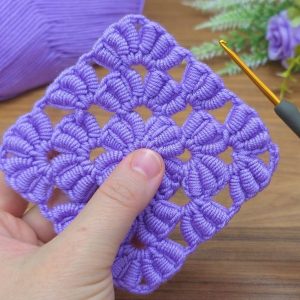
Crochet Multi-Purpose Blouse, Shawl, Runner Model

Crochet fairy houses are an enchanting and whimsical craft that brings a magical touch to your home decor. These little crochet creations evoke images of fairies and woodland creatures living in charming homes made from yarn and imagination.
In this article, we will explore a variety of ideas for creating crochet fairy houses, share a step-by-step video tutorial, and offer tips and tricks to make your fairy house crochet project a delightful success.
Whether you’re a beginner looking to try your hand at crochet or an experienced crafter, the beauty of crochet fairy houses is that they can be customized to suit your personal style and preferences.
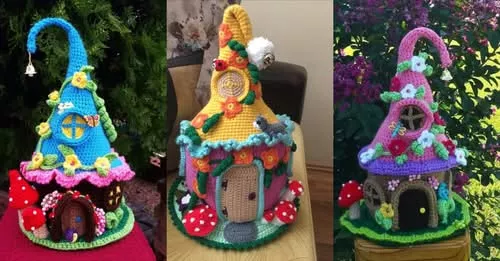
Image from google.
From simple cottages to elaborate castles, the possibilities are endless. Let’s dive into some creative ideas and learn how to make your very own crochet fairy house.
As you follow along with this guide, you will be introduced to different techniques for constructing these adorable houses, from choosing the right yarn to adding magical details like windows, doors, and roofs.
With a few basic crochet stitches, you’ll be able to create miniature homes that are perfect for display, gifting, or incorporating into a larger fantasy-themed project.
The first step in creating your crochet fairy houses is deciding on the design. There are so many creative possibilities when it comes to these little homes, and the beauty of crochet is that you can experiment with various shapes, sizes, and details to bring your vision to life. Here are some fun ideas to inspire your crochet fairy house project.
A mushroom-shaped fairy house is a delightful and whimsical choice. Using different shades of red, white, and brown yarn, you can create a mushroom with a curved cap and a sturdy stem. This charming little house is perfect for a forest or woodland-themed crochet project.
For a more traditional fairy home, a cozy crochet cottage is a fantastic option. You can crochet a small rectangular or square house with a thatched roof, and add little details like a stone chimney, windows, and a tiny door. Use pastel yarns for a soft and inviting look.
For a grander design, try crocheting a fairy castle. A tall, cylindrical tower can be made using simple crochet stitches, and you can embellish it with little flags, turrets, and balconies. This is a perfect idea for anyone who loves fantasy and wants to create a magical castle for their fairies.
A treehouse fairy home is a great idea for bringing nature into your crochet project. You can use a combination of earthy brown and green yarn to create a tree trunk and leaves, making the house appear as if it’s nestled within a tree. Add little crochet ladders or steps for added charm.
If you love flowers, try creating a flower cottage. Crocheted flowers can be sewn onto the walls of the house, creating a vibrant and colorful design. This type of house can also be made in various shapes, such as round or hexagonal, and adorned with floral garlands.
For a more elaborate project, consider making multiple crochet fairy houses to create a fairy village. Each house can have its own unique design, and you can place them on a crocheted base that looks like a garden or meadow. This will allow you to build a beautiful scene that is full of charm.
Once you’ve decided on the design for your crochet fairy houses, it’s time to gather your materials. Choosing the right yarn, tools, and accessories will make your project more enjoyable and ensure the best results.
For crochet fairy houses, you’ll want to select yarn that is durable yet flexible. Acrylic yarn works well for its versatility and ease of care, while cotton yarn is a great option for a more textured and sturdy finish. You can experiment with different yarn weights to achieve the desired look. Lighter weights, such as DK (double knit) yarn, are ideal for small, detailed crochet houses.
The size of the crochet hook you use will depend on your yarn weight. Generally, a 3.5mm to 4mm hook works well for most DK-weight yarns. If you prefer a firmer and denser fabric for your houses, consider using a slightly smaller hook to achieve a tighter stitch.
To make your crochet fairy houses even more enchanting, you can incorporate other materials like beads, buttons, or fabric. These embellishments can be used for windows, doors, or even as tiny decorations around the house. You can also use metallic or glitter yarns to add a touch of sparkle and magic.
You’ll need a small sewing needle to weave in the ends of your yarn after finishing your crochet pieces. A tapestry needle is also useful for adding any decorative details such as flowers or vines, making it easier to sew things into place.
Some designs may require a bit of stuffing to give your crochet fairy house structure and depth. Polyester fiberfill works well for this, as it is lightweight and easy to work with. This is particularly useful if you’re making a more three-dimensional fairy house.
For more elaborate fairy houses, you may want to use fabric for roofs or other design elements. Felt is a great option for creating roof shingles or doors that have a different texture than crochet. You can easily cut felt into shapes and sew them onto your crocheted pieces.
Now that you have your materials ready, let’s go through a simple video tutorial for making a basic crochet fairy house. Follow the steps below, and you’ll have a charming little house to add to your collection in no time.
Begin by crocheting a small circle to form the base of your fairy house. Use a magic ring and work in continuous rounds, increasing the number of stitches as you go to create a flat, circular base. This will serve as the foundation for the walls of your house.
Once you have the base, switch to working in the round to form the walls of your house. Use a simple single crochet stitch and continue until the walls reach the desired height. If you’re making a mushroom house or cottage, you can change colors or add texture as you work to give the walls character.
To create the roof of your crochet fairy house, you can either crochet a flat circular or a peaked roof. If you want a peaked roof, work in decreases to form a triangle shape. For a flat roof, continue working in the round until it reaches the desired size.
Now it’s time to add magical details! Crochet small windows and doors to sew onto the house. You can use a contrasting color for these elements to make them stand out. Additionally, crochet little flowers, vines, or even a tiny doormat to give your fairy house some personality.
Once all your pieces are crocheted, sew the roof to the walls and attach any embellishments like windows and doors. Use a tapestry needle to weave in the ends of your yarn neatly. If you’re adding stuffing, do this before sewing everything together.
Finally, add any finishing touches, such as buttons, beads, or small crochet items to enhance the design. Press the house lightly with an iron to set the shape, and your crochet fairy house is complete!
Creating crochet fairy houses is an incredibly creative process, and there are many ways to make your designs stand out. Here are some helpful tips for adding your personal touch to your crochet projects.
While traditional fairy houses are often made in earthy tones, don’t be afraid to experiment with bold or unconventional yarn colors. Bright pinks, purples, or blues can create a more fantastical and otherworldly look for your fairy homes.
Try using textured stitches such as bobbles or puff stitches to add depth to your crochet fairy house. This will give the house a more interesting appearance and make it stand out from simpler designs.
Pair your crochet fairy houses with crocheted flowers, mushrooms, and trees to create a magical fairy garden scene. This is a fun way to expand your project and make a whimsical display.
If you love working in tiny detail, create miniature crochet fairy houses that are perfect for display on shelves or in terrariums. These small-scale designs can be a charming way to decorate your home.
To make your crochet fairy house even more enchanting, consider adding glow-in-the-dark yarn or embellishments. This can make your house appear to glow softly in the dark, adding an extra layer of magic.
Crochet fairy houses make wonderful gifts for friends and family. You can customize each house to reflect the recipient’s personality, making it a thoughtful and personalized present.
Q: Can I make a crochet fairy house without a pattern?
A: Yes! Crochet fairy houses are versatile and allow for creativity. You can create your own design by starting with basic crochet shapes and adding details like windows, doors, and roofs.
Q: What type of yarn should I use for crochet fairy houses?
A: Acrylic or cotton yarn is ideal for crochet fairy houses. Choose a yarn that complements your design and gives the structure the right amount of firmness or softness.
Q: Are crochet fairy houses suitable for beginners?
A: Absolutely! Basic crochet fairy houses can be made using simple stitches like single crochet and slip stitches. You can start with a basic design and gradually add more details as you become more comfortable.
Join our VIP broadcast list and gain access to exclusive patterns, all for free. As a VIP member, you’ll receive the best patterns daily, delivered directly to your device. ✨📱 It’s a unique opportunity to stay up-to-date with the latest trends and designs, curated just for you. Don’t miss out on enhancing your projects and discovering new inspirations with the best patterns every day! 🎨🔝
In this article, you’ve learned how to create your very own crochet fairy houses with a variety of creative ideas and a step-by-step tutorial. From selecting materials to adding details, each step allows for plenty of personal flair and customization. With the right yarn, stitches, and embellishments, your crochet fairy house can become a charming addition to your home or a unique gift.
We hope this guide has inspired you to begin your crochet journey and make magical homes for your fairies. Please leave a comment below to share your thoughts or any suggestions for future tutorials! Happy crocheting!


