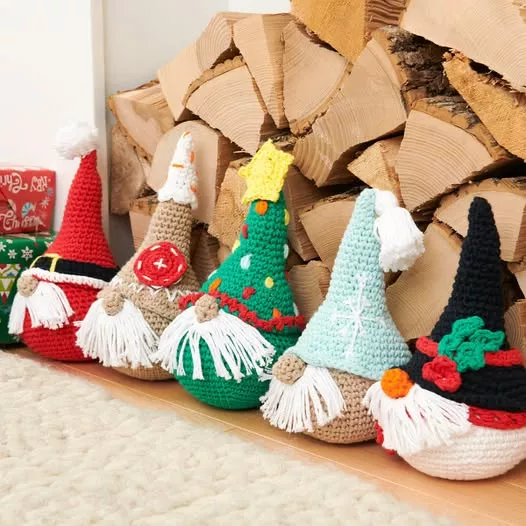
Crochet Christmas Baubles Pattern: Santa, Elf, Reindeer is a fun and festive way to bring holiday cheer to your home.
Whether you’re a seasoned crochet enthusiast or just beginning, these adorable baubles make the perfect addition to your Christmas tree decorations.
With a combination of classic holiday characters like Santa, the Elf, and a Reindeer, you can create unique, handmade ornaments that will brighten up your tree and spread holiday joy.
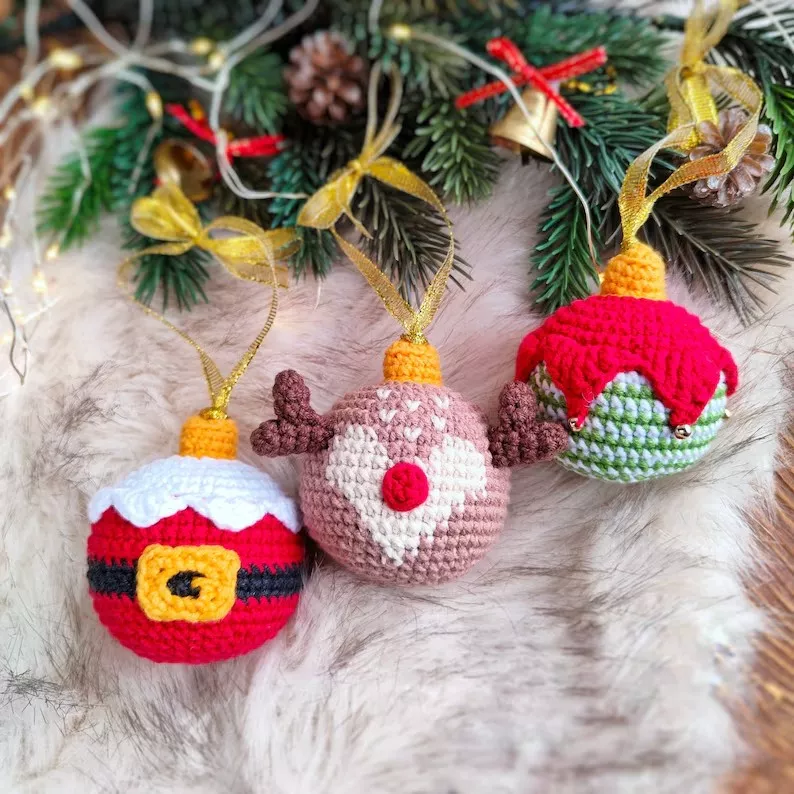
Image from google.
Each of these baubles can be customized in different ways, allowing you to choose your favorite colors and embellishments.
SEE MORE PATTERNS
The best part? This pattern is easy to follow, and it provides clear steps to help you crochet each bauble with ease. Whether you’re looking for a fun family project or a special handmade gift, Crochet Christmas Baubles Pattern: Santa, Elf, Reindeer has got you covered. Let’s dive into the details of these adorable holiday characters and how to crochet them!
As you work through this pattern, you’ll notice that crochet allows you to add a personal touch to each ornament.
You can experiment with colors, sizes, and textures to make each bauble unique. The combination of these three Christmas characters ensures that your tree will look vibrant and whimsical, and the best part is that you’ll have the joy of knowing you made them with your own hands.
Before jumping into the specifics of each bauble, let’s take a look at the essential materials you’ll need to complete this project. With the right tools and yarn, you’ll be ready to bring these Crochet Christmas Baubles to life!
1. Materials Needed for Crochet Christmas Baubles
To get started with your Crochet Christmas Baubles Pattern: Santa, Elf, Reindeer, you’ll need a few basic materials. Here’s what you’ll need to gather before starting the project:
- Yarn
Choose yarn that is suitable for amigurumi (crochet toys). Cotton yarn works great for these baubles, but you can also use acrylic yarn for a softer texture. You’ll need several colors to make the Santa, Elf, and Reindeer: red, white, green, brown, and black are essential, along with optional colors for extra details like skin tone and scarf.
- Crochet Hook
A 3.5mm to 4mm crochet hook is ideal for creating the right tension and size for your ornaments. If you prefer, you can use a smaller hook if you want tighter stitches for a more detailed appearance.
- Stuffing
To give your baubles their round shape, you’ll need some soft, lightweight stuffing. Polyester fiberfill works best for this purpose, but any suitable stuffing will do. It helps to give your crochet ornaments a soft, 3D look.
- Scissors
You’ll need a good pair of scissors to cut the yarn once you’ve completed each section. Always keep them handy as you work through each step.
- Stitch Markers
Stitch markers are especially useful when working in rounds. They help you keep track of the beginning of each round, ensuring that your work remains even and properly shaped.
- Yarn Needle
After completing each bauble, you’ll need a yarn needle to weave in the loose ends. This step is essential for securing your work and finishing your baubles neatly.
Now that you have your materials ready, let’s move on to the specific patterns for each of the Christmas characters: Santa, Elf, and Reindeer.
2. Crocheting the Santa Bauble
The Santa Bauble is a classic Christmas decoration that brings the jolly spirit of Santa Claus into your home. Here’s how you can crochet this adorable ornament:
- Start with a Magic Ring
Begin by creating a magic ring with your white yarn. This will form the base of Santa’s head and body.
- Round 1: Making the Head
Crochet 6 single crochet (sc) stitches into the magic ring and tighten it. This will form a small circle to shape the head of your Santa bauble.
- Round 2: Increase Stitches
For the next round, increase each stitch around, creating 12 stitches. This gives the head more volume and forms the basic structure.
- Round 3: Forming the Body
Switch to red yarn for Santa’s coat. Crochet a few rounds in the red yarn to form the body of Santa. Increase stitches as needed to create a slightly larger body, and keep it a little smaller than the head to give the bauble a cute proportion.
- Adding the Hat and Details
Crochet Santa’s hat by working with the red yarn and adding a white brim. You can make the brim by crocheting a few rounds in white yarn and then attaching it to the top of the bauble.
- Finishing Touches
Add a small black bead or button for Santa’s eyes and embroider a simple nose with pink or brown yarn. Don’t forget to add a fluffy white pom-pom on the tip of his hat!
Now that you’ve completed Santa, let’s move on to the next fun Christmas character: the Elf.
3. Crocheting the Elf Bauble
The Elf Bauble brings a playful and whimsical touch to your Christmas decorations. Here’s how to crochet this cute little elf:
- Start with a Magic Ring
Begin by crocheting a magic ring using green yarn. This will form the elf’s hat.
- Round 1: Making the Hat
Crochet 6 single crochet stitches into the magic ring. Increase in each stitch to form a small circle for the top of the elf’s hat.
- Round 2: Add the Hat Brim
Switch to a contrasting color like red or white for the brim of the hat. Make a few rounds to create a sturdy brim, ensuring it’s wide enough to give the elf’s hat a classic shape.
- Creating the Body
Switch to green yarn for the elf’s body. Crochet several rounds in green to form the elf’s outfit. You can create a cute pointed collar by switching to red yarn.
- Adding the Elf’s Face
Use small black beads for the eyes and a simple pink stitch for the nose. You can also embroider a smile with black thread to give the elf a cheerful expression.
- Finishing the Bauble
To finish, crochet the elf’s pointed shoes using brown yarn and add small decorative buttons on the front. You can also make a small pom-pom to attach at the top of the elf’s hat for extra charm!
Finally, let’s move on to the third character: the Reindeer.
4. Crocheting the Reindeer Bauble
The Reindeer Bauble is another classic Christmas figure that adds charm to your holiday decor. Here’s how to crochet this adorable reindeer ornament:
- Start with a Magic Ring
Create a magic ring with brown yarn to form the reindeer’s head. Crochet 6 single crochet stitches into the magic ring to start shaping the head.
- Round 1: Shaping the Head
Increase each stitch in the round to form a slightly larger circle for the reindeer’s head.
- Making the Antlers
Crochet small branches using tan or brown yarn for the reindeer’s antlers. Attach these to the top of the head.
- Creating the Body
Switch to a slightly darker brown yarn and crochet the reindeer’s body. Keep it slightly smaller than the head for a cute, rounded look.
- Adding Features
Use black beads or small crochet stitches to create the eyes, and embroider a red nose to make your reindeer look just like Rudolph! You can also add a small bell around its neck.
- Finishing Touches
Finish by adding a small scarf or collar for your reindeer using red or green yarn, and then stuff the ornament lightly to give it some shape.
Now that you’ve completed the Santa, Elf, and Reindeer baubles, it’s time to put them on display!
FAQ
1. Can I use other colors for these baubles?
Yes! Feel free to experiment with different color combinations to make each bauble unique. You can use pastel colors, metallic yarns, or even glittery threads for a more festive look.
2. How long does it take to make one bauble?
It usually takes around 1-2 hours to complete each bauble, depending on your crochet skill level. You can make several in a single afternoon!
3. Can these baubles be used for other decorations?
Definitely! In addition to hanging them on your Christmas tree, you can also use these baubles as gift toppers, table centerpieces, or even attach them to wreaths for extra holiday cheer.
4. What yarn is best for this project?
Cotton or acrylic yarn works well for these baubles. Choose yarn that is not too thick, as this will help your baubles maintain a good shape.
Join our VIP broadcast list and gain access to exclusive patterns, all for free. As a VIP member, you’ll receive the best patterns daily, delivered directly to your device. ✨📱 It’s a unique opportunity to stay up-to-date with the latest trends and designs, curated just for you. Don’t miss out on enhancing your projects and discovering new inspirations with the best patterns every day! 🎨🔝
JOIN NOW
Conclusion
In this article, we’ve walked through how to create Crochet Christmas Baubles Pattern: Santa, Elf, Reindeer, including all the materials, stitches, and techniques you need to make your own festive decorations. These crochet baubles add a personal touch to your holiday celebrations and are a perfect way to spread joy. Whether you keep them for yourself or gift them to others, these adorable ornaments are sure to bring smiles to everyone who sees them.
PATTERN HERE
We hope you enjoyed this crochet tutorial! Let us know how your baubles turned out and share any tips or suggestions you might have for others in the comments below. Happy crocheting and Merry Christmas!


