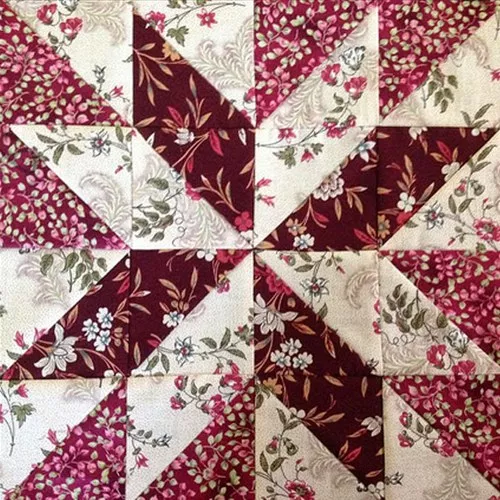
Hunter’s Star Quilt Block is a stunning and versatile pattern that can add depth and beauty to any quilt project.
This intricate-looking design may seem complicated at first, but with a little patience and the right approach, you can create it quickly and easily.
Advertising
The Hunter’s Star block features diamond shapes that create a star pattern, perfect for a variety of quilting projects, from bed quilts to wall hangings and everything in between.
Image from google.
In this tutorial, we’ll walk you through the process of making this block, providing you with all the tips and tricks you need to succeed.
Quilting is a rewarding hobby that allows you to create beautiful, handmade treasures for your home or as gifts for loved ones.
One of the best things about quilting is that you can experiment with different block patterns, colors, and layouts to make each quilt uniquely yours. The Hunter’s Star Quilt Block is a great choice for quilters of all skill levels because it combines both simplicity and visual impact.
Advertising
In this article, you’ll learn step-by-step instructions on how to make the Hunter’s Star Quilt Block. We’ll cover everything from fabric choices to cutting and piecing techniques, ensuring that you can create this block with confidence. Let’s dive into the process and get started on your next quilting project!
1. Materials Needed for the Hunter’s Star Quilt Block
Before we dive into the tutorial, let’s take a look at the materials you’ll need to complete the Hunter’s Star Quilt Block. Having everything ready will make the process smooth and enjoyable.
Fabric
Choose fabrics in contrasting colors to create the star effect. You’ll need two different fabrics: one for the stars and one for the background. Consider using quilting cotton, which is easy to work with and comes in a wide variety of patterns and colors.
Rotary Cutter and Cutting Mat
A rotary cutter and cutting mat will help you cut your fabric pieces precisely. Accuracy is key when piecing together a Hunter’s Star Quilt Block, so be sure to use these tools to ensure clean, straight edges.
Quilt Ruler
A quilting ruler will help you measure and cut your fabric pieces accurately. It’s especially helpful when working with small pieces that need to align perfectly.
Sewing Machine
You’ll need a sewing machine to stitch together your fabric pieces. If you’re using a walking foot, it can help ensure smooth sewing, especially when working with multiple layers of fabric.
Thread
Choose a thread that matches your fabric or a neutral color to keep the seams less noticeable. Cotton thread is commonly used for quilting projects.
Pins or Clips
To keep your fabric pieces in place while you sew, use pins or quilting clips. These will help prevent your fabric from shifting as you sew, ensuring that your blocks come out evenly.
2. How to Cut the Fabric for the Hunter’s Star Block
Now that we have the materials ready, let’s get into the first step: cutting your fabric. Proper cutting is crucial for achieving the best results with your Hunter’s Star Quilt Block.
Cut the Background Fabric
Start by cutting the background fabric into squares. You’ll need a square for each block you plan to make. The size of the square will depend on the pattern you’re using, but generally, it should be larger than the finished size of your block, allowing for seam allowances.
Cut the Star Points
Next, cut the fabric for the star points. These pieces will be sewn into triangles that form the star’s points. Make sure you cut these triangles accurately to ensure the star points align perfectly when pieced together.
Cut the Center Pieces
The center of the Hunter’s Star Quilt Block is a square that will be surrounded by the star points. Cut this fabric from a contrasting color to help the star stand out against the background fabric.
Cut the Corner Pieces
For the corners of the star, cut small square pieces from your background fabric. These will be sewn into the block to form the outer edges of the star.
Make Half-Square Triangles
To create the star points, you will need to make half-square triangles. Cut the fabric for these triangles and pair them with the star fabrics to create the desired look.
Trim All Pieces
Once all your pieces are cut, take a moment to trim any edges that may be uneven. Neat, straight edges will make piecing your Hunter’s Star Quilt Block much easier and result in a more polished finished product.
3. Assembling the Hunter’s Star Quilt Block
Now that your fabric pieces are ready, it’s time to start piecing your Hunter’s Star Quilt Block. Follow these steps to assemble the block:
Sew the Half-Square Triangles
Begin by sewing the half-square triangles. Place two pieces of fabric right sides together and sew along the diagonal line. Then, trim the excess fabric and press the seam open to create the triangle shape.
Sew the Star Points
Once you’ve completed the half-square triangles, sew them together to form the star points. Arrange the pieces in the pattern you want and stitch them together to create the outer edges of the star.
Sew the Center Square
Next, sew the center square to the star points. This piece will form the core of the Hunter’s Star Quilt Block and should align perfectly with the surrounding triangles.
Join the Rows
Arrange the star points and center square in rows, then sew the rows together. Be sure to align the edges carefully to maintain the star shape as you piece the block together.
Press the Seams
Once all the rows are sewn together, press the seams flat. Pressing helps set the stitches and ensures that your quilt block lies flat and even.
Trim the Block
After assembling the block, trim the edges to make sure the block is the correct size. Use a quilting ruler to measure the block and trim any uneven edges.
4. Tips for Success When Making the Hunter’s Star Quilt Block
Making the Hunter’s Star Quilt Block can be a fun and rewarding project, but it’s important to keep a few tips in mind to ensure your success:
Be Precise with Cutting
Accurate cutting is crucial for achieving clean lines and perfect points. Use a rotary cutter and ruler to make sure your fabric pieces are the correct size.
Use a Quarter-Inch Seam
A consistent quarter-inch seam is essential for accurate piecing. If you don’t have a quarter-inch foot for your sewing machine, use masking tape to mark a guide on your machine for a perfect seam.
Pin or Clip Pieces Together
Pinning or clipping your fabric pieces together before sewing helps ensure that the fabric stays in place and aligns properly. This is especially important when piecing small pieces together.
Press Seams Open
Pressing seams open, rather than to one side, can help reduce bulk and create a smoother, more even quilt block.
Take Your Time
Although the Hunter’s Star Quilt Block may seem complicated, it’s a manageable project when broken down into steps. Take your time and enjoy the process of creating this beautiful block.
Try Different Color Combinations
Experiment with different color schemes to create a unique look for your quilt. The Hunter’s Star Quilt Block can look striking with bold colors or soft pastels—choose what best fits your style.
FAQ
1. How do I make the Hunter’s Star Quilt Block smaller or larger?
To resize the Hunter’s Star Quilt Block, simply adjust the dimensions of your fabric pieces. Make sure to keep the same proportions between the star points and the background fabric for the design to work.
2. Can I use different fabrics for the star points?
Yes! You can mix and match different fabrics for the star points to create a more colorful and dynamic block. Just make sure the colors complement each other.
3. Is this pattern suitable for beginners?
The Hunter’s Star Quilt Block is suitable for beginners with basic quilting knowledge, such as how to sew straight seams and press fabric. It may take some time, but with patience, anyone can make this block.
4. How many blocks do I need for a quilt?
The number of blocks you need depends on the size of the quilt you want to make. A standard lap quilt may require 20-30 blocks, while a full-size quilt may require 50 or more.
5. Can I make a Hunter’s Star quilt without a sewing machine?
While a sewing machine is recommended for efficiency, it’s possible to make the Hunter’s Star Quilt Block by hand if you prefer hand stitching.
6. Can I make the Hunter’s Star block in different colors for a modern look?
Yes! Using a variety of colors can give the Hunter’s Star Quilt Block a more modern or eclectic look. Feel free to experiment with bold or contrasting colors to make the star pop.
Join our VIP broadcast list and gain access to exclusive patterns, all for free. As a VIP member, you’ll receive the best patterns daily, delivered directly to your device. ✨📱 It’s a unique opportunity to stay up-to-date with the latest trends and designs, curated just for you. Don’t miss out on enhancing your projects and discovering new inspirations with the best patterns every day! 🎨🔝
In this Hunter’s Star Quilt Block – Quick & Easy Tutorial, we’ve covered the materials needed, how to cut and assemble the block, and helpful tips to ensure your success. Whether you’re new to quilting or an experienced quilter, this block is sure to add a beautiful and intricate design to your next quilt.
VIDEO TUTORIAL:
We’d love to hear your thoughts! Leave a comment below with your favorite quilting tips or suggestions, and feel free to share photos of your Hunter’s Star Quilt Block creations. Happy quilting!


