CROCHET TABLE SETTING - step by step Crochet Tutorial
Advertising
A Crochet Table Setting is a beautiful and creative way to add a personal touch to your dining experience.
Whether you’re preparing for a festive meal or simply enhancing the look of your everyday table, a crochet setting can bring charm, warmth, and elegance to your home.
This step by step crochet tutorial will guide you through the process of creating stunning crochet table settings, from placemats to coasters, giving your table a handmade, cozy feel.
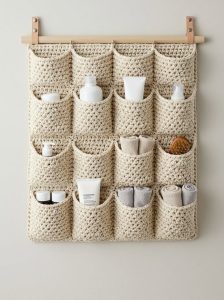
Image from google.
Crocheting your own table accessories is not only rewarding but also a wonderful way to showcase your creativity and style.
The beauty of crochet lies in its versatility, allowing you to experiment with colors, patterns, and textures to suit any occasion or season.
In this tutorial, you will learn how to make a crochet table setting from start to finish, with easy-to-follow instructions and helpful tips.
As you follow along, you’ll find that creating a crochet table setting is a simple and enjoyable task, even for beginners.
By the end of this guide, you will have a beautifully crafted set that can be used for both everyday meals and special occasions. Let’s dive into this exciting crochet project!
Advertising
1. Gathering Your Materials for the Crochet Table Setting
Before starting your Crochet Table Setting, it’s important to gather all the materials you’ll need. Proper preparation ensures that the project flows smoothly, and you’ll have everything you need at your fingertips.
Yarn Selection: Choose a yarn that is both soft and durable, such as cotton or acrylic. These materials are perfect for table settings, as they are easy to care for and withstand frequent use.
Crochet Hook: Select a crochet hook that is suitable for your chosen yarn. Typically, a 3.5mm to 5mm hook works well with most medium-weight yarns, but refer to your yarn label for the recommended hook size.
Scissors: Keep a pair of sharp scissors nearby to trim yarn ends as you work.
Measuring Tape: For consistent sizing, especially if you’re creating matching placemats or coasters, use a measuring tape to ensure each piece is the same size.
Stitch Markers: If you’re working with complex patterns, stitch markers can help you keep track of your stitches and rows.
Tapestry Needle: A tapestry needle is essential for weaving in the loose yarn ends once your pieces are complete.
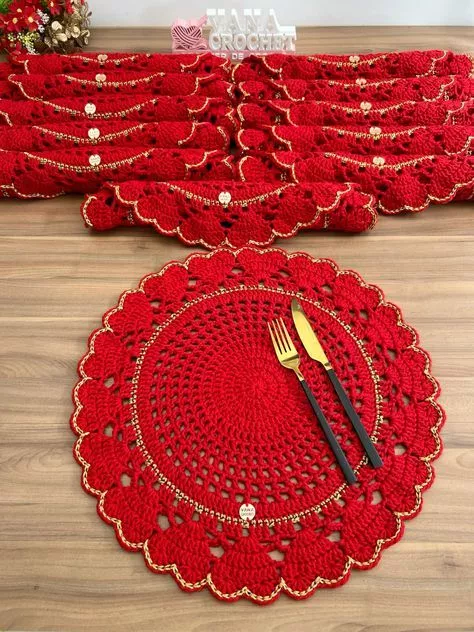
2. Crochet Placemats: Creating a Foundation
The first piece in your Crochet Table Setting is the placemat. Placemats provide a functional yet decorative foundation for your table setting. Here’s how to create a simple, classic crochet placemat:
Starting with a Foundation Chain: Begin by making a foundation chain that matches the desired width of your placemat. A chain of around 30-40 stitches will give you a nice, medium-sized placemat, but adjust it according to your needs.
Choosing the Stitch Pattern: For a simple yet elegant look, you can use basic stitches such as single crochet or half double crochet. A popular stitch pattern for placemats is the double crochet stitch, which creates a nice texture and allows the placemat to have a slight thickness.
Work in Rows: Once you’ve completed your foundation chain, continue crocheting in rows. Each row should be worked back and forth, ensuring your stitch count remains consistent.
Switching Colors (Optional): If you want to add some flair to your placemat, consider changing yarn colors after a few rows. You can alternate between colors or create stripes to add dimension and interest.
Creating the Desired Size: Continue crocheting until your placemat reaches the length you want. Typically, placemats range from 12 to 18 inches in length, but feel free to adjust according to your table size.
Finishing the Edges: To give your placemat a neat, polished look, finish the edges with a round of slip stitches or a simple border using your chosen yarn.
3. Crochet Coasters: Adding the Perfect Touch
Next, let’s create crochet coasters to complete your Crochet Table Setting. Coasters are small but important pieces that help protect your table from cup rings while adding a touch of elegance.
Starting the Coaster: Begin by making a small magic ring, or alternatively, a foundation chain and join it into a circle. The size of the magic ring should be small—around 2-3 inches in diameter to fit a standard cup.
Crocheting in the Round: Work in the round using a circular stitch pattern such as double crochet or treble crochet. Increase in each round by making two stitches in the same stitch to expand the coaster’s size evenly.
Switching Yarn for Variety: Like with the placemats, you can switch colors after every few rounds to create a striped pattern. This is a great way to make each coaster unique.
Adding Texture: For added texture, experiment with different stitch types such as bobbles, shells, or cluster stitches. These create a more intricate look and make the coaster stand out.
Finishing the Coaster: Once your coaster is the desired size, finish off by joining the last stitch with a slip stitch and fastening off. Weave in any loose yarn ends with a tapestry needle.
Making Multiple Coasters: To complete your table setting, make a set of coasters that match your placemats. Typically, a set of four to six coasters works well for most tables.
4. Crochet Napkin Rings and Other Decorative Touches
To complete your Crochet Table Setting, consider adding crochet napkin rings and other small decorative touches that will elevate the overall look. Here’s how to make crochet napkin rings:
Creating a Foundation Ring: Begin by crocheting a small ring to fit around the napkin. A foundation chain of 10-15 stitches should be enough to form a circle that comfortably fits a rolled napkin.
Crocheting the Ring: Work in the round to form the ring, using a simple stitch such as single crochet or slip stitch. You can also use a decorative stitch to add texture and style.
Adding a Decorative Element: Enhance your napkin ring by adding a small crochet flower, leaf, or other embellishment. This will give your table setting a more polished and elegant look.
Finishing the Ring: Once your ring is the desired size and the embellishments are attached, finish off by weaving in the loose ends.
Customizing for Seasons: If you’re creating a crochet table setting for a specific season, consider using seasonal colors or motifs. For example, use red and green for Christmas or pastels for spring.
Other Decorative Pieces: You can also create small crochet bowl covers, placemat holders, or even crochet flowers as centerpieces for your table.
FAQ About Crochet Table Settings
1. Can I use different yarns for my table setting?
Yes, you can use different yarns to create variety and texture. Just make sure to choose yarns that are durable and easy to care for, such as cotton or acrylic.
2. How long does it take to create a full crochet table setting?
The time it takes depends on your experience and the complexity of the designs, but a basic crochet table setting can typically be completed in 8-12 hours.
3. Can I wash my crochet table setting?
Yes, if you use cotton yarn, you can machine wash the pieces, but always check the care instructions on your yarn label. Acrylic yarns are generally machine washable as well.
4. Can I add personalized elements to my crochet table setting?
Absolutely! You can add embroidered names, initials, or other personal touches to your crochet pieces, making your table setting unique.
5. How do I make sure my crochet pieces are the right size?
Use a measuring tape to check the dimensions as you crochet. Consistently check your rows and stitches to ensure your pieces match your desired size.
6. Is crochet a beginner-friendly project?
Yes, crochet is an ideal project for beginners. Start with simple stitches and designs, and you can gradually work your way up to more complex patterns.
Join our VIP broadcast list and gain access to exclusive patterns, all for free. As a VIP member, you’ll receive the best patterns daily, delivered directly to your device. ✨📱 It’s a unique opportunity to stay up-to-date with the latest trends and designs, curated just for you. Don’t miss out on enhancing your projects and discovering new inspirations with the best patterns every day! 🎨🔝
Creating a Crochet Table Setting is a wonderful way to bring warmth, personality, and charm to your dining space. From placemats and coasters to napkin rings, this step-by-step tutorial has provided you with the tools and techniques to craft a beautiful table setting that you can enjoy for years to come.
VIDEO TUTORIAL
If you’ve enjoyed this tutorial or have any tips to share, please leave a comment below. We’d love to hear your thoughts and suggestions for future projects!


