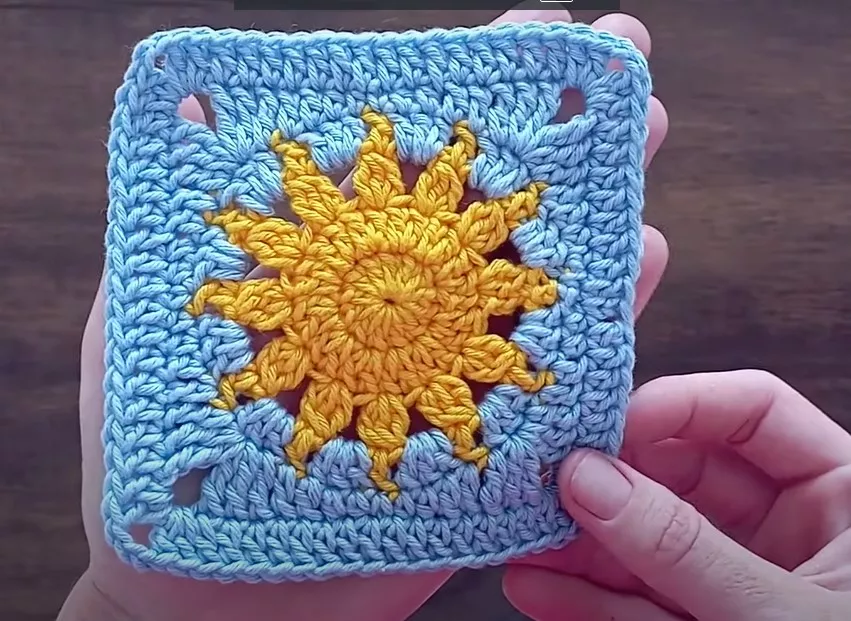
If you are looking to create a stunning crochet piece, the Crochet Square Sun Step by Step! guide is the perfect project to try.
This pattern is ideal for crocheters of all skill levels, and its bright, radiant design brings a cheerful touch to any creation. Whether you are making a blanket, a cushion cover, or a wall hanging, the sun motif can add a beautiful and vibrant element to your crochet projects.
Advertising
In this article, we will walk you through every step of the way to crochet a perfect square sun design. From selecting your materials to the final finishing touches, you will learn how to master the technique and create a stunning piece that will catch the eye.
Image from google.
The beauty of this pattern lies in its simplicity and the way it can be customized to suit your preferences, whether you want bold colors or a more subtle pastel theme. By following this step-by-step guide, you’ll be able to make the Crochet Square Sun with ease.
The Crochet Square Sun Step by Step! pattern is not just easy to follow, but it also opens the door to creativity. You can experiment with different yarns, colors, and textures to make this design truly unique. Now, let’s dive into the tutorial to help you create your own version of the Crochet Square Sun.
1. Materials You Will Need for the Crochet Square Sun Step by Step!
Before we begin crocheting the sun square, it’s important to gather all the necessary materials. Having the right tools ensures a smooth crochet experience and helps you achieve a professional-looking result.
Advertising
Yarn: The choice of yarn is essential for the finished look of your Crochet Square Sun. Opt for a medium-weight yarn, such as worsted weight, which gives your work structure while still being soft and easy to work with. Choose bright and cheerful colors like yellow, orange, or even a gradient of colors for a striking effect.
Crochet Hook: A 4mm or 5mm crochet hook is recommended for this pattern. If you’re using a different yarn weight, you may need to adjust the hook size accordingly. The hook size plays a big role in achieving the right tension for your stitches.
Scissors: Keep a sharp pair of scissors handy to cut your yarn when needed. This will help you avoid fraying and keep your work neat.
Yarn Needle: After finishing your square, you’ll need a yarn needle to weave in the loose ends and tidy up your piece.
Stitch Markers: These are useful to help keep track of your rounds. Marking your first stitch in each round ensures that you won’t lose your place and that the pattern remains even.
Tape Measure: A tape measure is optional but can be helpful to ensure your square is the correct size, especially if you are planning to join multiple squares together for a larger project like a blanket.
2. Starting Your Crochet Square Sun Step by Step!
Now that you have your materials ready, it’s time to start crocheting! Here’s how to begin the Crochet Square Sun Step by Step! pattern:
Creating the Magic Ring: The first step in this pattern is to create a magic ring. This allows you to start your crochet piece in the center and work outwards, creating a clean and tight foundation for your sun square.
Round 1 – Starting the Sun Center: Begin with a chain 4 and join to form a ring. Then, crochet 12 double crochet stitches into the ring, pulling the tail of the yarn tight to close the center. This will create the center of your sun.
Round 2 – Forming the Sun’s Rays: For the second round, create a chain of 3 to begin each ray. Then, crochet a set of double crochets to form the rays, spacing them evenly around the ring. You’ll create 12 rays, giving your sun its characteristic sunburst look.
Round 3 – Adding More Texture: To make your sun square more vibrant, continue adding another layer of stitches around the rays. This round will add more texture and help the rays pop out, giving your square a radiant, dynamic look.
Round 4 – The Sun’s Shape: In this round, you will start crocheting the square edges. You’ll alternate between crocheting the sun rays and building the straight sides of the square. The contrast between the sun’s rays and the square edges will add definition and structure to the piece.
Round 5 – Completing the Square: Finally, finish off the square with a round of single crochet stitches along the edges to create a neat and sturdy border. This will ensure that your Crochet Square Sun holds its shape and is ready for display or further use.
3. Customizing Your Crochet Square Sun Step by Step!
Once you have completed the basic pattern, it’s time to add your personal touch! Here are some ideas on how to customize the Crochet Square Sun to make it truly yours:
Color Variations: The sun is often associated with bright, bold colors, but don’t be afraid to experiment. Try using a gradient of yellow, orange, and red for a fiery sun or go for pastel shades like pale yellow and light pink for a softer effect.
Textured Edging: You can add additional texture to your square by working a different stitch into the edging. A scalloped or shell stitch edging will give your square a unique, elegant look, making it stand out.
Smaller or Larger Squares: If you need a smaller square for a specific project, simply adjust the number of rounds you crochet. Conversely, if you want a larger sun square, continue adding rounds until you reach your desired size.
Adding Embellishments: Try adding a few beads or sequins to the center of the sun to make it sparkle, or embroider tiny flowers along the edges to create an even more intricate design.
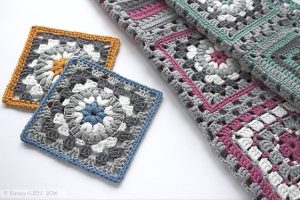
Joining Squares: If you are making a larger project, like a blanket, you can join multiple squares together by using a whip stitch or slip stitch to create a seamless and neat finish. The sun squares will create a beautiful, cohesive design when joined.
Creating Variations: While the classic sun motif is beautiful, you can experiment with different motifs to create a variety of squares. Try adding small stars or geometric shapes to the sun’s center, or modify the rays to have a more abstract design.
4. Troubleshooting Common Issues with the Crochet Square Sun Step by Step!
Crocheting can sometimes come with challenges, especially when trying a new pattern. Here are some tips for troubleshooting common issues you might encounter while making the Crochet Square Sun:
Uneven Stitching: If your stitches are uneven, try adjusting your tension. Make sure you’re not pulling the yarn too tight or leaving it too loose. Practice making consistent stitches for a uniform appearance.
Twisting Edges: If your edges start to twist, it could be a sign that you’re not increasing evenly. Be sure to follow the pattern’s stitch count and pay close attention to the instructions for each round to avoid this issue.
Missed Stitches: If you find you’ve missed a stitch or added too many, simply pull out the stitches and redo the round. Crocheting in the round can be tricky, but going back and fixing errors ensures your sun square will look perfect.
Crochet Hook Size: If your square is coming out too tight or too loose, consider adjusting your crochet hook size. A larger hook will create looser stitches, while a smaller hook will make your stitches tighter.
Too Large or Too Small: If your sun square is turning out too large or too small, you can adjust the pattern by adding or removing rounds. This will help you achieve the perfect size for your project.
Finishing Loose Ends: After completing your sun square, be sure to weave in all loose ends using a yarn needle. This will give your project a clean and professional finish, preventing any yarn from unraveling.
FAQ About the Crochet Square Sun Step by Step!
1. Can I use any yarn for this project?
Yes, you can experiment with different types of yarn. However, for a more durable and structured piece, medium-weight yarn such as worsted weight is recommended.
2. How long does it take to make one sun square?
The time required to crochet a sun square depends on your skill level and experience. On average, it can take 1-2 hours to complete one square.
3. Can I make a blanket using these squares?
Yes! The Crochet Square Sun is ideal for creating blankets, especially when you join multiple squares together. Just be sure to adjust the size as needed for your project.
4. How do I join the squares together?
You can join squares using a whip stitch or slip stitch. Both methods create a clean, seamless look when joining multiple crochet squares.
5. Can I use this design for other projects, like cushions or bags?
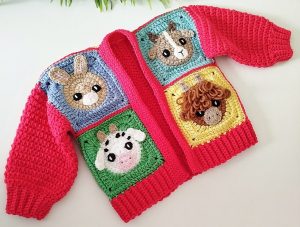
Absolutely! The Crochet Square Sun design is versatile and can be used for various projects like cushions, bags, or even wall hangings. Feel free to adapt the pattern to suit your creative ideas.
6. What if my square isn’t turning out perfectly?
Don’t worry! Crochet takes practice, and it’s normal to have a few imperfections. If you notice any mistakes, simply fix them by undoing a few stitches and reworking the pattern until it looks right.
Join our VIP broadcast list and gain access to exclusive patterns, all for free. As a VIP member, you’ll receive the best patterns daily, delivered directly to your device. ✨📱 It’s a unique opportunity to stay up-to-date with the latest trends and designs, curated just for you. Don’t miss out on enhancing your projects and discovering new inspirations with the best patterns every day! 🎨🔝
By following this Crochet Square Sun Step by Step! tutorial, you have learned how to create a bright and beautiful crochet piece that adds a vibrant touch to any project. Whether you’re making a blanket, cushion, or wall hanging, the Crochet Square Sun is a versatile and creative design that will surely impress. Feel free to experiment with colors and styles to personalize your creation!
VIDEO TUTORIAL
We’d love to hear your thoughts on the tutorial and any suggestions you may have. Don’t hesitate to leave your feedback or share your finished sun squares with us. Happy crocheting!


