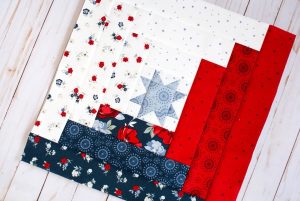
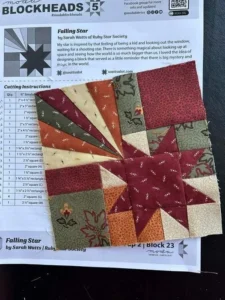
The February Quilt Block – Tutorial is a perfect way to add a burst of color and creativity to your quilting projects.
Whether you’re working on a seasonal design or just love the idea of celebrating February through your quilting, this block will make a beautiful addition to any quilt.
By following this tutorial, you will learn how to create a stunning February-themed block, whether you’re a beginner or an experienced quilter.
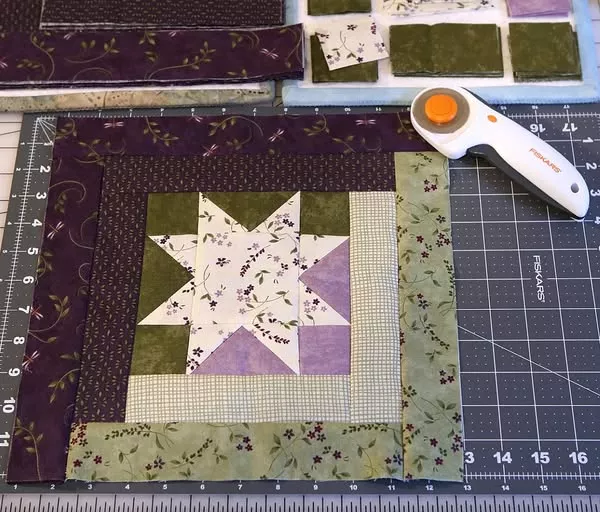
Image from google.
This step-by-step guide will take you through each stage of the process, ensuring that you can easily replicate the block and customize it as you wish.
SEE MORE PATTERNS
The February Quilt Block – Tutorial is designed with love and warmth in mind, making it ideal for those who wish to create quilts that symbolize the coziness and romance often associated with the month of February.
It’s also a great way to practice essential quilting skills while crafting something beautiful. If you enjoy making quilts that showcase different themes, this tutorial will guide you through the steps of creating a simple yet striking February block.
In the following sections, we’ll go over the materials you’ll need, break down the steps for creating the quilt block, and discuss how to customize your February block with different color schemes or patterns. Let’s dive into this exciting quilting journey and learn how to make the perfect February quilt block!
1. Materials Needed for the February Quilt Block – Tutorial
Before you start quilting, it’s important to gather the right materials to ensure your project goes smoothly. Here’s a list of everything you’ll need to complete your February Quilt Block – Tutorial:
- Fabric: Choose fabrics that align with your February theme. You can select red, pink, white, or any other colors associated with Valentine’s Day or winter. A mix of solid fabrics and patterned ones can add visual interest to the block.
- Quilting Ruler: A quilting ruler will help you cut your fabric into precise shapes. Make sure to use a ruler that has grid lines for accurate measurements.
- Rotary Cutter: A rotary cutter is essential for cutting fabric efficiently and precisely. It ensures that your cuts are smooth and clean, leading to better results when piecing your block together.
- Sewing Machine: While hand sewing is an option, using a sewing machine will speed up the process and provide a more consistent stitch.
- Thread: Select thread in a neutral color or one that matches your fabric choices. Cotton thread is ideal for quilting projects.
- Iron and Ironing Board: Pressing your fabric and seams as you go is crucial for a professional finish. An iron will help flatten any creases and ensure your seams are sharp.
With these materials, you’ll be fully equipped to create your February Quilt Block – Tutorial and bring your quilt to life.
2. Step-by-Step Guide to Creating the February Quilt Block – Tutorial
Now that you have your materials, let’s move on to the most exciting part: creating your February Quilt Block. Follow this step-by-step guide to piece together the perfect block for your quilt.
- Cut Your Fabric: Start by cutting your fabric into the required pieces. For this block, you will typically need a mix of square and triangle shapes. The fabric dimensions will depend on the size of the quilt block you are making, so be sure to follow the pattern for accurate measurements.
- Piece Together the Squares: Begin by sewing the smaller squares together, matching the edges carefully to ensure a precise fit. Use a ¼ inch seam allowance for consistent stitching. Press each seam as you go to ensure everything lays flat.
- Add the Triangular Pieces: Once the squares are assembled, you will need to add the triangular pieces. These triangles can be created using the half-square triangle method, where two fabric triangles are sewn together to form a square with a diagonal seam.
- Assemble the Quilt Block: After you have all of your pieces cut and sewn together, begin assembling the full quilt block. Lay out the pieces in the design you want before sewing them together to ensure the pattern looks the way you envision.
- Sew the Pieces Together: Once you’ve arranged the pieces, start sewing them into rows, then join the rows together to complete the quilt block. Use a ¼ inch seam allowance and ensure the points where the seams meet align perfectly for a polished look.
- Press the Final Block: Once the quilt block is pieced together, press all the seams flat with your iron. This will ensure that the quilt block maintains its shape and looks neat and crisp.
By following these steps, you will have created a beautiful February Quilt Block that can be incorporated into a larger quilt or used as a standalone project.
3. Customizing Your February Quilt Block – Tutorial
One of the best aspects of quilting is that you can customize the design to reflect your style and preferences. With the February Quilt Block – Tutorial, there are many ways to make the block uniquely yours. Here are a few ideas for customization:
- Choose Your Colors: While the traditional February colors are red, pink, and white, feel free to experiment with different color schemes. For example, you could use pastel tones for a soft, romantic feel, or even incorporate shades of blue and silver for a wintery theme.
- Incorporate Embellishments: To make your February quilt block stand out, consider adding embellishments such as applique hearts, lace trim, or small embroidered designs. This will add texture and a personal touch to your block.
- Change the Block Size: You can resize your quilt block to fit a specific pattern. If you want to make a smaller block for a table runner or a larger block for a quilt, simply adjust the dimensions accordingly.
- Mix Fabrics: Don’t be afraid to mix fabrics with different textures. Use cotton for the main sections of the quilt block, and experiment with linen or flannel for the border or background to add variety and depth.
- Add a Border: Consider adding a border around the quilt block for a more defined look. You can use contrasting fabric or keep it simple with a neutral tone.
- Create a Matching Set: If you’re making multiple blocks for a quilt, create a coordinated set of February blocks. Use the same color palette and design elements across all the blocks to maintain consistency throughout your project.
These customization ideas will help you create a February Quilt Block that’s tailored to your personal style and the overall theme of your quilt.
4. Tips for Perfecting Your February Quilt Block – Tutorial
To ensure that your February Quilt Block turns out beautifully, here are a few additional tips to keep in mind:
- Use a Quarter-Inch Seam: For quilting, precision is key. Make sure to use a quarter-inch seam allowance to ensure that your pieces fit together properly. This will also help your quilt block maintain its shape.
- Press as You Go: Pressing each seam as you sew will help your quilt block maintain crisp, clean lines. It also helps to prevent the fabric from shifting or puckering.
- Check the Grain of the Fabric: When cutting your fabric, pay attention to the grain. Cutting along the grain will result in a more stable quilt block that holds its shape over time.
- Be Consistent with Your Stitching: Make sure that your stitches are consistent in size and tension. This will prevent puckering and ensure your quilt block looks polished.
- Use a Design Wall: A design wall is a helpful tool when assembling quilt blocks. It allows you to arrange your pieces and experiment with different layouts before sewing them together.
- Take Your Time: Quilting is an art form that requires patience. Don’t rush the process—take your time to ensure each step is done carefully for the best results.
By following these tips, you’ll be able to create a February Quilt Block that is not only functional but also visually stunning.
FAQ About the February Quilt Block – Tutorial
1. Can I make a February quilt block without a sewing machine?
Yes, it’s possible to hand-sew the pieces together, but using a sewing machine will make the process faster and more precise. If you prefer hand-sewing, just be sure to maintain consistent seam allowances.
2. What size should my February quilt block be?
The size of your block depends on the quilt you’re making. Typically, quilt blocks are either 6”, 8”, or 12” square, but you can adjust the size based on your project’s needs.
3. Can I use other colors for the February quilt block?
Absolutely! While red, pink, and white are traditional for February-themed quilts, feel free to experiment with other color palettes. Pastels, blues, and even metallics can give your quilt a unique touch.
4. How can I make my quilt block more festive?
Add embellishments like embroidered hearts, lace, or fabric flowers to make your February quilt block more festive. You can also include applique designs to enhance the look.
5. How do I prevent my quilt block from getting uneven edges?
To avoid uneven edges, always press your seams as you go and be mindful of your seam allowances. Using a quilting ruler and rotary cutter will help ensure your cuts are precise.
6. Can I make a smaller version of the February quilt block?
Yes, you can resize the block by adjusting the fabric dimensions. Just be sure to maintain the same proportions for a balanced look.
Join our VIP broadcast list and gain access to exclusive patterns, all for free. As a VIP member, you’ll receive the best patterns daily, delivered directly to your device. ✨📱 It’s a unique opportunity to stay up-to-date with the latest trends and designs, curated just for you. Don’t miss out on enhancing your projects and discovering new inspirations with the best patterns every day! 🎨🔝
JOIN NOW
Conclusion
In this February Quilt Block – Tutorial, you’ve learned how to create a beautiful, personalized quilt block that’s perfect for the month of February.
By following the steps, gathering the right materials, and customizing the block to fit your style, you can craft a stunning piece for your quilt.
PATTERN HERE
Remember to take your time, use the tips provided, and have fun with the process! Don’t forget to leave your thoughts and suggestions in the comments below, and happy quilting!