
Pie Carrier Sewing Pattern

Crafting your own holiday decor is a wonderful way to bring warmth and a personal touch to your celebrations.
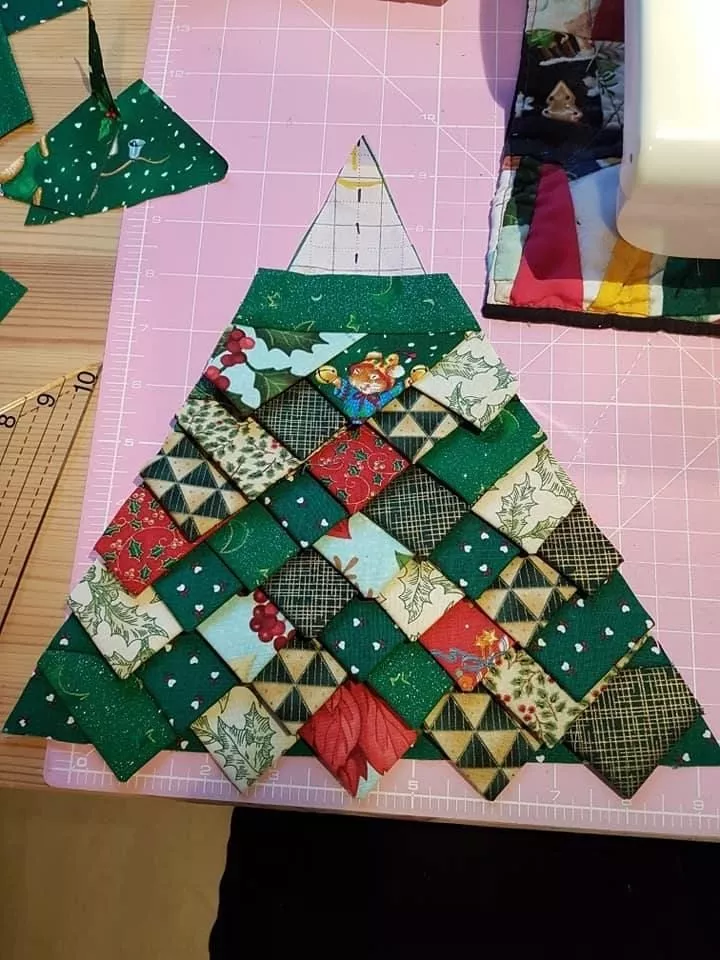
Learning how to make a Prairie Point Christmas Tree quilt – TUTORIAL is an excellent project for quilters of all levels.
This unique design combines the charm of prairie points with the festive spirit of Christmas trees, resulting in a quilt that’s as beautiful as it is functional.
This step-by-step guide ensures that you can create a stunning Prairie Point Christmas Tree quilt with ease.
Whether you’re making it as a centerpiece for your holiday decor or as a thoughtful handmade gift, this project is sure to delight. With just a few materials and some creativity, you’ll have a quilt that brings holiday cheer to any room.
Prairie points are a classic quilting technique, adding texture and dimension to your projects.
When combined with the festive theme of a Christmas tree, the result is a quilt that’s not only eye-catching but also deeply meaningful. Let’s dive into the steps and tips for creating your own Prairie Point Christmas Tree quilt.
Before you begin crafting your Prairie Point Christmas Tree quilt, it’s important to gather the necessary materials and set up a comfortable workspace.
By preparing your tools and materials beforehand, you set yourself up for a successful quilting experience.
Prairie points are the hallmark of this project, giving the quilt its distinctive texture and charm.
Creating precise prairie points may take some practice, but the effort is well worth the stunning result.
Once your prairie points are ready, it’s time to assemble the quilt.
This step brings your quilt to life, transforming the individual pieces into a cohesive and festive design.
Adding personal touches to your Prairie Point Christmas Tree quilt makes it truly one-of-a-kind.
Personalization adds sentimental value and ensures your quilt stands out during the holiday season.
1. What size should the quilt be?
The size depends on its purpose. A wall hanging can be smaller, while a bed quilt should be larger. Common sizes range from 40×40 inches to 60×80 inches.
2. Can I hand-sew the Prairie Point Christmas Tree quilt?
Yes, but it may take longer. Hand-sewing provides a more traditional feel and is ideal for those without a sewing machine.
3. How do I care for the quilt?
Machine wash on a gentle cycle with cold water and air dry. Avoid bleach and harsh detergents to maintain the colors and fabric quality.
4. Can I use scraps for this project?
Absolutely! This project is a great way to use up fabric scraps, especially for the prairie points and tree decorations.
5. Are prairie points difficult for beginners?
Not at all! With practice, prairie points become easy to create. Start with larger squares to simplify the process.
6. Can I gift this quilt?
Yes, it makes a thoughtful and personalized holiday gift. Add a handwritten note to make it extra special.
Join our VIP broadcast list and gain access to exclusive patterns, all for free. As a VIP member, you’ll receive the best patterns daily, delivered directly to your device. ✨📱 It’s a unique opportunity to stay up-to-date with the latest trends and designs, curated just for you. Don’t miss out on enhancing your projects and discovering new inspirations with the best patterns every day! 🎨🔝
Creating a Prairie Point Christmas Tree quilt is a rewarding and festive project that showcases your quilting skills and holiday spirit. This tutorial provides all the steps and inspiration needed to craft a unique quilt that will be cherished for years.
Have you tried this project? Share your experience and suggestions in the comments below. Your feedback enriches the quilting community and inspires others to create their own masterpieces. Happy quilting!


