Scandi 3 Quilt - Free Pattern

Advertising

If you’re searching for a simple yet elegant quilt design, the Scandi 3 Quilt – Free Pattern is an excellent choice.

Known for its Scandinavian-inspired style, this quilt combines clean lines, minimalism, and timeless beauty, making it perfect for any season.

Advertising

Whether you’re a seasoned quilter or just getting started, this free pattern offers a relaxing and rewarding experience.

Image from google.

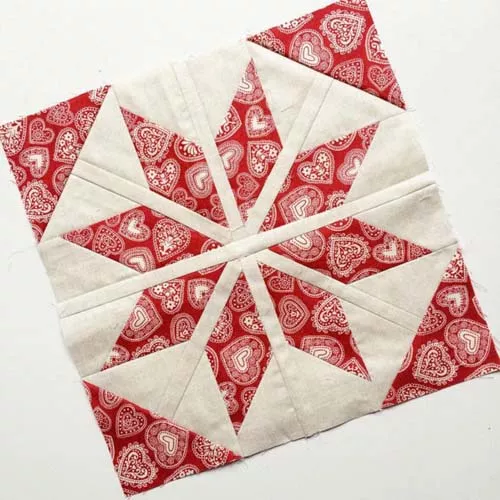
The Scandi 3 Quilt is characterized by its geometric precision and soothing color palette, often featuring neutral tones like whites, grays, and soft reds.

       SEE MORE PATTERNS       

Its design reflects the Scandinavian aesthetic, which emphasizes simplicity and functionality without compromising on style. This quilt is not only a stunning addition to your home décor but also makes a meaningful handmade gift for family and friends.

In this tutorial, we’ll walk you through all the steps to create the Scandi 3 Quilt – Free Pattern, from materials and cutting to piecing and finishing your quilt. With easy-to-follow instructions and tips for success, you’ll have a beautiful quilt ready in no time!

Advertising

1. Materials Needed for the Scandi 3 Quilt

Before you begin quilting, it’s important to gather all the necessary materials to ensure a smooth and enjoyable project.

  1. Fabric: Choose high-quality quilting cotton in neutral colors like white, gray, or soft red. You’ll need a mix of solid and patterned fabrics for contrast.
  2. Cutting Tools: Use a rotary cutter, quilting ruler, and self-healing cutting mat to accurately cut your fabric pieces.
  3. Thread: Select a thread color that complements your fabric. Neutral tones like white or gray work best for the Scandi aesthetic.
  4. Sewing Machine: A sewing machine with a walking foot is ideal for piecing and quilting layers.
  5. Batting: Choose lightweight cotton batting to keep the quilt soft and cozy.
  6. Backing Fabric: You’ll need a large piece of fabric for the quilt’s backing. A subtle print or solid color works well.

Gathering the right materials ensures that your Scandi 3 Quilt comes together seamlessly. Quality materials will enhance the look, feel, and durability of your finished quilt.

2. Cutting and Piecing the Fabric

The Scandi 3 Quilt is all about precision, so accurate cutting and piecing are essential to achieving its clean, geometric design. Follow these steps to get started:

  1. Cut the Fabric: Begin by cutting your fabric into squares and rectangles, following the dimensions provided in the free pattern. Use a rotary cutter and ruler for clean, straight edges.
  2. Arrange the Pieces: Lay out your fabric pieces on a flat surface or design wall to preview the quilt layout. The Scandi 3 design features alternating blocks and neutral spaces, so focus on achieving balance and contrast.
  3. Sew the Blocks: Start piecing the fabric blocks together using a ¼-inch seam allowance. Press the seams open or to one side to reduce bulk and keep the quilt top flat.
  4. Assemble Rows: Once the blocks are sewn, begin assembling them into rows. Double-check alignment to ensure the geometric pattern stays clean and consistent.
  5. Join the Rows: Sew the rows together, taking care to match seams for a polished, professional look.
  6. Press the Quilt Top: After joining all the rows, press the quilt top to smooth out any wrinkles and ensure the seams lie flat.

Piecing the quilt is a satisfying process, and by focusing on precision, you’ll achieve a beautiful and visually striking Scandi 3 Quilt.

3. Quilting and Finishing the Scandi 3 Quilt

Once the quilt top is complete, it’s time to quilt the layers together and add the finishing touches. Here’s how to proceed:

  1. Create the Quilt Sandwich: Lay out the backing fabric (right side down), batting, and quilt top (right side up). Smooth out each layer to avoid wrinkles and secure them with safety pins or basting spray.
  2. Choose a Quilting Design: The Scandi 3 Quilt looks stunning with simple, straight-line quilting. Use your walking foot to quilt along the seams or in a grid pattern for a modern finish.
  3. Start Quilting: Begin quilting from the center outward to prevent fabric shifting. Keep your stitches even and straight for a clean look.
  4. Trim the Edges: Once the quilting is complete, trim the excess batting and backing fabric to align with the quilt top edges.
  5. Add the Binding: Sew binding strips around the quilt edges to finish it off. You can machine-sew the binding or hand-stitch it for a more traditional touch.
  6. Final Press: Give the quilt a final press to smooth out any creases and enhance the overall appearance.

By following these steps, your Scandi 3 Quilt will come together beautifully, with its clean lines and minimalist charm shining through.

4. Tips for Perfecting Your Scandi 3 Quilt

To ensure your Scandi 3 Quilt turns out flawless, keep these helpful tips in mind during the quilting process:

  1. Stick to a Simple Color Palette: Scandinavian design thrives on neutral tones like white, gray, and beige. Limit bold colors to maintain the quilt’s calming aesthetic.
  2. Measure Twice, Cut Once: Precision is key when working with geometric patterns. Double-check measurements before cutting your fabric.
  3. Use Quality Tools: Invest in sharp rotary cutters, rulers, and a good sewing machine for consistent, professional results.
  4. Take Your Time: Quilting is a relaxing process, so don’t rush. Focus on accuracy, especially when piecing blocks and aligning seams.
  5. Practice Straight-Line Quilting: If you’re new to quilting, practice straight-line quilting on a small piece of fabric before working on the full quilt.
  6. Pre-Wash Your Fabrics: Pre-washing fabric helps prevent shrinking and color bleeding, ensuring a more durable finished quilt.

These tips will help you create a stunning quilt that reflects the beauty of Scandinavian design while showcasing your craftsmanship.

FAQ

1. What size is the Scandi 3 Quilt?
The Scandi 3 Quilt can vary in size depending on your preference, but most patterns provide dimensions for a lap quilt or throw size.

2. Can I use bold colors for the Scandi 3 Quilt?
While the traditional Scandi style uses neutral tones, you can incorporate bold colors if you prefer. Just be mindful of maintaining balance and harmony in the design.

3. Is this pattern beginner-friendly?
Yes, the Scandi 3 Quilt – Free Pattern is perfect for beginners, as it uses simple blocks and straight-line quilting techniques.

4. How long does it take to complete the Scandi 3 Quilt?
The time required depends on your skill level and available time. On average, it may take a few days to a week to complete the quilt.

5. Can I hand-quilt the Scandi 3 Quilt?
Absolutely! While machine quilting is faster, hand quilting adds a lovely, personal touch to the finished quilt.

6. How should I wash and care for the Scandi 3 Quilt?
Wash the quilt on a gentle cycle with cold water and lay it flat or hang it to dry to preserve its shape and quality.

Join our VIP broadcast list and gain access to exclusive patterns, all for free. As a VIP member, you’ll receive the best patterns daily, delivered directly to your device. ✨📱 It’s a unique opportunity to stay up-to-date with the latest trends and designs, curated just for you. Don’t miss out on enhancing your projects and discovering new inspirations with the best patterns every day! 🎨🔝

       JOIN NOW       

Conclusion

The Scandi 3 Quilt – Free Pattern is a beautiful and accessible project that brings the elegance of Scandinavian design to your home. With its clean lines, minimalist aesthetic, and calming color palette, this quilt is a timeless piece that works for any space. Whether you’re making it for yourself or as a thoughtful gift, this quilt will be cherished for years to come.

      PATTERN HERE       

Have you tried making the Scandi 3 Quilt? Share your thoughts, experiences, or suggestions in the comments below! I’d love to hear how your project turned out and any creative variations you explored. Happy quilting!

Advertising