
Pie Carrier Sewing Pattern

Creating the Fourth Block: Star in a Star quilt pattern is an exciting and creative way to enhance your quilting projects.
This tutorial will guide you step-by-step through the process, making it simple and enjoyable for quilters of all skill levels.
Combining two star designs into one block creates an eye-catching result that adds depth and dimension to any quilt.
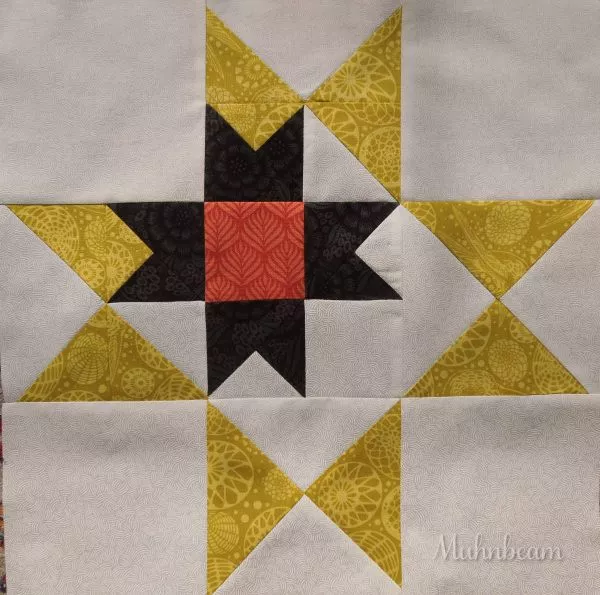
The Star in a Star pattern is a timeless classic in quilting, known for its stunning visual appeal. Whether you are making a quilt for yourself, a loved one, or as part of a larger project, this block can be customized to match any color palette or theme.
In this Fourth Block: Star in a Star – Tutorial, we’ll walk you through the materials you need, how to cut and piece your fabric accurately, and tips for sewing each section together seamlessly.
By the end of this guide, you’ll have a gorgeous block that’s perfect for your next quilting project. Let’s get started!
Before you begin, it’s essential to gather all the materials and tools you’ll need to create the Fourth Block: Star in a Star. Having everything ready will make the process smoother and more enjoyable.
With these tools and materials, you’ll be well-prepared to start creating the Star in a Star quilt block. Preparing in advance helps save time and allows you to focus on the fun part—sewing!
The foundation of a beautiful Fourth Block: Star in a Star lies in precise cutting. Following these steps will ensure all your pieces fit together perfectly:
Taking the time to cut carefully ensures accuracy, which is essential for achieving crisp lines and perfectly aligned stars in your quilt block.
Now that you have all your pieces cut, it’s time to start sewing the Fourth Block: Star in a Star. We’ll begin with the inner star:
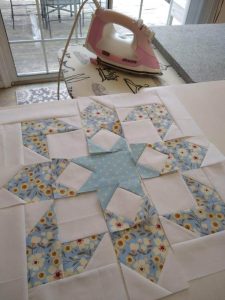
With the inner star complete, you now have the foundation for the Fourth Block: Star in a Star. This step sets the stage for the outer star, adding even more visual interest.
The final step in creating your Star in a Star block is adding the outer star. Follow these steps to complete your quilt block:
This final step brings everything together, showcasing the beauty of the layered stars. Your block is now ready to be added to a quilt or displayed on its own.
1. What size can I make the Star in a Star block?
You can customize the block size to suit your project. Common sizes include 12-inch, 16-inch, or larger blocks for quilts.
2. Is the Star in a Star block beginner-friendly?
Yes, this pattern is great for beginners. It uses basic cutting and piecing techniques that are easy to follow.
3. What fabrics work best for this block?
Cotton fabrics are ideal because they are easy to cut, sew, and press. Solid and contrasting colors enhance the star design.
4. How do I ensure my points align perfectly?
Precision cutting and careful seam allowances are key. Use pins or clips to hold pieces in place before sewing.
5. Can I use scraps for this project?
Absolutely! The Star in a Star block is perfect for using up fabric scraps in coordinating colors.
6. How can I use the Star in a Star block?
You can incorporate it into quilts, wall hangings, table runners, or as a standalone block for decoration.
Join our VIP broadcast list and gain access to exclusive patterns, all for free. As a VIP member, you’ll receive the best patterns daily, delivered directly to your device. ✨📱 It’s a unique opportunity to stay up-to-date with the latest trends and designs, curated just for you. Don’t miss out on enhancing your projects and discovering new inspirations with the best patterns every day! 🎨🔝
This Fourth Block: Star in a Star – Tutorial provides a detailed and easy-to-follow guide for creating a stunning quilt block. The combination of an inner and outer star adds depth, symmetry, and timeless beauty to any quilting project. Whether you’re a beginner or experienced quilter, this block is a rewarding project to add to your repertoire.
Now it’s your turn! Try out this tutorial and let us know how it turned out. Share your experiences, tips, or suggestions in the comments below. Happy quilting!


