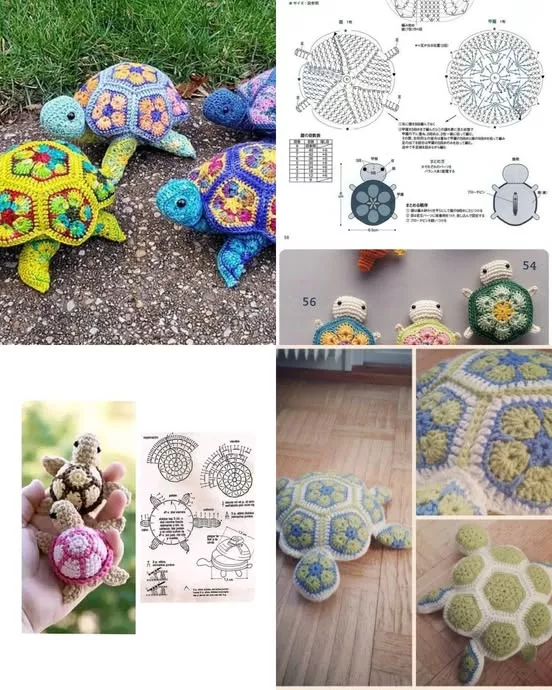
Crocheting a turtle using the African Flower motif is a delightful way to blend creative artistry with functional design.
This project is perfect for anyone looking to create a charming, handcrafted decoration or toy that doubles as a heartfelt gift.
Advertising
The African Flower Turtle combines vibrant geometric patterns with soft, cozy textures, making it a favorite among crochet enthusiasts.
Image from google.
In this tutorial, we’ll explore free patterns to help you bring your crocheted turtle to life. Whether you’re a beginner or a seasoned crocheter, this guide will provide step-by-step instructions and helpful tips to ensure your success.
Before diving into the free patterns, let’s discuss why the African Flower design is so versatile. Its unique hexagonal shape lends itself beautifully to various projects, from toys to blankets and more.
With a simple color scheme or a burst of vibrant hues, you can make your turtle truly unique. Now, let’s get started on this exciting project!
Advertising
1. Understanding the African Flower Motif
The African Flower motif is the foundation of this project. Mastering this pattern ensures a flawless turtle.
Basic Structure: This motif features a hexagonal base with a flower-like design in the center. It’s created by layering stitches in a circular pattern.
Choosing Colors: Select colors that contrast well to highlight the flower’s petals. Traditional African Flowers often use bright, bold shades, but pastel tones or monochrome schemes also look stunning.
Stitch Techniques: Familiarize yourself with the double crochet (dc), slip stitch (sl st), and chain stitch (ch), as these are the main stitches used.
Customizing the Size: You can adjust the size of your turtle by increasing or decreasing the number of rounds in your African Flower motifs.
Connecting Motifs: Once you’ve completed several hexagons, you’ll need to sew or crochet them together to form the turtle’s body.
Practice Makes Perfect: Begin with a sample motif to ensure consistency in your stitches and gauge.
2. Crafting the Turtle’s Body
The turtle’s body is primarily composed of multiple African Flower motifs sewn together.
Head and Limbs: Create smaller, rounded motifs for the head, legs, and tail. These can be crafted using a similar technique but with fewer rounds.
Body Construction: Assemble six larger African Flower motifs into a spherical shape for the turtle’s shell. Use a contrasting color for the edging to make the pieces stand out.
Filling the Turtle: Before sealing the shell, stuff it with fiberfill or another soft material to give it a plush texture.
Stitching Tips: Use an invisible stitch or a slip stitch to join motifs seamlessly. This ensures a smooth, professional finish.
Adding Details: Crochet small embellishments, like a smile for the face or decorative accents on the shell, to personalize your turtle.
Final Assembly: Attach the head, limbs, and tail securely to the shell. Reinforce the stitches to ensure durability, especially if the turtle is meant for children.
3. Customizing Your African Flower Turtle
Personalization makes your turtle unique and special.
Size Variations: Adjust the size of the motifs to create a larger or smaller turtle. Larger motifs make assembly faster, while smaller ones add intricate detail.
Color Themes: Choose a specific theme, such as ocean blues or garden greens, to match your turtle’s environment or intended recipient’s preferences.
Yarn Selection: Opt for soft, durable yarns, especially if the turtle will be used as a toy. Cotton yarn works well for a sturdy and washable finish.
Textured Stitches: Incorporate puff or bobble stitches into the motifs to add dimension and tactile interest.
Decorative Accessories: Add features like a crocheted bow, tiny flowers, or even a small crocheted baby turtle for an extra cute touch.
Gift Packaging: Present your turtle in a themed box or bag with a handwritten note explaining its handmade origins.
4. Troubleshooting Common Issues
Even experienced crocheters can encounter challenges. Here’s how to resolve them:
Uneven Motifs: Ensure consistent tension by practicing a few test motifs before starting the main project.
Gaps Between Motifs: Use smaller stitches or tighter tension when joining pieces to eliminate visible gaps.
Loose Stuffing: Avoid overstuffing the shell, which can distort the motifs. Use just enough to maintain shape.
Color Bleeding: Pre-wash yarns to prevent color bleeding, especially if you’re using vibrant or contrasting shades.
Misaligned Pieces: Lay out all motifs before stitching to ensure proper alignment and symmetry.
Stitch Count Issues: Regularly count stitches while crocheting to maintain pattern accuracy.
FAQ
Q: Can I use leftover yarn for this project? A: Absolutely! The African Flower Turtle is an excellent project for using up yarn scraps. Just ensure the yarns are of similar weight for uniformity.
Q: How long does it take to complete? A: Depending on your skill level and available time, this project can take anywhere from a few days to a week.
Q: Is this project suitable for beginners? A: Yes, with patience and practice, even beginners can master the African Flower motif and assemble the turtle.
Q: Can I make this turtle in larger sizes? A: Yes, simply increase the number of rounds in each motif and adjust the connecting pieces accordingly.
Q: How do I clean the finished turtle? A: Handwash gently with mild soap and air dry to maintain its shape and texture.
Q: Where can I find free patterns? A: Many websites and crochet blogs offer free African Flower patterns. Explore online resources or join crochet forums for inspiration.
Join our VIP broadcast list and gain access to exclusive patterns, all for free. As a VIP member, you’ll receive the best patterns daily, delivered directly to your device. ✨📱 It’s a unique opportunity to stay up-to-date with the latest trends and designs, curated just for you. Don’t miss out on enhancing your projects and discovering new inspirations with the best patterns every day! 🎨🔝
Creating a charming African Flower Turtle is a fulfilling and enjoyable crochet project. By mastering the African Flower motif and following this free tutorial, you can craft a unique and adorable piece.
Whether for yourself or as a thoughtful gift, this turtle is sure to bring joy. If you found this tutorial helpful, please leave your feedback and share your suggestions for future projects. We’d love to hear about your experience and see your creations!


