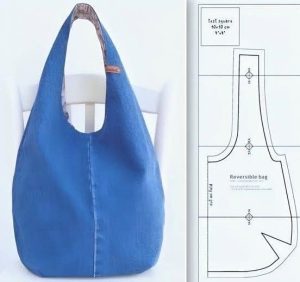
How To Crochet A Paw Coaster or Doily - Tutorial

Advertising

If you’ve ever wanted to learn how to crochet a paw coaster or doily, this is the perfect tutorial for you! These adorable creations are not only functional but also a delightful way to add charm to your home.

Whether you’re a beginner or an experienced crocheter, this project is both enjoyable and rewarding. Paw coasters or doilies make excellent gifts, decor, or even fundraising items for animal-related causes.

Advertising

In this tutorial, we’ll guide you step-by-step through the process of crocheting a paw-shaped design.

Image from google.

Using simple stitches and techniques, you’ll craft something both practical and decorative. Plus, with the freedom to choose colors and yarn types, you can customize your coaster or doily to match your style.

       SEE MORE PATTERNS       

By the end of this guide, you’ll have a complete paw coaster or doily, and you’ll be equipped with tips to create more for various occasions. Let’s get started on this creative journey to craft a paw-shaped masterpiece!

1. Why Crochet a Paw Coaster or Doily?

Crocheting a paw coaster or doily offers several benefits and joys.

Advertising
  1. Perfect for Animal Lovers: The paw design resonates with pet enthusiasts, making it a meaningful addition to your decor.
  2. Beginner-Friendly: The pattern involves basic stitches, making it accessible for those new to crochet.
  3. Customizable Design: Choose colors and yarn textures to suit your preferences or match your home theme.
  4. Functional Decor: Use your paw coaster to protect surfaces from heat or moisture, combining utility with charm.
  5. Great Gift Idea: These coasters or doilies make thoughtful, handmade gifts for friends and family.
  6. Quick to Make: Unlike larger crochet projects, a paw coaster or doily can be completed in a single sitting.

2. Materials You’ll Need

Gathering the right materials ensures a smooth crocheting process.

  1. Yarn: Select medium-weight or cotton yarn for durability and easy maintenance. Choose colors that contrast for paw pads and the base.
  2. Crochet Hook: Use the hook size recommended for your yarn. Common sizes for coasters range from 3.5mm to 5mm.
  3. Scissors: A sharp pair of scissors helps cut yarn cleanly and precisely.
  4. Tapestry Needle: This tool is essential for weaving in ends and attaching parts like paw pads.
  5. Stitch Markers: Use these to keep track of rounds or sections in your pattern.
  6. Pattern Guide: Have a printed or digital version of the how to crochet a paw coaster or doily – tutorial for reference.

3. Step-by-Step Instructions for the Paw Coaster or Doily

Follow these steps to crochet your paw coaster or doily.

  1. Create the Base: Begin with a magic circle and crochet in rounds to form the circular base of the paw. Use single or double crochet stitches for a sturdy foundation.
  2. Make the Paw Pads: Crochet smaller circles for the toe pads and a larger oval for the main pad. These can be created using the same technique as the base, adjusting stitch counts for size.
  3. Assemble the Paw: Position the paw pads onto the base to form a paw shape. Secure them with a whip stitch or single crochet around the edges.
  4. Add Details: For added charm, consider stitching outlines or patterns onto the pads. Use contrasting yarn for visibility.
  5. Finish the Edges: Crochet a border around the base to give your coaster a polished look. A scalloped edge works beautifully for doilies.
  6. Weave in Ends: Use a tapestry needle to tuck away loose yarn ends for a neat and professional finish.

4. Creative Ways to Use Your Paw Coaster or Doily

The possibilities are endless when it comes to utilizing your paw coasters or doilies.

  1. Table Decor: Place them under mugs, teapots, or small vases to protect your furniture and add charm.
  2. Gifts: Pair a set of coasters with a mug for a thoughtful, handmade gift.
  3. Pet Accessories: Use them as placemats for pet bowls or decorative accents in your pet’s area.
  4. Wall Art: Frame or hang them to display your handiwork in a creative way.
  5. Fundraisers: Create sets to sell at craft fairs or fundraisers, especially for animal shelters or pet causes.
  6. Holiday Themes: Customize colors and embellishments for holidays like Christmas, Halloween, or Valentine’s Day.

FAQ

Q: What type of yarn is best for paw coasters?
A: Cotton yarn is ideal as it’s durable, washable, and heat-resistant, making it perfect for coasters.

Q: Can I use different colors for the paw pads and base?
A: Absolutely! Contrasting colors make the paw design stand out and add visual appeal.

Q: How long does it take to crochet a paw coaster?
A: Depending on your skill level, it usually takes 1–2 hours to complete one coaster.

Q: Are paw coasters suitable for beginners?
A: Yes, the pattern uses basic crochet stitches and simple assembly, making it beginner-friendly.

Q: Can I enlarge the pattern to make a paw-shaped rug?
A: Yes, by using thicker yarn and a larger hook, you can scale up the pattern for rugs or placemats.

Q: How do I clean my paw coasters?
A: Wash them gently by hand or use a delicate cycle in the washing machine. Lay flat to dry.

Join our VIP broadcast list and gain access to exclusive patterns, all for free. As a VIP member, you’ll receive the best patterns daily, delivered directly to your device. ✨📱 It’s a unique opportunity to stay up-to-date with the latest trends and designs, curated just for you. Don’t miss out on enhancing your projects and discovering new inspirations with the best patterns every day! 🎨🔝

       JOIN NOW       

Conclusion

This how to crochet a paw coaster or doily – tutorial offers a fun and rewarding project for crocheters of all skill levels. With its charming design and practical use, the paw coaster or doily is sure to bring joy to any home. Whether for personal use, gifting, or charity, this versatile pattern is a must-try.

VIDEO TUTORIAL

We’d love to hear about your experience with this project! Share your feedback and suggestions in the comments below. Your input helps us create more valuable content for the crafting community. Happy crocheting!

Advertising