
Crochet Multi-Purpose Blouse, Shawl, Runner Model

Crocheting your own accessories can be a deeply rewarding hobby, and the Granny Purse Crochet – FREE PATTERN is a perfect example of combining practicality with creative flair.
This charming project is both beginner-friendly and versatile, making it a wonderful choice for anyone looking to craft a handmade purse with timeless appeal.
Whether you’re creating a gift or adding a personal touch to your wardrobe, this crochet pattern offers endless possibilities.
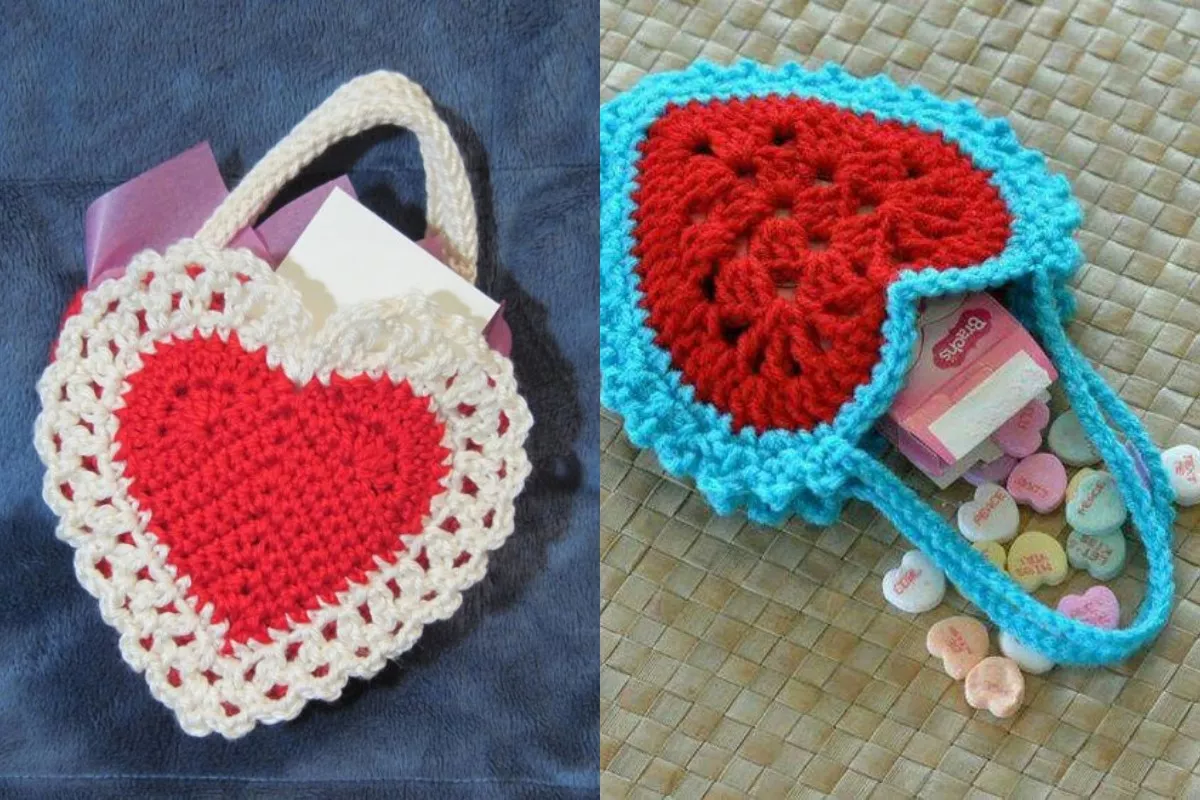
The Granny Purse Crochet design is inspired by classic granny square techniques, which are beloved for their simplicity and beauty. Using this free pattern, you can craft a small yet stylish purse that’s perfect for carrying essentials like keys, cards, or even small craft supplies.
With the ability to customize colors, patterns, and finishing touches, you can make each purse truly unique.
In this article, we’ll guide you step-by-step through creating your own Granny Purse Crochet masterpiece.
From gathering materials to finishing the final stitches, you’ll find everything you need to bring this pattern to life.
Before diving into the crafting process, it’s essential to gather all the materials needed for your Granny Purse Crochet – FREE PATTERN. Having everything ready ensures a smoother and more enjoyable crocheting experience.
To start, you’ll need yarn. Choose a medium-weight yarn for the best results. Cotton yarn is an excellent option for its durability and vibrant colors, but acrylic works well, too, especially if you’re experimenting with patterns and textures.
Next, you’ll need a crochet hook that matches the size of your yarn. Most granny square patterns recommend a 4mm or 5mm hook, but always check the yarn label for guidance. A smaller hook may be necessary if you prefer tighter stitches.
Scissors are another essential tool for this project. Make sure they’re sharp enough to cut through yarn cleanly, as frayed edges can be challenging to work with. Additionally, a yarn needle is required for weaving in the ends and sewing pieces together.
Don’t forget about closures. For a purse, you’ll need a zipper, button, or snap to secure the opening. Consider choosing a closure that complements your yarn color and style.
Finally, print or download the FREE PATTERN for the Granny Purse Crochet. This pattern will serve as your guide and template throughout the project, making it easier to follow along.
Having all these materials on hand will set you up for success as you embark on this fun and rewarding crochet project.
The foundation of the Granny Purse Crochet – FREE PATTERN is the iconic granny square. This versatile motif is the starting point for many crochet projects and forms the main body of your purse.
To begin, create a slip knot on your crochet hook and chain four stitches. Join the last chain to the first with a slip stitch to form a small ring. This ring will serve as the center of your granny square.
Next, work your first round of stitches into the ring. Most granny squares use double crochet (DC) stitches arranged in clusters of three, separated by chain spaces. This creates the signature open and airy look of a granny square. Follow the pattern closely, ensuring you count your stitches accurately to maintain symmetry.
As you move to subsequent rounds, you’ll notice the square shape forming. Each corner is made by working three double crochets, two chains, and three more double crochets into the same space. This method allows the square to expand while keeping its geometric shape intact.
Continue adding rounds until your square reaches the desired size for your purse. For smaller purses, three to four rounds may be sufficient. Larger purses may require six or more rounds, depending on your preference.
Once your granny squares are complete, fasten off the yarn and weave in the loose ends with a yarn needle. This step ensures a neat and polished appearance, setting the stage for the next phase of the project.
With your granny squares complete, it’s time to assemble your Granny Purse Crochet. This step involves joining the squares and adding structural elements to transform the motifs into a functional purse.
First, decide how many squares you want to use. Most purse designs require two squares—one for the front and one for the back. If you’d like to add more depth, you can create additional squares for the sides and bottom.
To join the squares, use a slip stitch or single crochet (SC) seam. Place the squares with the right sides facing each other, and stitch along the edges to connect them. Be consistent with your tension to ensure a uniform appearance.
If you’ve chosen to include additional squares for the sides or bottom, attach them now using the same technique. Once all the squares are joined, your purse will begin to take shape.
Next, add a lining to the inside of the purse. This step is optional but highly recommended, as it provides added structure and durability. Choose a fabric that complements your yarn and sew it into place using a needle and thread.
Finally, attach your closure. If you’re using a zipper, sew it securely along the top edge of the purse. For button or snap closures, position them where the flap meets the front of the purse.
With the assembly complete, your granny purse is ready for its finishing touches.
The beauty of the Granny Purse Crochet – FREE PATTERN lies in its potential for customization. Adding personal touches can elevate your creation from a simple accessory to a unique work of art.
Start with color. Experiment with different yarn shades and combinations to create eye-catching patterns. Bright, bold colors work well for a playful look, while neutral tones exude elegance and sophistication.
Consider embellishments. Adding beads, sequins, or embroidery to your purse can enhance its aesthetic appeal. These details make your purse stand out and reflect your personal style.
You can also experiment with different granny square designs. Incorporate floral motifs, geometric patterns, or textured stitches to give your purse a unique flair. Mix and match squares for a patchwork effect that’s both creative and trendy.
Adding a strap is another way to personalize your purse. Use a crocheted chain, braided yarn, or even a repurposed leather strap for added functionality. Adjustable straps are ideal for creating a versatile accessory that suits different occasions.
Don’t forget about labels. If you’re proud of your handmade work, sew a small tag with your name or initials inside the purse. It’s a subtle yet meaningful detail that adds a professional touch.
Finally, package your purse beautifully if you’re gifting it. A handmade card or tag explaining the story behind the purse can make the gift even more special.
1. What yarn is best for the Granny Purse Crochet pattern?
Cotton yarn is ideal for durability and vibrant colors. Acrylic yarn is also suitable, especially for experimenting with textures.
2. Is this pattern suitable for beginners?
Yes, the Granny Purse Crochet pattern is beginner-friendly. The granny square is a simple technique that’s easy to learn and master.
3. Can I resize the purse?
Absolutely! You can adjust the size of the granny squares or add more squares to create a larger or smaller purse.
4. How do I clean my crochet purse?
Hand wash your purse with mild detergent and lay it flat to dry. Avoid machine washing, especially if the purse has embellishments or a lining.
5. Can I sell purses made with this pattern?
Yes, as long as the pattern allows for commercial use. Always credit the pattern creator if required.
Join our VIP broadcast list and gain access to exclusive patterns, all for free. As a VIP member, you’ll receive the best patterns daily, delivered directly to your device. ✨📱 It’s a unique opportunity to stay up-to-date with the latest trends and designs, curated just for you. Don’t miss out on enhancing your projects and discovering new inspirations with the best patterns every day! 🎨🔝
The Granny Purse Crochet – FREE PATTERN is a delightful project that combines creativity with functionality.
By following this guide, you can craft a beautiful and personalized purse that showcases your crochet skills. From selecting materials to adding personal touches, this pattern offers endless possibilities for customization.
We’d love to hear about your experience and see your creations—share your thoughts and suggestions in the comments below! Happy crocheting!


