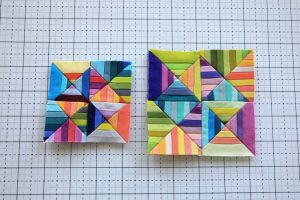
The Log Cabin Quilt Block is a timeless classic in the world of quilting, loved for its simplicity and versatility.
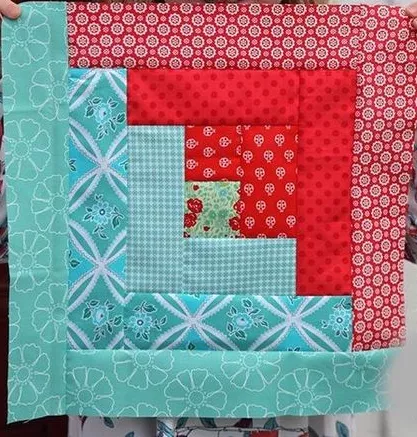
This design has stood the test of time and continues to inspire quilters of all skill levels. The block features a central square surrounded by strips of fabric that radiate outward, resembling the structure of a log cabin.
Advertising
Whether you’re new to quilting or an experienced crafter, this free pattern provides a great way to create stunning quilts with ease.
Image from google.
One of the appealing aspects of the Log Cabin Quilt Block – Free Pattern is the endless possibilities for customization.
You can choose your colors, fabric patterns, and block arrangement to create unique designs that suit your style. From traditional layouts to modern twists, the Log Cabin pattern allows for a wide range of creative expression.
Before you dive into making your quilt block, it’s essential to gather the necessary materials and understand the basics of the pattern.
Advertising
This guide will walk you through the steps of creating your very own Log Cabin Quilt Block, providing tips and techniques to help you achieve a beautiful result.
1. Choosing Fabrics for the Log Cabin Quilt Block
Selecting the right fabrics is the foundation of a successful Log Cabin Quilt Block. The contrast between the fabrics helps to highlight the block’s design.
Light and Dark Fabrics: A defining feature of the Log Cabin pattern is the contrast between light and dark fabrics. This contrast creates the visual depth and structure of the block. Choose fabrics that clearly differentiate between the two tones.
Fabric Types: Cotton is the most commonly used fabric for quilting. Its durability, ease of handling, and wide availability make it an excellent choice.
Color Scheme: Decide on a color scheme that complements your project. Traditional Log Cabin quilts often use earthy tones, while modern versions may include bold, vibrant colors.
Patterned vs. Solid Fabrics: While solid fabrics can create clean lines, patterned fabrics add texture and interest. Consider mixing both to enhance the visual appeal of your quilt block.
Pre-Washing: Pre-washing your fabrics prevents shrinkage and ensures the colors won’t bleed during washing. This step is particularly important when working with bold or dark-colored fabrics.
Organizing Your Fabrics: Before starting, organize your fabrics into two piles: light and dark. This will make the sewing process more straightforward and efficient.
With your fabrics ready, you can begin cutting and preparing the pieces for your quilt block.
2. Cutting and Preparing the Fabric Pieces
Accurate cutting and preparation are essential for creating a well-aligned Log Cabin Quilt Block.
Cutting the Center Square: The center square is the focal point of the Log Cabin block. Traditionally, this piece is red to symbolize the hearth of the home, but you can use any color that fits your design.
Measuring the Strips: Use a quilting ruler and rotary cutter to cut strips of fabric. The width of the strips is typically consistent throughout the block, but the length will vary depending on the size of your quilt.
Numbering the Strips: Number your fabric strips in the order they’ll be sewn. This ensures you follow the pattern correctly and achieve the desired layout.
Ironing the Fabrics: Press your fabrics before cutting to remove any creases. This helps with precision and ensures your quilt pieces lie flat.
Seam Allowance: Plan for a standard ¼-inch seam allowance. Using a quilting foot on your sewing machine can help maintain consistency.
Double-Check Measurements: Before you start sewing, double-check all your measurements to avoid mistakes that could disrupt the pattern.
Once your fabric pieces are ready, it’s time to start assembling your Log Cabin block.
3. Sewing the Log Cabin Quilt Block
Assembling the Log Cabin Quilt Block involves sewing the fabric strips around the center square in a specific order.
Start with the Center Square: Place the center square on your workspace and attach the first fabric strip to one side. Sew the strip using a ¼-inch seam and press it open.
Adding Strips in Sequence: Continue adding strips in a clockwise or counterclockwise direction, sewing one strip at a time. Press each strip flat before attaching the next one.
Maintaining Alignment: Align the edges of the strips carefully to ensure the block remains square. This is crucial for creating a polished final product.
Trimming Excess Fabric: After sewing each strip, trim any excess fabric to keep the block tidy and even.
Checking for Consistency: Periodically check your block for consistency in size and shape. Adjust as needed to maintain the correct dimensions.
Completing the Block: Repeat the process until the block reaches your desired size. Larger blocks can be used for quilts, while smaller ones are perfect for cushions or wall hangings.
Once your block is complete, you can move on to creating additional blocks or finishing your quilt.
4. Arranging and Finishing Your Log Cabin Quilt
The arrangement of the blocks can significantly impact the overall look of your quilt.
Traditional Layouts: Traditional Log Cabin quilts often use a barn-raising or diamond layout. These classic designs emphasize the contrast between light and dark fabrics.
Modern Variations: For a contemporary twist, try experimenting with asymmetrical layouts or incorporating negative space into your design.
Piecing the Blocks Together: Arrange your blocks on a flat surface before sewing them together. This allows you to adjust the placement and ensure the pattern flows seamlessly.
Adding Borders: Borders can frame your quilt and add an extra touch of style. Choose a fabric that complements the overall design.
Quilting the Layers: Once your quilt top is complete, layer it with batting and backing fabric. Quilt the layers together using a machine or by hand.
Binding the Edges: Finish your quilt by binding the edges with a coordinating fabric. This step gives your quilt a clean, professional look.
FAQ
1. What is a Log Cabin quilt block?
The Log Cabin quilt block is a classic design made by sewing strips of fabric around a central square, creating a layered effect resembling a log cabin.
2. What fabrics work best for a Log Cabin quilt?
Cotton fabrics are ideal due to their durability and ease of use. Choose contrasting light and dark fabrics for the best visual effect.
3. How big should the strips be?
The strips are typically 2 ½ inches wide, but you can adjust the size depending on the scale of your quilt.
4. Can I use scraps for a Log Cabin quilt?
Yes, scraps are perfect for this pattern! The design is versatile and works well with leftover fabric pieces.
5. How do I arrange the blocks?
Popular layouts include the barn-raising, diamond, and chevron designs. Experiment with arrangements to find the one you like best.
6. Is this pattern suitable for beginners?
Yes, the Log Cabin quilt block is beginner-friendly and an excellent project for learning basic quilting techniques.
Join our VIP broadcast list and gain access to exclusive patterns, all for free. As a VIP member, you’ll receive the best patterns daily, delivered directly to your device. ✨📱 It’s a unique opportunity to stay up-to-date with the latest trends and designs, curated just for you. Don’t miss out on enhancing your projects and discovering new inspirations with the best patterns every day! 🎨🔝
The Log Cabin Quilt Block – Free Pattern is a timeless and versatile design that offers endless possibilities for creativity. From choosing fabrics to sewing and arranging the blocks, each step is an opportunity to express your unique style.
We hope this guide has inspired you to start your own Log Cabin quilt project. Share your thoughts and experiences in the comments below. What other patterns would you like to see tutorials for? Your feedback helps us create more content tailored to your interests. Happy quilting!


