
Crochet Multi-Purpose Blouse, Shawl, Runner Model

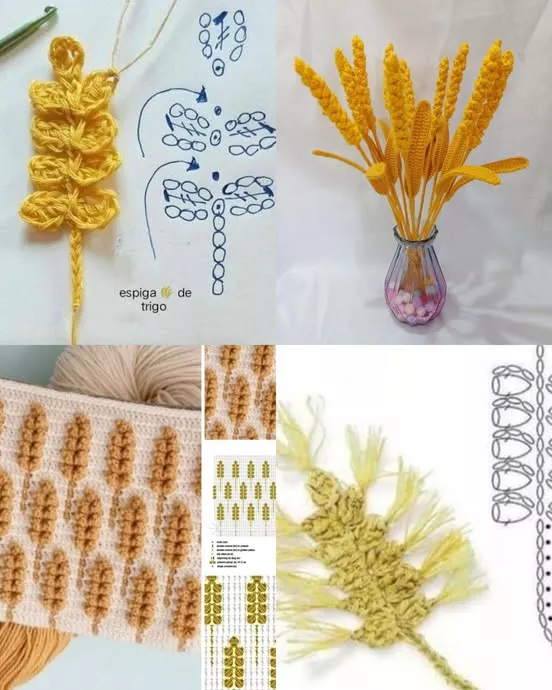
If you’ve ever wondered how to crochet wheat, this guide is here to help. This simple yet elegant craft technique is perfect for adding a rustic and artistic touch to your projects.
From home décor to wearable art, crocheting wheat designs is both versatile and rewarding. Whether you’re a seasoned crocheter or a beginner looking for a unique project, this tutorial will provide the inspiration and knowledge you need.
Crocheted wheat designs are not only aesthetically pleasing but also symbolize abundance and prosperity.
They can be used in a variety of crafts, including wall hangings, table runners, and embellishments for clothing. Plus, this technique is beginner-friendly and doesn’t require advanced skills or materials.
In this article, we’ll explore how to crochet wheat, step-by-step instructions, tips for customization, and common mistakes to avoid. Let’s dive into this delightful craft that blends simplicity with elegance.
Before you begin, it’s essential to gather the right tools and materials. Having everything ready will make the process smoother and more enjoyable.
Follow these simple steps to create a beautiful wheat design:
The beauty of crocheted wheat lies in its adaptability. Here are some ideas to make your project unique:
Even the simplest projects can come with challenges. Here’s how to troubleshoot common issues:
Q: Can beginners crochet wheat designs?
A: Absolutely! This project is beginner-friendly and only requires basic crochet skills like chaining and single crochet stitches.
Q: What type of yarn works best for crocheting wheat?
A: Cotton or lightweight yarn in natural colors is ideal. These materials provide the texture and appearance of real wheat.
Q: How long does it take to crochet wheat?
A: Depending on the size and complexity, each wheat stalk can take anywhere from 10 to 30 minutes.
Q: Can I use crocheted wheat in wearable projects?
A: Yes! Crocheted wheat can be used as embellishments for hats, scarves, and even jewelry.
Q: How do I maintain the shape of the wheat design?
A: Starch or block your finished piece to help it retain its shape over time.
Q: Are there variations of the wheat pattern?
A: Yes, you can find numerous patterns online or modify existing ones to create custom designs.
Join our VIP broadcast list and gain access to exclusive patterns, all for free. As a VIP member, you’ll receive the best patterns daily, delivered directly to your device. ✨📱 It’s a unique opportunity to stay up-to-date with the latest trends and designs, curated just for you. Don’t miss out on enhancing your projects and discovering new inspirations with the best patterns every day! 🎨🔝
Learning how to crochet wheat is a delightful and rewarding experience. This simple yet elegant craft opens up endless possibilities for creativity, whether you’re making home décor or unique accessories. By following the steps and tips outlined in this article, you’ll be well on your way to mastering this charming design.
Have you tried crocheting wheat? We’d love to hear about your experiences and see your creations! Share your thoughts and suggestions in the comments below. Happy crocheting!


