Easy Easter Bunny Crochet Napkin Rings - FREE PATTERNS

Advertising

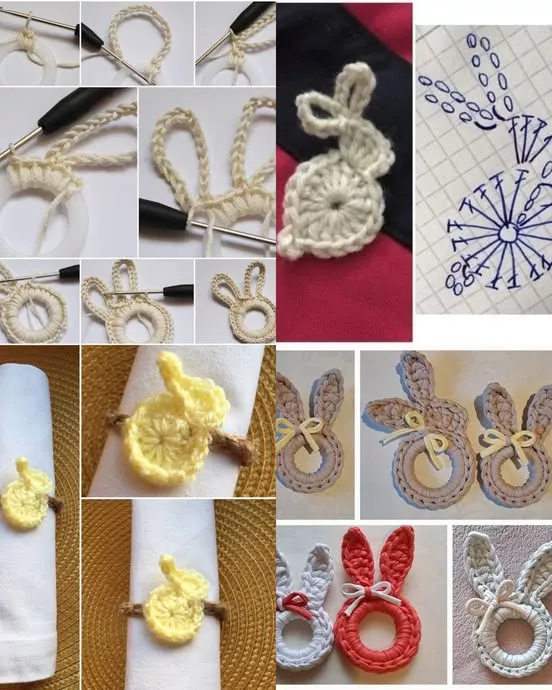
Easter is a time of joy, celebration, and gathering with loved ones. Adding a handmade touch to your table setting can elevate the festive atmosphere, and Easy Easter Bunny Crochet Napkin Rings – FREE PATTERNS are the perfect way to do just that.

These charming napkin rings bring personality and warmth to your table while showcasing your crochet skills.

Advertising

In this tutorial, we’ll explore how to create your own Easy Easter Bunny Crochet Napkin Rings, complete with step-by-step instructions and helpful tips.

Image from google.

Whether you’re a beginner or a seasoned crocheter, this project is simple and rewarding. Let’s dive in!

       SEE MORE PATTERNS       

1. Materials Needed for Your Crochet Napkin Rings

Before getting started, gather all the necessary materials to make your crafting experience smooth and enjoyable.

  1. Yarn Selection: Choose a lightweight or medium-weight yarn in pastel shades like white, pink, yellow, or lavender. These colors evoke the spirit of Easter and complement most table settings.
  2. Crochet Hook: Use a crochet hook that matches your yarn’s recommended size, typically between 3.5mm to 5mm for this type of project.
  3. Additional Supplies: You’ll also need scissors, a tapestry needle, and a stitch marker for precise work.
  4. Pattern Printout: Have your FREE PATTERN on hand for reference throughout the process.
  5. Embellishments: Optional items like small ribbons, beads, or buttons can add an extra touch of charm to your bunny designs.
  6. Measuring Tape: This ensures your napkin rings are the right size for your napkins.

With these materials ready, you’re set to create stunning napkin rings that will impress your guests.

Advertising

2. Step-by-Step Instructions for Crochet Bunny Napkin Rings

Let’s go through the steps to bring your Easy Easter Bunny Crochet Napkin Rings to life.

  1. Create the Base Ring: Start by crocheting a simple circular ring. This forms the base of your napkin holder. Use a chain stitch to make the ring adjustable to your napkin size.
  2. Craft the Bunny Ears: Using the same yarn, crochet two elongated loops to form the iconic bunny ears. Single crochet stitches are ideal for a sturdy, upright look.
  3. Attach the Ears to the Ring: Securely stitch the ears to the base ring using a tapestry needle. Ensure the ears are evenly spaced for a balanced appearance.
  4. Add Facial Features: Use embroidery techniques to add eyes, a nose, and whiskers to the bunny face. Black yarn works well for the eyes and whiskers, while pink is perfect for the nose.
  5. Incorporate Embellishments: If desired, sew on ribbons or small bows to give your bunny a playful, decorative touch.
  6. Finishing Touches: Weave in any loose ends with the tapestry needle and ensure all stitches are tight and secure.

3. Tips and Tricks for Perfect Crochet Results

Creating crochet napkin rings may seem challenging at first, but these tips will help you achieve polished results.

  1. Practice Makes Perfect: If you’re new to crochet, practice your stitches on scrap yarn before starting your project.
  2. Check Tension: Maintain consistent tension to ensure your bunny ears and base ring are uniform and sturdy.
  3. Follow the Pattern Closely: Refer to your FREE PATTERN regularly to stay on track and avoid mistakes.
  4. Experiment with Colors: Mix and match yarn colors to create unique designs for each napkin ring.
  5. Work in Good Lighting: Proper lighting will help you see your stitches clearly, reducing errors.
  6. Be Patient: Take your time and enjoy the process. Crocheting is as much about relaxation as it is about crafting.

4. Creative Ways to Use Your Crochet Bunny Napkin Rings

Your handmade napkin rings can serve multiple purposes beyond table decor. Here are some creative ideas:

  1. Gift Them: Share the joy by giving these adorable napkin rings as Easter gifts to friends and family.
  2. Decorate Gift Packages: Use the bunny rings to add a festive touch to wrapped presents.
  3. Photo Props: Incorporate them into your Easter photoshoots for a charming, handmade element.
  4. Kids’ Crafts: Involve children in the decoration process by letting them add embellishments.
  5. Easter Egg Hunt Accessories: Use the rings as markers for hidden eggs or as part of the hunt prizes.
  6. Sell Your Creations: If you’re a craft seller, these unique napkin rings can make an excellent addition to your inventory.

FAQ About Crochet Bunny Napkin Rings

Q: Are these napkin rings beginner-friendly?
A: Yes, the Easy Easter Bunny Crochet Napkin Rings are suitable for beginners, especially with the included FREE PATTERNS guiding each step.

Q: How long does it take to complete one napkin ring?
A: Each napkin ring typically takes 30-60 minutes, depending on your skill level.

Q: Can I use leftover yarn for this project?
A: Absolutely! This is a great way to use up yarn scraps from previous projects.

Q: How do I clean crochet napkin rings?
A: Hand wash them gently with mild soap and let them air dry to maintain their shape.

Q: Can I customize the pattern?
A: Yes, feel free to modify the size, colors, or embellishments to suit your preferences.

Q: Where can I find the FREE PATTERNS?
A: Many online resources and crochet websites offer FREE PATTERNS for these napkin rings. A quick search will provide several options.

Join our VIP broadcast list and gain access to exclusive patterns, all for free. As a VIP member, you’ll receive the best patterns daily, delivered directly to your device. ✨📱 It’s a unique opportunity to stay up-to-date with the latest trends and designs, curated just for you. Don’t miss out on enhancing your projects and discovering new inspirations with the best patterns every day! 🎨🔝

       JOIN NOW       

Conclusion

Creating Easy Easter Bunny Crochet Napkin Rings – FREE PATTERNS is a delightful way to add a personal touch to your Easter celebrations. With simple materials and a bit of creativity, you can craft charming napkin rings that will impress your guests and make your table setting unforgettable.

      PATTERN HERE       

We hope this tutorial has inspired you to try this fun and festive project. Share your experience and let us know if you have any suggestions or unique ideas. Your feedback is always appreciated!

Advertising