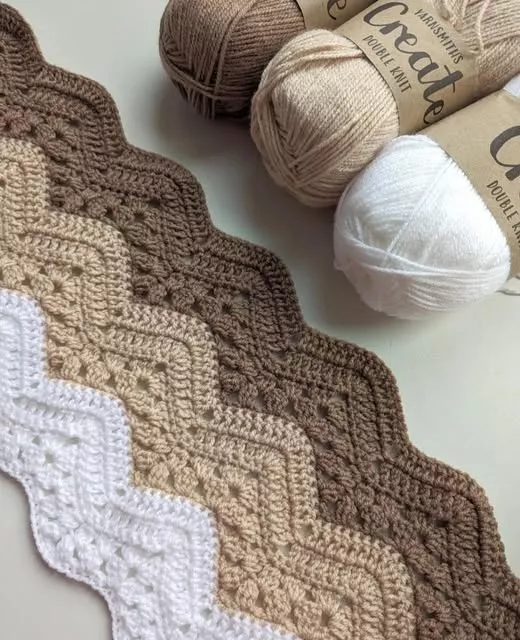
Crocheting for kids is always a delightful experience, especially when you have a fun and quick pattern like The 6-Day Kid Crochet Blanket – Free Pattern.
This project is perfect for beginners and seasoned crocheters alike, offering a beautiful finished product in just six days! Whether you’re crafting for your own child, a loved one, or as a gift, this pattern is sure to impress.
Advertising
Using bright colors, soft yarn, and a touch of creativity, the 6-day blanket is designed to be both functional and visually appealing.
Image from google.
The pattern’s unique texture and style make it a favorite among crochet enthusiasts. Plus, it’s a fantastic way to experiment with colors and stitch variations while creating something truly special.
In this article, we’ll guide you through everything you need to know about creating The 6-Day Kid Crochet Blanket – Free Pattern. From materials to detailed steps, you’ll have all the information needed to complete this charming project in no time. Let’s dive into the details and get started on this exciting journey.
1. Materials and Tools Needed
Having the right materials is essential for any crochet project. The 6-day blanket requires specific items to ensure your final product turns out as expected.
Advertising
Yarn Selection: Use soft and durable yarn suitable for children. Acrylic or cotton blends are excellent choices due to their comfort and easy maintenance.
Crochet Hook Size: Most patterns recommend a hook size between 5mm and 6mm, depending on your yarn’s weight.
Color Choices: Choose bright, kid-friendly colors or customize them to match a nursery or child’s preferences.
Additional Tools: You’ll need scissors, a tapestry needle for weaving in ends, and stitch markers to keep track of your rows.
Pattern Printout: Download and print the free pattern for easy reference as you work through the project.
Ensuring you have these materials ready before starting will make the process smoother and more enjoyable.
Soft yarn helps make the blanket cozy and kid-friendly, which is essential for children’s sensitive skin.
Selecting the right hook size ensures your stitches are even and consistent, which is vital for a polished finish.
Bright colors not only make the blanket visually appealing but also create an engaging and cheerful design kids will love.
Having all your tools handy eliminates interruptions and keeps your workflow efficient.
Following the pattern closely ensures that you’re on track to complete the blanket within six days.
2. Understanding the Stitch Patterns
The success of this project relies heavily on mastering a few basic crochet stitches. The pattern includes a combination of stitches that create its signature texture.
Foundation Chain: This is the starting point of your blanket. It determines the width and ensures uniformity.
Double Crochet (DC): A versatile stitch that adds height and structure to your rows.
Half Double Crochet (HDC): A shorter stitch that provides a dense and cozy texture.
Slip Stitch (SS): Used for joining sections or adding decorative touches.
Cluster Stitches: These create the intricate, detailed look that makes the blanket unique.
By practicing these stitches beforehand, you’ll feel more confident when working on the actual pattern.
Mastering the foundation chain ensures your blanket starts with a strong and even base.
Double crochet and half double crochet stitches are easy to learn but provide the structure and aesthetic appeal necessary for this project.
Slip stitches allow for smooth transitions between sections, giving your blanket a seamless appearance.
Cluster stitches may seem challenging at first, but they add depth and character to the design, making it worth the effort.
Combining these stitches effectively creates the intricate and delightful texture that defines the 6-day kid crochet blanket.
3. Step-by-Step Guide to Crocheting the Blanket
Now that you have the materials and understand the stitches, it’s time to begin crocheting. Follow these steps to ensure a smooth process.
Step 1: Start with the Foundation Chain: Create a chain with the desired number of stitches based on the blanket size.
Step 2: Work the Base Rows: Use double crochet stitches for the first few rows to establish the base.
Step 3: Incorporate Cluster Stitches: Add cluster stitches according to the pattern to create the unique texture.
Step 4: Alternate Stitch Rows: Switch between double and half double crochet rows for added depth and variation.
Step 5: Change Colors Strategically: Transition between colors seamlessly by tying off and weaving in ends carefully.
Step 6: Finish with a Border: Use slip stitches to add a neat border that frames the entire blanket beautifully.
Each step is crucial to achieving a professional-looking finish that’s both durable and visually stunning.
The foundation chain sets the tone for the rest of the blanket, so take your time to make it even and tight.
Adding cluster stitches in alternating rows creates the signature texture that sets this pattern apart.
Changing colors strategically allows you to customize the design and adds visual interest.
Finishing with a border not only improves the blanket’s durability but also gives it a polished and complete look.
Following the step-by-step guide ensures you stay on track and complete the blanket within the six-day timeframe.
4. Tips for Customizing the Blanket
One of the best aspects of crocheting is the ability to customize patterns. Here are some tips to make the 6-day kid crochet blanket uniquely yours.
Experiment with Colors: Choose a color palette that reflects your style or matches the child’s room decor.
Adjust the Size: Add or subtract rows and stitches to make the blanket larger or smaller as needed.
Incorporate Personal Touches: Add appliqués, embroidery, or themed patches for a personalized touch.
Use Specialty Yarns: Try using yarns with glitter, gradient effects, or unique textures.
Add a Lining: Sew a soft fabric lining to the back for extra warmth and comfort.
Make Matching Accessories: Create matching pillow covers, toys, or scarves to complement the blanket.
Customization makes the blanket extra special and shows the recipient that it was made with love and care.
Experimenting with colors allows you to create a one-of-a-kind design that stands out.
Adjusting the size makes the pattern versatile and suitable for different purposes.
Adding personal touches like embroidery or appliqués makes the blanket a keepsake item.
Using specialty yarns enhances the overall look and feel of the blanket.
Including a lining adds functionality and ensures the blanket is suitable for all seasons.
Making matching accessories turns the project into a complete gift set that’s sure to delight.
FAQ
Q: Can I complete the blanket in less than six days? A: Yes! If you have experience and dedicate more hours daily, it’s possible to finish faster.
Q: What type of yarn is best for this pattern? A: Soft, machine-washable yarns like acrylic or cotton blends are ideal for comfort and practicality.
Q: How do I change colors seamlessly? A: Use the slip stitch technique to transition between colors and weave in the ends neatly.
Q: Can beginners try this pattern? A: Absolutely! The pattern is beginner-friendly with clear instructions, making it a great learning project.
Q: How do I fix mistakes in the pattern? A: Use a crochet hook to undo the stitches gently and redo the section following the pattern.
Q: Is it possible to adjust the pattern for adults? A: Yes! Simply increase the foundation chain length and add more rows to scale up the blanket size.
Join our VIP broadcast list and gain access to exclusive patterns, all for free. As a VIP member, you’ll receive the best patterns daily, delivered directly to your device. ✨📱 It’s a unique opportunity to stay up-to-date with the latest trends and designs, curated just for you. Don’t miss out on enhancing your projects and discovering new inspirations with the best patterns every day! 🎨🔝
Creating The 6-Day Kid Crochet Blanket – Free Pattern is a rewarding experience that combines creativity and functionality. This project allows you to craft a heartfelt gift while honing your crochet skills. With the right materials, stitches, and a little patience, you’ll have a beautiful blanket that’s sure to bring joy.
Have you tried this pattern? Share your thoughts, tips, or suggestions in the comments below. Your feedback is invaluable and helps inspire others to embark on their crochet journey!


