
Pie Carrier Sewing Pattern

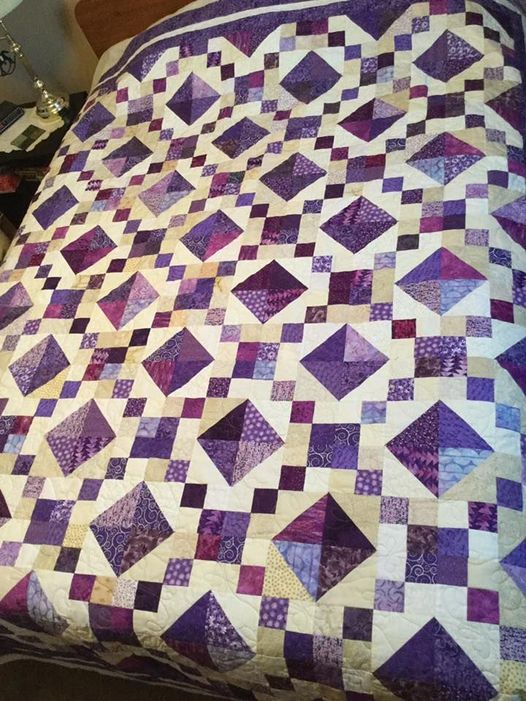
If you’re a fan of quilting or just starting out, the Jewel Box Block is a fantastic design to add to your collection. This classic block pattern offers a sophisticated and vibrant look, making it perfect for a variety of quilting projects.
The Jewel Box Block Free Pattern is a popular choice among quilters for its versatility and striking design. Whether you’re making a quilt for your living room or creating a gift for a loved one, this block is sure to impress with its bold geometric shapes and clean lines.
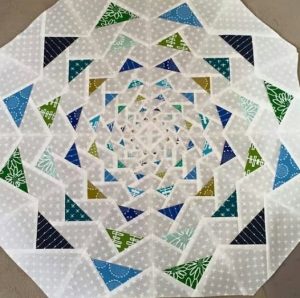
The beauty of the Jewel Box Block lies in its simplicity. By combining just a few simple techniques, you can create a block that looks intricate and impressive. The pattern is composed of squares and half-square triangles, making it accessible for quilters of all skill levels.
This makes the Jewel Box Block Free Pattern not only a great choice for beginners but also a timeless design for seasoned quilters to enjoy.
In this tutorial, we will walk you through the process of creating the Jewel Box Block, from selecting your fabrics to putting the block together.
Whether you plan to use it as part of a larger quilt or as a standalone piece, we’ve got you covered with step-by-step instructions and helpful tips to make your quilting experience enjoyable and rewarding.
Before you start sewing your Jewel Box Block, it’s important to gather the right materials. The Jewel Box Block Free Pattern requires just a few basic quilting supplies, which you may already have in your sewing kit. However, having the proper tools will ensure that your block comes together seamlessly.
First, choose your fabric. The Jewel Box Block works well with a variety of fabrics, but for a traditional look, use contrast fabrics—one light and one dark. You can opt for solid fabrics or use prints for an added dimension. The key is to create a distinct contrast between the fabrics so that the block’s design stands out. Consider using fabric from your stash or selecting coordinating colors that suit the theme of your quilt.
Next, you’ll need a rotary cutter and cutting mat to accurately cut your fabric pieces. Precision is important when making the Jewel Box Block, and using a rotary cutter ensures clean, straight cuts. A sharp blade is key for cutting through multiple layers of fabric at once, speeding up the process.
You’ll also need a ruler to measure and cut your fabric pieces according to the pattern. A quilting ruler with a ¼-inch seam allowance is ideal for this type of block. Additionally, make sure to have pins or clips to hold your fabric pieces in place as you sew them together.
Lastly, a sewing machine with a quarter-inch foot will make sewing the seams easier and more accurate. If you prefer hand piecing, you can use a needle and thread, but a sewing machine will allow you to complete the block faster and more precisely.
The first step in making the Jewel Box Block Free Pattern is cutting the fabric. Accurate cutting is essential for ensuring that your pieces fit together correctly, so be sure to take your time with this step.
Start by cutting square pieces for the center of the block. You will need one larger square, which will be the focal point of the block. This piece should be cut to the desired size according to the pattern.
Next, cut half-square triangles. These will form the edges of the block, creating the jewel-like effect. To cut half-square triangles, you will need to cut your fabric on the diagonal from corner to corner. Once you’ve cut these pieces, press the seams open to ensure that they lay flat and don’t create any bulk in your seams.
To complete the Jewel Box Block, cut the smaller square pieces that will serve as the corners of the block. These should be the same size as your half-square triangle pieces, so it’s important to measure carefully.
When cutting your fabric, always use your quilting ruler to ensure accurate measurements. Taking the time to cut everything precisely will make sewing your Jewel Box Block much easier and help ensure that the pieces fit together perfectly.
Once all of your fabric pieces are cut, it’s time to start assembling the Jewel Box Block. The key to putting this block together is paying attention to the order in which the pieces are sewn. Each piece must be sewn together in a specific sequence to create the desired effect.
Start by joining two of the half-square triangles together to form a diamond shape. When joining these pieces, use a quarter-inch seam allowance to ensure that the edges align properly. Press the seams open to create a smooth, flat finish.
Next, sew the remaining half-square triangles together to form the opposite side of the block. Once both diamond shapes are complete, sew the two halves together. Again, use a quarter-inch seam allowance and press the seams open to ensure that the block lies flat.
Now, sew the center square to the middle of the diamond. This square will serve as the focal point of the Jewel Box Block, so it’s important that it is centered properly. Pin the center square in place, then sew the edges together, making sure that everything lines up correctly.
After the center is attached, sew the corner pieces into place. These smaller squares will complete the block and give it its final shape. Again, use a quarter-inch seam allowance and press the seams open.
Once the block is fully assembled, trim the edges to ensure that the block is square and even. This will make it easier to join multiple blocks together when you’re ready to start putting your quilt together.
The Jewel Box Block Free Pattern is simple, but like all quilting, it requires attention to detail. Here are some helpful tips to ensure that your blocks turn out perfect every time.
First, always use consistent seam allowances. A quarter-inch seam is standard for quilting, but even a slight variation can cause your block to be uneven. If you have trouble with this, consider using a quilting foot on your sewing machine, which will help maintain the correct seam width.
When piecing your block together, make sure to press the seams as you go. Pressing your seams helps the fabric lay flat and keeps the block from becoming bulky. Avoid ironing the fabric, as this can stretch the fibers and distort the shape. Instead, press each seam with the iron to ensure that your block maintains its shape.
If you’re making a large quilt using multiple Jewel Box Blocks, it’s important to ensure that each block is the same size. Take the time to measure each block carefully before joining them together. If any blocks are slightly larger or smaller, trim them to make sure they fit together properly.
Finally, experiment with fabric combinations to create a unique and personal look. While the classic Jewel Box Block features contrasting light and dark fabrics, you can use any color palette you prefer. Try using different shades of the same color for a monochromatic look or incorporate multiple colors for a more playful effect.
1. Can I use a different size for the Jewel Box Block?
Yes! While the traditional Jewel Box Block is typically made with a 12-inch square, you can easily adjust the size by scaling up or down the measurements for the center and corner pieces. Just make sure to adjust the half-square triangles accordingly.
2. How do I make the block lay flat?
The key to making your Jewel Box Block lay flat is pressing the seams open as you go. This helps to reduce the bulk and allows the fabric to sit smoothly. Be sure to use a hot iron with steam to set the seams.
3. Can I use a different shape for the center of the block?
While the classic Jewel Box Block features a square center, you can experiment with different shapes, such as a hexagon or a circle, for a more unique look. Just be sure to adjust the piecing method accordingly.
4. How many blocks do I need for a quilt?
The number of Jewel Box Blocks you need will depend on the size of the quilt you’re making. For example, a lap quilt may require 25 to 30 blocks, while a larger bed quilt may require 50 or more blocks. Plan accordingly based on your desired quilt size.
5. Can I add borders to the Jewel Box Block?
Yes, you can add borders to your Jewel Box Block for a more polished look. You can either add a single fabric border around each block or create a larger border around the entire quilt for added interest.
6. What other quilting patterns can I use with the Jewel Box Block?
The Jewel Box Block pairs well with a variety of other quilting patterns, including basic squares, flying geese, and log cabin blocks. Try combining different patterns for a more intricate quilt design.
Join our VIP broadcast list and gain access to exclusive patterns, all for free. As a VIP member, you’ll receive the best patterns daily, delivered directly to your device. ✨📱 It’s a unique opportunity to stay up-to-date with the latest trends and designs, curated just for you. Don’t miss out on enhancing your projects and discovering new inspirations with the best patterns every day! 🎨🔝
In this Jewel Box Block Free Pattern tutorial, you’ve learned the step-by-step process for creating this beautiful and versatile block. We’ve covered everything from selecting the right materials to cutting, assembling, and finishing your block. With the tips provided, you can now confidently create Jewel Box Blocks for your quilting projects.
If you found this tutorial helpful, we’d love to hear your feedback! Please leave a comment with your thoughts and any suggestions you may have for future tutorials. Happy quilting!


