
Crochet Multi-Purpose Blouse, Shawl, Runner Model

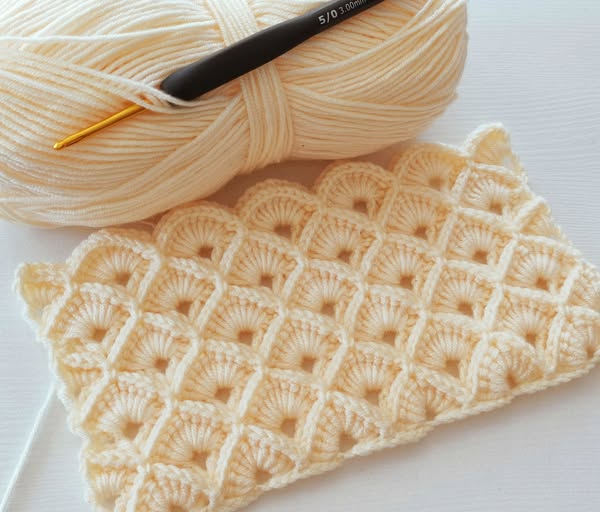
Crochet Shell Stitch Blanket – Tutorial is a fantastic way to create a cozy and decorative piece for your home. This timeless stitch pattern is perfect for beginners and experienced crocheters alike.
The shell stitch creates a beautiful, textured look that works well for blankets, scarves, and even clothing accessories. Whether you want to make a baby blanket or a large throw, this tutorial will guide you through each step.
The Crochet Shell Stitch Blanket is known for its elegant, scalloped edges and repetitive design, making it easy to memorize once you get started.
This pattern is also highly adaptable, allowing you to play with different yarn weights and colors to achieve unique results. You can use solid colors for a classic look or experiment with variegated yarns for a more vibrant effect.
In this guide, we will go over the materials you need, step-by-step instructions on how to crochet the shell stitch, tips for achieving a perfect finish, and creative ways to customize your blanket.
By the end of this tutorial, you will have all the knowledge required to make a stunning Crochet Shell Stitch Blanket.
Before diving into the crochet process, it is essential to gather all the necessary materials. Choosing the right supplies will ensure that your blanket turns out beautifully and lasts a long time.
To begin, select a high-quality yarn that suits your project. A soft worsted-weight yarn is ideal for most shell stitch blankets, as it provides the perfect balance of thickness and flexibility. If you’re making a baby blanket, opt for hypoallergenic, machine-washable yarn for easy maintenance.
Next, choose an appropriate crochet hook. The size of the hook should match the yarn you’ve selected. Most worsted-weight yarns work well with a 5.0 mm (H) or 6.0 mm (J) crochet hook. Using the recommended hook size ensures an even, consistent stitch pattern.
You will also need a pair of scissors for cutting the yarn as needed. Sharp scissors help create clean cuts and prevent frayed ends that may unravel over time.
A tapestry needle is useful for weaving in loose ends once your blanket is complete. It helps secure the stitches and gives your blanket a polished finish.
Finally, stitch markers can be helpful if you’re working with a large blanket. They assist in keeping track of stitch counts and row placements, preventing mistakes as you work through the pattern.
Now that you have your materials ready, it’s time to start crocheting! The shell stitch is a simple but elegant design that adds texture and depth to your blanket.
To begin, create a foundation chain that is a multiple of six plus two extra chains. This ensures that the shell stitch pattern remains even throughout your blanket.
For the first row, work a single crochet stitch into the second chain from the hook. Continue with single crochets across the entire row to create a solid base.
In the second row, start the shell stitch by skipping two stitches and making five double crochets in the next stitch. This forms the first shell. Skip two stitches again and make a single crochet in the next stitch to anchor the shell. Repeat this pattern across the row.
The third row begins with a chain of three to serve as the turning chain. Work shell stitches directly above the previous row’s shells, maintaining the pattern throughout the row.
Repeat these steps until your blanket reaches the desired size. The shell stitch pattern is repetitive, making it easy to follow and work up quickly.
To finish, crochet a simple border around the edges to give your blanket a neat and professional look. A scalloped or picot edge complements the shell stitch beautifully.
Creating a flawless Crochet Shell Stitch Blanket requires a few expert tips to enhance the overall look and feel of your project.
Maintaining even tension throughout your stitches is crucial. Uneven tension can lead to irregular shell shapes and an unbalanced pattern. Practice maintaining a consistent grip on the yarn and hook to achieve uniform stitches.
Blocking your blanket after completion helps set the stitches and improves the drape of the fabric. To block, lightly dampen the blanket and lay it flat on a clean surface, gently shaping it to the correct dimensions.
If you want to add stripes or color variations, plan your color changes in advance. Switching colors at the start of a new row ensures a clean transition without visible knots or uneven stitches.
Weaving in loose ends properly prevents unraveling over time. Use a tapestry needle to secure all yarn tails within the stitches discreetly.
To avoid curling or uneven edges, ensure that each row begins and ends consistently. Counting stitches regularly helps maintain the correct pattern sequence.
Lastly, choose a border design that enhances the shell stitch pattern. A simple single crochet or scalloped border adds a refined touch to your finished blanket.
Personalizing your Crochet Shell Stitch Blanket allows you to make a unique piece that reflects your style and creativity.
Experiment with different yarn textures to create varied effects. Combining soft, plush yarn with smooth cotton yarn adds depth and contrast to the design.
Add decorative fringe or tassels for an elegant touch. These embellishments enhance the bohemian or vintage aesthetic of your blanket.
Incorporate beadwork or embroidery for a customized look. Sewing small decorative elements along the edges or throughout the design makes the blanket truly one-of-a-kind.
Try making a gradient or ombré effect by blending colors gradually. This technique creates a visually striking appearance that makes your blanket stand out.
For special occasions, use personalized labels or tags. Adding a custom tag with your name or a heartfelt message makes the blanket a meaningful gift.
Consider using mixed shell stitch patterns by combining different variations of shells. Mixing large and small shell designs creates an intricate, detailed pattern.
1. What type of yarn works best for a Crochet Shell Stitch Blanket?
Worsted-weight cotton or acrylic yarn is ideal for durability and softness.
2. Can beginners make a shell stitch blanket?
Yes! The shell stitch is beginner-friendly and easy to learn with basic crochet skills.
3. How do I prevent my blanket from curling?
Ensure even tension and use a proper foundation row. Blocking also helps maintain a flat shape.
4. What size should I make my blanket?
It depends on the purpose! Baby blankets are typically 30″ x 40″, while throws are around 50″ x 60″.
5. How do I wash a crochet shell stitch blanket?
Follow the yarn’s care instructions, typically hand wash or machine wash on a gentle cycle.
Join our VIP broadcast list and gain access to exclusive patterns, all for free. As a VIP member, you’ll receive the best patterns daily, delivered directly to your device. ✨📱 It’s a unique opportunity to stay up-to-date with the latest trends and designs, curated just for you. Don’t miss out on enhancing your projects and discovering new inspirations with the best patterns every day! 🎨🔝
In this tutorial, we explored how to make a Crochet Shell Stitch Blanket, from gathering materials to step-by-step instructions and creative customization ideas.
This timeless pattern is a beautiful addition to any home and makes a perfect handmade gift. We hope you found this guide helpful! Please share your thoughts and suggestions in the comments. Happy crocheting!


