
Crochet Multi-Purpose Blouse, Shawl, Runner Model

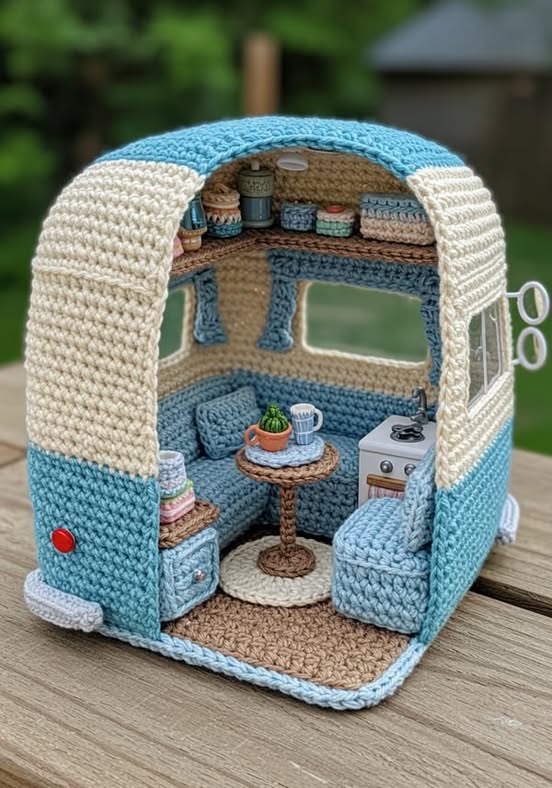
Crocheting a mini vintage caravan is a delightful project for those who love both vintage aesthetics and handmade crafts. Whether you’re an experienced crocheter or a beginner looking for a fun challenge, this guide will provide step-by-step instructions to help you create a charming mini vintage caravan.
Using basic crochet techniques and a few materials, you can bring this adorable design to life and add it to your collection of handcrafted decorations.
This project is perfect for personalizing your home decor, gifting to friends, or even using as a keychain or hanging ornament. The mini vintage caravan crochet pattern allows for customization, making it an exciting project for anyone who enjoys expressing their creativity.
With a combination of stitches, colorwork, and simple assembly, you will soon have a finished piece that reflects your unique style.
In this tutorial, we will cover everything from the materials needed to the final assembly. You’ll also find helpful tips to ensure your mini vintage caravan turns out beautifully. Let’s get started on this fun crochet adventure!
Before diving into the crocheting process, it’s essential to gather all the necessary materials. The right supplies will ensure your mini vintage caravan has a professional and polished look.
Having all your materials ready will make the process smoother and more enjoyable. Proper preparation ensures that you won’t have to pause midway through the project to find missing items.
Understanding the fundamental stitches is key to successfully completing your mini vintage caravan. Here are the primary techniques used in this pattern:
If you’re new to these stitches, practicing them beforehand will help you gain confidence. Once comfortable, you’ll find it easier to follow the pattern and assemble the pieces effortlessly.
Now that you have your materials and understand the necessary stitches, it’s time to start crocheting your mini vintage caravan. Follow these steps carefully:
Taking your time with each step will ensure a high-quality final product. Don’t rush the process—enjoy the journey of creating something handmade and unique!
After assembling your mini vintage caravan, you can personalize it further with these creative ideas:
Customizing your crochet project makes it even more special. Let your creativity shine and enjoy the process of making a one-of-a-kind vintage caravan.
Q: What type of yarn is best for a mini vintage caravan? A: Cotton yarn is ideal as it holds its shape well and provides a smooth finish.
Q: How long does it take to crochet a mini vintage caravan? A: Depending on skill level, it can take between 3 to 6 hours to complete.
Q: Can I use different stitches to modify the pattern? A: Yes! You can experiment with textured stitches for a unique look.
Q: Is this project suitable for beginners? A: Yes, but beginners may need to practice basic stitches first.
Q: How do I clean a crocheted mini vintage caravan? A: Hand-wash gently with mild soap and let it air dry.
Q: Can I make a larger version? A: Absolutely! Adjusting the stitch count will help you create a bigger caravan.
Join our VIP broadcast list and gain access to exclusive patterns, all for free. As a VIP member, you’ll receive the best patterns daily, delivered directly to your device. ✨📱 It’s a unique opportunity to stay up-to-date with the latest trends and designs, curated just for you. Don’t miss out on enhancing your projects and discovering new inspirations with the best patterns every day! 🎨🔝
In this guide, we explored the steps to create a mini vintage caravan through crochet. From selecting materials to assembling the final piece, this tutorial provided detailed instructions for crafting a charming and customizable project. Whether you’re making it as a gift, a decoration, or a personal keepsake, the possibilities are endless.
We hope you enjoyed this tutorial! If you have any feedback or creative ideas to enhance this pattern, feel free to share your thoughts in the comments. Happy crocheting!


