
Crochet Multi-Purpose Blouse, Shawl, Runner Model

The Classic Granny Square is one of the most beloved crochet patterns, known for its simplicity, versatility, and timeless charm. Whether you’re a beginner or an experienced crocheter, mastering this pattern opens up endless possibilities for creating blankets, scarves, pillow covers, and more.
The Classic Granny Square is often used in vintage and modern crochet projects alike, making it an essential skill in any crocheter’s repertoire.
One of the best things about the Classic Granny Square is how easy it is to customize. You can use a single color for a uniform look or incorporate multiple colors to create a vibrant, patchwork effect.
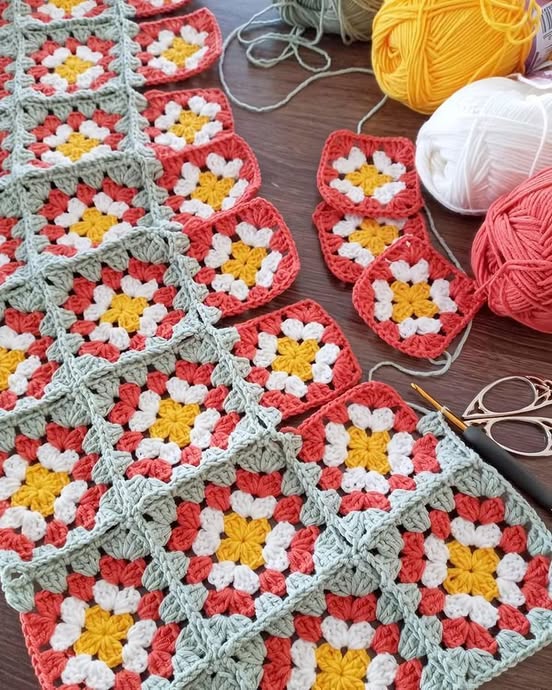
The pattern consists of a series of clusters and chain spaces, which makes it easy to memorize and work up quickly. Plus, you can make the squares as large or as small as you like, depending on your project needs.
In this tutorial, we will guide you step by step on how to crochet a Classic Granny Square, from selecting the right yarn and hook to assembling your finished squares into a beautiful project.
Whether you’re making a simple coaster or a full-sized afghan, this guide will help you create stunning pieces with ease.
Before starting your Classic Granny Square, it’s important to gather the right materials. The type of yarn and hook you use can affect the final look and feel of your project.
Choosing the right yarn is essential. Worsted weight yarn is commonly used for Classic Granny Squares, as it provides a good balance between softness and durability. However, you can also experiment with cotton, acrylic, or wool, depending on the texture and drape you want.
A suitable crochet hook is also important. Most patterns recommend using a hook size between 4mm (G-6) and 5.5mm (I-9), but you should check the yarn label for the best fit. A larger hook creates a looser, softer fabric, while a smaller hook results in a tighter stitch.
Other essential tools include a pair of sharp scissors for cutting yarn, a tapestry needle for weaving in ends, and stitch markers if needed. Keeping these items handy will make your crocheting experience smoother.
Selecting colors can be a fun part of the process. You can go with a monochrome look for a classic aesthetic or mix multiple colors for a vibrant, eye-catching design. Many crocheters love using leftover yarn scraps to create unique and colorful squares.
Once you have your materials ready, it’s time to start crocheting. Having a comfortable and well-lit workspace will help you focus and enjoy the process without strain.
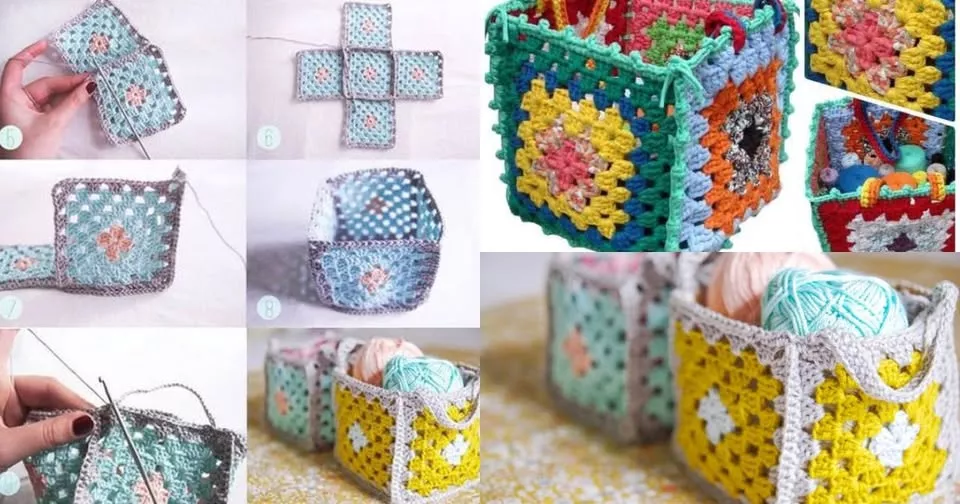
The Classic Granny Square follows a simple yet effective pattern that consists of chains, double crochets, and slip stitches. Below are the step-by-step instructions to create your first square.
Start by making a slip knot and chaining four stitches. Then, join the last stitch to the first with a slip stitch to form a small ring. This creates the center of your Classic Granny Square.
In the first round, chain three (counts as the first double crochet) and make two more double crochets into the ring. Chain two and repeat this sequence three more times, creating four clusters of three double crochets. Join the last stitch with a slip stitch.
For the second round, slip stitch into the next two stitches to reach the corner space. Chain three and work two double crochets into the same space. Chain two, then work another cluster of three double crochets. Repeat this around the square, adding an extra corner cluster in each chain-two space.
As you continue adding rounds, follow the same pattern. Each corner should have a (3 double crochet, chain 2, 3 double crochet) sequence, while the sides only need clusters of three double crochets separated by chain spaces.
You can make your Classic Granny Square as large as you want by simply continuing the pattern. Always slip stitch to the next corner to start a new round and keep your stitches even.
When finishing your last round, fasten off by cutting the yarn and pulling it through the final loop. Weave in the loose ends using a tapestry needle to secure your work.
To achieve the best results when crocheting a Classic Granny Square, consider the following helpful tips.
Keeping your tension consistent is key to making uniform squares. Too tight, and your square may curl; too loose, and it may stretch unevenly. Practice finding a balance for neat stitches.
Using the right hook size can make a significant difference. If your stitches are too tight, switch to a larger hook. If they are too loose, try a smaller hook to maintain structure.
Blocking your squares ensures they maintain a perfect shape. After completing several squares, lightly dampen them and pin them onto a flat surface to dry. This helps straighten any uneven edges.
Changing colors between rounds adds dimension to your Classic Granny Square. When switching colors, always join the new yarn at a corner to keep the transitions seamless.
Avoid twisting stitches by ensuring each round aligns correctly. Placing a stitch marker at the beginning of each round can help you keep track of your progress.
Weaving in ends neatly will give your final project a professional finish. Use a tapestry needle to carefully secure loose yarn ends without affecting the stitches.
The Classic Granny Square is incredibly versatile, and you can use it to create a wide range of projects. Here are some popular ideas to inspire you.
Granny square blankets are a traditional and timeless project. You can make multiple squares and join them together to create a cozy, colorful blanket for any season.
Cushion covers made from Classic Granny Squares add a handmade touch to any home decor. Simply crochet two squares and stitch them together around a pillow insert.
Granny square bags are stylish and practical. Create a few squares, stitch them together, and add a lining and straps for a beautiful handmade tote.
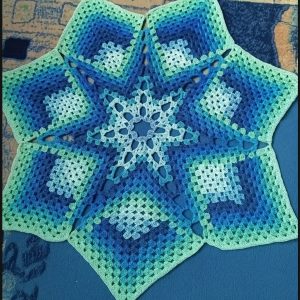
Scarves and shawls can be made by connecting rows of Classic Granny Squares. This creates a unique, openwork pattern perfect for layering in cooler weather.
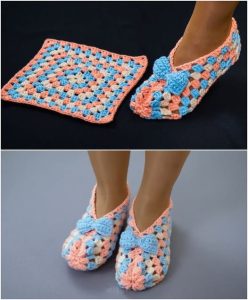
Clothing items such as vests, cardigans, and tops have gained popularity using Classic Granny Squares. Combining multiple squares in a creative layout can produce stunning results.
Coasters and table runners offer quick and satisfying small projects. Using cotton yarn, you can crochet durable and decorative table accessories.
1. What type of yarn is best for Classic Granny Squares? Worsted weight yarn is a popular choice, but you can use any yarn type depending on your desired texture and look.
2. How do I keep my Granny Square from becoming wavy? Ensure your tension is even, and avoid adding extra stitches in corners.
3. Can I make a Granny Square without holes in the center? Yes, you can use a magic ring instead of chaining four to create a tighter center.
4. How do I join Granny Squares together? You can use slip stitches, single crochet, or sewing methods to join squares for a seamless look.
5. How many Granny Squares do I need for a blanket? It depends on the size. A baby blanket may require 20-30 squares, while a full-sized afghan could need over 100.
Join our VIP broadcast list and gain access to exclusive patterns, all for free. As a VIP member, you’ll receive the best patterns daily, delivered directly to your device. ✨📱 It’s a unique opportunity to stay up-to-date with the latest trends and designs, curated just for you. Don’t miss out on enhancing your projects and discovering new inspirations with the best patterns every day! 🎨🔝
The Classic Granny Square is a fundamental crochet pattern that offers endless creative possibilities. Whether you’re making a blanket, bag, or wearable item, this versatile pattern is a must-learn for any crocheter. By following the steps in this tutorial, you can master the Classic Granny Square and create stunning handmade projects.
We’d love to hear from you! Share your thoughts, experiences, and project ideas in the comments. Happy crocheting!


