
Crochet Multi-Purpose Blouse, Shawl, Runner Model

The Crochet Cherries – Free Pattern is a delightful and simple project perfect for beginners and experienced crocheters alike.
Whether you’re looking to create decorative accents, keychains, or embellishments for other crochet projects, these tiny cherries add a touch of charm to any piece.
This fun and quick crochet project is an excellent way to use leftover yarn while honing your crochet skills.
Crocheting cherries is not only enjoyable but also incredibly versatile. You can use them to decorate hats, bags, baby blankets, or even create a fun garland for your home.
With the right stitches and a bit of creativity, you can make your cherries as realistic or whimsical as you like. Plus, this free pattern is easy to follow, making it an excellent option for crafters of all levels.
In this guide, we will provide a step-by-step tutorial for making Crochet Cherries using a free pattern. We’ll discuss the best materials to use, the techniques needed, and some fun ways to personalize your finished cherries. Get ready to add a sweet touch to your crochet projects!
Before starting your Crochet Cherries – Free Pattern, gathering the right materials will ensure the best results. Here’s what you’ll need:
Choose a soft, durable yarn for this project. Cotton yarn is ideal as it holds its shape well and provides a clean stitch definition. Alternatively, acrylic yarn works well for a softer texture.
Use a crochet hook that complements your yarn choice. A 2.5mm to 3.5mm hook is recommended for small projects like cherries, as it helps maintain a tight stitch.
You’ll need a small amount of fiberfill stuffing to give the cherries a plump, rounded shape. If you prefer, you can also use yarn scraps for filling.
Select red or burgundy yarn for the cherries and green yarn for the stems and leaves. You can also experiment with different shades for a unique look.
A tapestry needle is essential for weaving in ends and attaching the stems securely to the cherries.
Scissors and stitch markers will help with cutting yarn and keeping track of your stitches as you work.
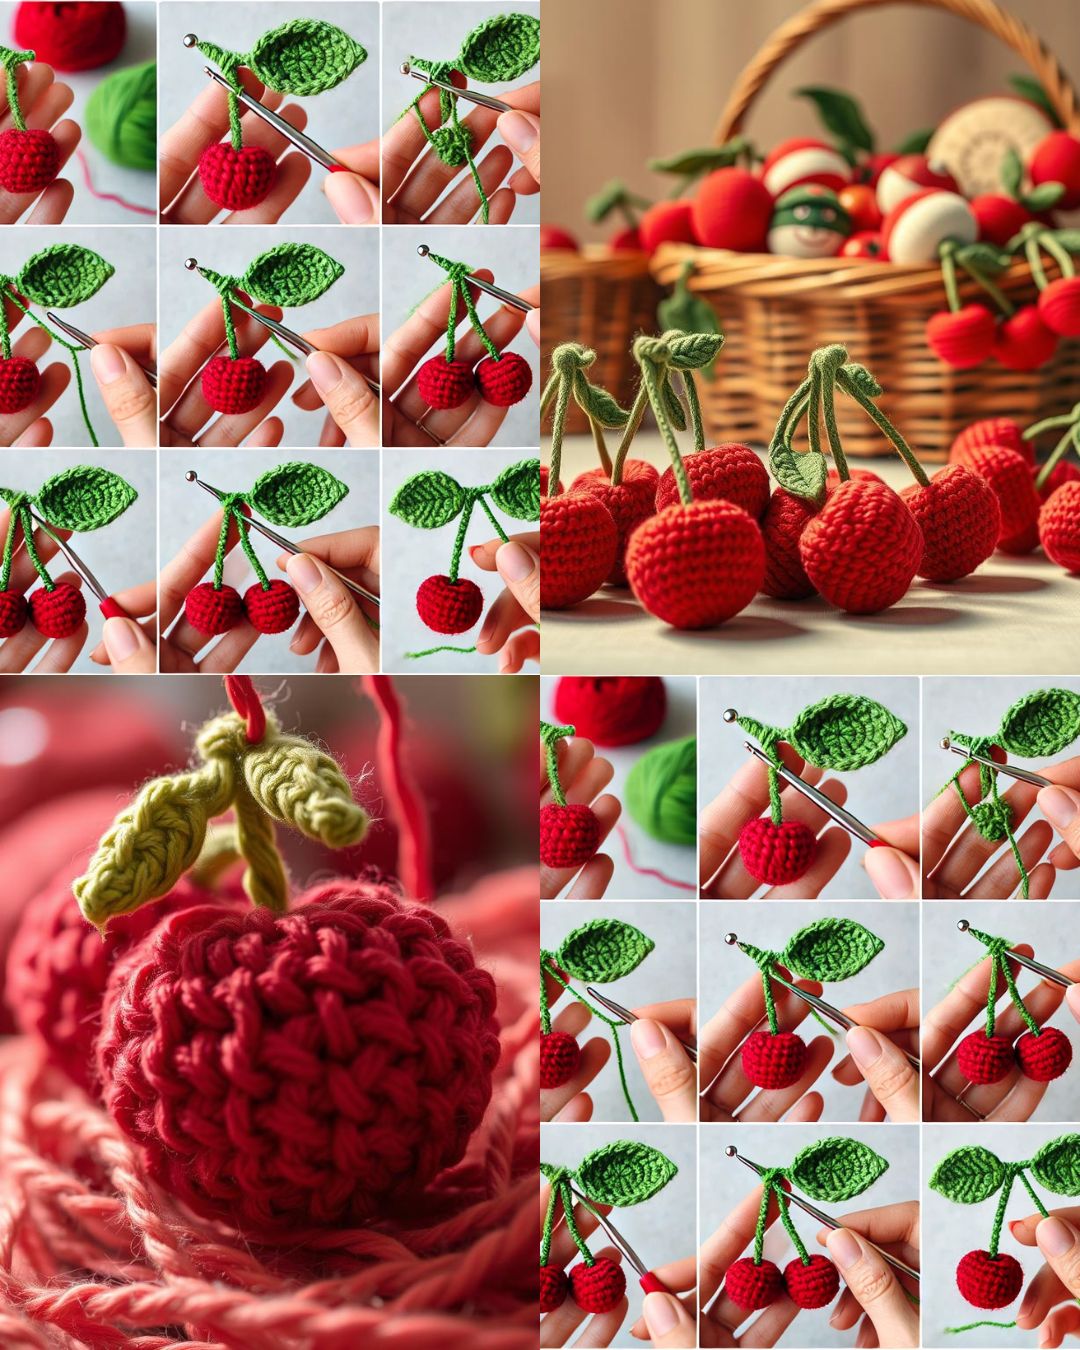
Now that you have your materials, let’s begin crocheting your Crochet Cherries – Free Pattern. Follow these easy steps to create perfect little cherries.
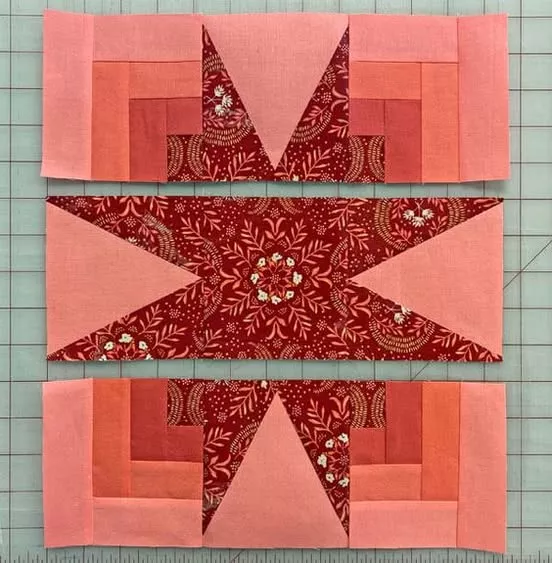
Start by making a magic ring using your red yarn. This technique allows for a tight and seamless start to your cherry.
Work six single crochet (sc) stitches into the magic ring. Pull the ring tight and join with a slip stitch to form a small circle.
Increase in each stitch around to create a round shape. You should have 12 stitches by the end of this round.
Continue working even rounds, maintaining the stitch count until the cherry is about the size of a real cherry. Typically, four to five rounds work well.
Stuff the cherry lightly with fiberfill before closing. Avoid overstuffing to keep the shape round and natural.
To close the cherry, decrease in each stitch until only a few stitches remain. Use a tapestry needle to weave through the last stitches and pull tight to secure.
The stems and leaves are what bring your Crochet Cherries – Free Pattern to life. Here’s how to make them.
Using green yarn, create a slip knot and chain 10 to 15 stitches, depending on how long you want the stem to be.
Slip stitch back along the chain to reinforce it. This keeps the stem from stretching out over time.
To make the leaf, chain six and work a combination of single crochet, half-double crochet, and double crochet stitches along the chain to shape the leaf.
Once the leaf is formed, work slip stitches along the opposite side of the chain to give the leaf a more defined shape.
Attach the stem to the cherry using a tapestry needle. Secure it tightly by weaving in the yarn multiple times to prevent it from coming loose.
Sew the leaf onto the stem at an angle to give it a more natural look. You can add multiple leaves for extra detail.
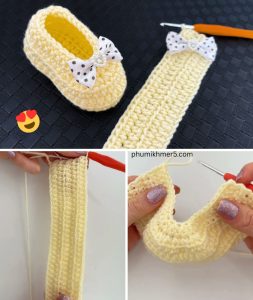
Now that you’ve completed your Crochet Cherries – Free Pattern, let’s explore some creative ways to use them.
Attach a keyring to your cherries to create a fun and unique keychain. These make great gifts and are easy to personalize.
Sew cherries onto hats, scarves, or sweaters as cute embellishments. They add a playful touch to any accessory.
Make a cherry garland by connecting multiple cherries with a crochet chain. This works beautifully as nursery or party decor.
Use them as appliqués on baby blankets, tote bags, or pillows for a charming, handmade look.
Incorporate them into holiday decorations. Red cherries work wonderfully as Christmas ornaments or as part of a festive wreath.
Create a cherry-themed amigurumi set by crocheting other fruits like strawberries or apples to complement your cherries.
1. Is the Crochet Cherries pattern beginner-friendly?
Yes! This pattern is simple and requires only basic crochet stitches, making it perfect for beginners.
2. What type of yarn is best for crochet cherries?
Cotton yarn works best for a firm and structured shape, but acrylic yarn can also be used for a softer finish.
3. Can I make my cherries bigger or smaller?
Absolutely! Adjust the number of rounds and stitch count to change the size of your cherries.
4. How do I attach my crochet cherries to other projects?
You can sew them onto fabrics using a tapestry needle or attach them with safety pins or Velcro for a removable option.
5. Can I wash my crochet cherries?
Yes, but it’s best to hand wash them in cool water and let them air dry to maintain their shape.
Join our VIP broadcast list and gain access to exclusive patterns, all for free. As a VIP member, you’ll receive the best patterns daily, delivered directly to your device. ✨📱 It’s a unique opportunity to stay up-to-date with the latest trends and designs, curated just for you. Don’t miss out on enhancing your projects and discovering new inspirations with the best patterns every day! 🎨🔝
The Crochet Cherries – Free Pattern is a fun and creative way to add a touch of sweetness to your crochet projects. Whether you’re making keychains, appliqués, or decorations, these adorable cherries are quick to make and highly versatile.
We hope you enjoyed this tutorial! Have you tried making crochet cherries before? Let us know in the comments below with your thoughts and suggestions. Happy crocheting!


