
Crochet Multi-Purpose Blouse, Shawl, Runner Model

The Crochet Bunny Bag: A Delightful Easter Project! is a fun and creative way to celebrate the Easter season with a handmade touch.
Whether you’re making one for a child’s Easter egg hunt, gifting it to a loved one, or using it as festive home decor, this project is both practical and adorable.
With its charming bunny design and customizable colors, it’s the perfect addition to any Easter celebration.
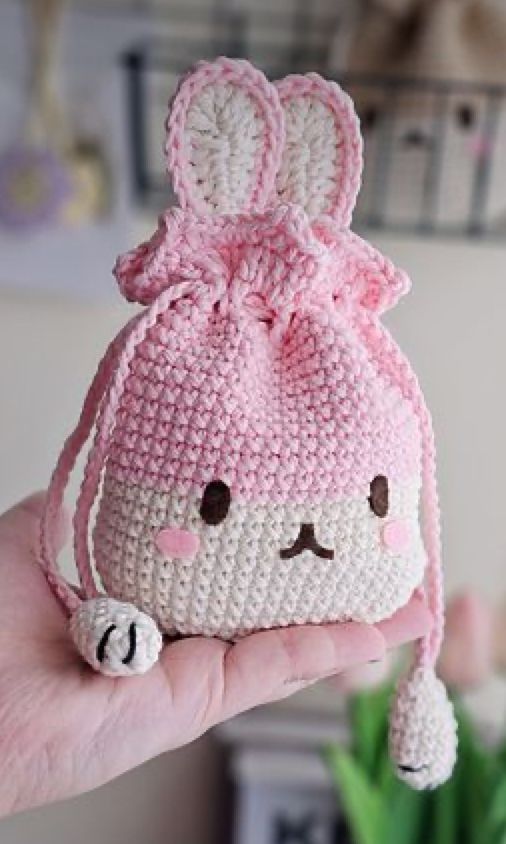
Crocheting a bunny bag is a fantastic project for beginners and experienced crafters alike. Using basic stitches and simple shaping techniques, you can create a functional and cute accessory that will be cherished for years to come. The best part? It’s a quick project, making it ideal for last-minute Easter gifts.
In this tutorial, we will guide you through everything you need to know to create your own Crochet Bunny Bag: A Delightful Easter Project! From materials and stitches to step-by-step instructions, you’ll have all the details to complete this charming crochet project with ease.
Before you start crocheting your bunny bag, gathering the right materials is essential. Using quality yarn and the appropriate crochet hook will ensure your bag is both sturdy and soft.
Choose a soft, medium-weight yarn in pastel or neutral colors for a classic Easter look. Cotton yarn is a great choice for durability and easy maintenance.
A crochet hook that matches the yarn weight is crucial for achieving the right stitch tension. A 4.0mm or 5.0mm hook is typically ideal for this project.
You’ll need a pair of scissors and a yarn needle for weaving in ends and sewing details onto the bag.
Optional embellishments like safety eyes, embroidery thread, and pom-poms can be used to add personality to your bunny bag.
A stitch marker can help you keep track of rounds, especially if you’re new to crocheting in the round.
Understanding the basic stitches is essential for making your crochet bunny bag. If you’re familiar with these stitches, the process will be smooth and enjoyable.
The magic ring is the starting point for crocheting in the round, allowing for a tight and seamless base.
Single crochet (sc) is the primary stitch used in this pattern, creating a firm and dense texture for the bag.
Increase stitches (sc inc) help shape the bag, making it wider as you work upwards.
Decrease stitches (sc dec) are used to taper the top of the bag and shape the bunny’s head.
Slip stitch (sl st) is helpful for joining rounds and adding finishing touches.
Adding facial details using embroidery or safety eyes will bring your bunny bag to life.
Now that you have your materials and understand the stitches, it’s time to start crocheting your bunny bag. Follow these steps carefully to achieve the best results.
Start with the base of the bag using a magic ring and work in continuous rounds to create a sturdy bottom.
Once the base is complete, begin working upwards in single crochet stitches to form the main body of the bag.
To create the bunny’s ears, crochet two separate pieces and attach them securely to the top of the bag.
Sew or crochet the handles onto the bag, ensuring they are strong enough to carry Easter goodies.
Embroider facial features or attach safety eyes to give your bunny a cute and expressive face.
Finish by weaving in loose ends, adding a pom-pom tail, and checking that all parts are securely attached.
Personalizing your Crochet Bunny Bag: A Delightful Easter Project! makes it even more special. Here are some creative ways to customize your design.
Use different yarn colors to match your Easter decor or a child’s favorite color.
Add embellishments like bows, buttons, or flowers for an extra touch of charm.
Incorporate a lining inside the bag for added durability and a polished look.
Experiment with different ear shapes and sizes to give your bunny a unique personality.
Make multiple bags in various sizes for a cute matching set for siblings or friends.
Use textured stitches like bobble or puff stitches to add depth and dimension to your bunny bag.
1. Is this project suitable for beginners?
Yes! This project mainly uses basic stitches, making it great for beginners.
2. How long does it take to make a crochet bunny bag?
Depending on skill level, it can take anywhere from 2 to 5 hours.
3. Can I use different yarn weights for this pattern?
Yes, but adjusting the hook size will be necessary to maintain the right proportions.
4. How do I make the bag larger or smaller?
Increase or decrease the number of stitches in the base and height to adjust the size.
5. What is the best way to attach the bunny ears securely?
Sew them on firmly with a yarn needle, making sure they are evenly positioned.
Join our VIP broadcast list and gain access to exclusive patterns, all for free. As a VIP member, you’ll receive the best patterns daily, delivered directly to your device. ✨📱 It’s a unique opportunity to stay up-to-date with the latest trends and designs, curated just for you. Don’t miss out on enhancing your projects and discovering new inspirations with the best patterns every day! 🎨🔝
The Crochet Bunny Bag: A Delightful Easter Project! is a charming and practical craft that brings joy to Easter celebrations. Whether you’re making one for a child, a loved one, or yourself, this project is a wonderful way to embrace the holiday spirit.
We hope this tutorial has inspired you to create your own crochet bunny bag. Have you tried making one? Share your experience and suggestions in the comments below! Happy crocheting!


