
Pie Carrier Sewing Pattern

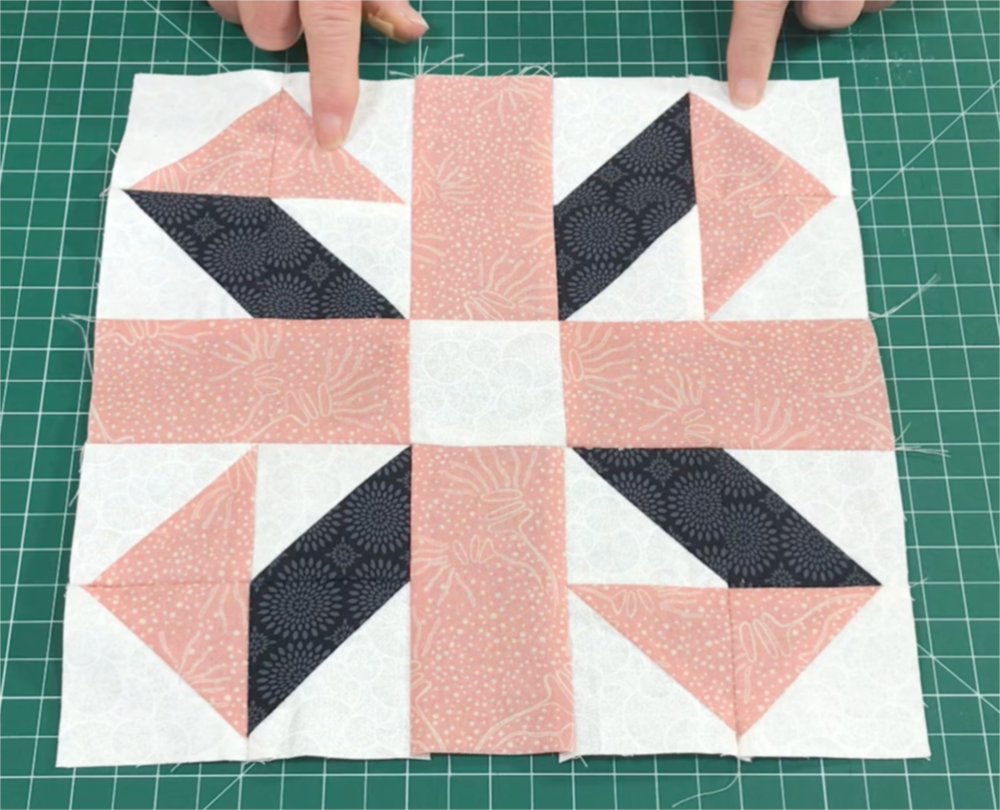
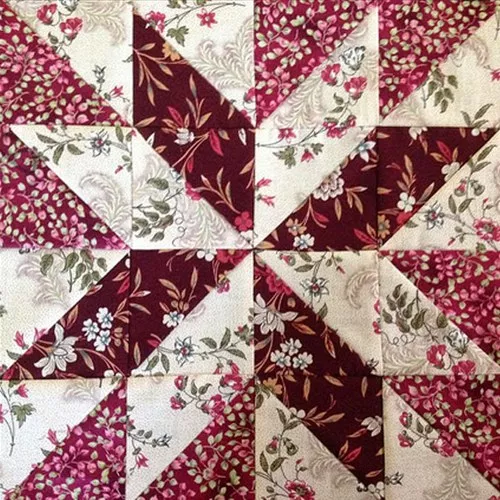
If you’re a quilting enthusiast looking to enhance your skills, you’re in for a treat with this Jack in the Box Quilt Block Tutorial. This charming block is an excellent choice for quilters of all levels, whether you’re a beginner looking to explore new designs or an advanced quilter seeking a fun challenge.
The Jack in the Box quilt block offers an intricate yet straightforward pattern that can bring life to any project. In this tutorial, we will take you through the steps necessary to master this unique quilt block.
Before diving into the Jack in the Box quilt block tutorial, it’s important to understand the key elements that make this design so special. The Jack in the Box block features a bold, contrasting design that incorporates squares and triangles, creating a captivating look.
By combining various colors and fabrics, you can create a block that is both eye-catching and fun to assemble. Whether you’re making a traditional quilt or experimenting with modern variations, this block is a versatile addition to any quilt pattern.
As we go through this tutorial, you will gain the knowledge to not only sew a Jack in the Box quilt block but also add your own personal touch to make it unique.
This quilt block can be used in a variety of quilt patterns, from classic layouts to creative contemporary designs. Ready to get started? Let’s break down the steps involved in making your own Jack in the Box quilt block!
Before beginning the Jack in the Box quilt block tutorial, gather all the necessary materials. Having everything on hand will ensure you can work through the steps without interruptions. Here’s a list of materials you’ll need to get started:
First, you will need quilting fabric in various colors. Typically, light and dark fabrics work well to create the sharp contrast that defines this block. Choose fabrics that complement each other or follow a specific color scheme if you’re creating a quilt with a theme. You will also need fabric for the background of the block.
In addition to fabric, a rotary cutter, cutting mat, and ruler are essential tools for precise cutting. These tools will help you achieve the perfect size for each piece in the Jack in the Box quilt block. Precision is key to ensuring your block fits together seamlessly. Don’t forget your sewing machine and thread, as well as pins to keep the fabric pieces in place while sewing.
Lastly, make sure you have a quilt pattern or block template that outlines the measurements for each piece of fabric. Having this reference will help guide you through the cutting and assembly process with ease. Now that you have all your materials, let’s dive into the steps of making the Jack in the Box quilt block!
Now that you have all your materials, it’s time to begin creating the Jack in the Box quilt block. Follow these easy-to-follow steps, and you’ll have a stunning block ready for your quilt in no time!
Start by cutting the fabric pieces for your Jack in the Box quilt block. You’ll need to cut squares and triangles in both light and dark fabrics. For example, cut two squares of your dark fabric measuring 4.5 inches, and cut four smaller squares of your light fabric (about 2.5 inches each). You will also need four triangles, which can be created by cutting squares of fabric diagonally.
Next, begin by creating the center of your block. Take one of your dark fabric squares and sew it to one of the light fabric triangles. Repeat this for the remaining three triangles, making sure that the right sides of the fabric are facing each other. Press each seam open once sewn to ensure the block lies flat.
Now, take the remaining light fabric squares and sew them onto the four corners of the block, using the same method you used for the center piece. This creates the iconic “box” shape in the Jack in the Box quilt block. Make sure each square is aligned properly to keep the block looking neat and symmetrical.
Once the center and corners are assembled, you’ll need to add the top and bottom borders of the Jack in the Box quilt block. Measure and cut the appropriate strips of fabric and sew them onto the top and bottom of the block. This helps frame the central design, creating a balanced and visually appealing pattern.
Once all the pieces are sewn together, it’s time to press the seams. This step is crucial to give the Jack in the Box quilt block a polished and professional finish. After pressing, take a moment to ensure all edges are even and that the block has the correct dimensions. If needed, trim any excess fabric to perfect the block’s shape.
Once you’ve pressed all seams and ensured the block is square, your Jack in the Box quilt block is complete! You can now use it as part of a larger quilt project or as a standalone piece. If you’re making multiple blocks, repeat the process and assemble them into your quilt top.
While the Jack in the Box quilt block is a fun project, there are a few tips and tricks that can help you achieve perfection in your quilting. Here are some helpful ideas to keep in mind:
Firstly, consistent seam allowances are essential when piecing your block together. Using a quarter-inch seam allowance is common in quilting, and it helps maintain uniformity across all your blocks.
Another great tip is to use a pressing cloth when pressing your seams. This helps prevent any fabric from getting too hot and allows you to achieve smoother, crisper seams without damaging the fabric.
If you want to add some extra flair to your Jack in the Box quilt block, try experimenting with fabric prints. Floral patterns, geometric shapes, or even solid colors can transform the look of the block, giving it a unique style.
Additionally, when cutting fabric, always measure twice and cut once to avoid mistakes. This step ensures that you don’t waste any fabric and that all your pieces fit together perfectly.
Lastly, consider chain piecing when sewing multiple blocks. This technique involves sewing the pieces of several blocks together in a continuous chain, making the process faster and more efficient.
1. What is a Jack in the Box quilt block? A Jack in the Box quilt block is a traditional quilting design that features a central square surrounded by triangles and additional fabric pieces. The contrasting shapes and colors create a visually striking pattern.
2. How do I choose fabrics for a Jack in the Box quilt block? When choosing fabrics, opt for both light and dark colors to create contrast. You can mix and match patterns, or use a consistent color scheme for a more unified look.
3. Can I make a Jack in the Box quilt block by hand? Yes, it’s absolutely possible to make a Jack in the Box quilt block by hand. However, using a sewing machine will speed up the process and give you more precise results.
4. How do I keep my seams straight when making the block? Using a quarter-inch seam allowance and a sewing machine guide can help ensure your seams are straight. Also, pressing the seams after every step will keep everything aligned.
5. Can I make a large quilt with Jack in the Box blocks? Absolutely! You can create a stunning quilt by repeating the Jack in the Box block multiple times. The blocks can be arranged in various layouts to create a unique quilt.
6. How do I make sure my block is the correct size? After sewing, always measure your block and trim the edges if necessary. Keeping an eye on your measurements throughout the process will ensure your block is the correct size.
Join our VIP broadcast list and gain access to exclusive patterns, all for free. As a VIP member, you’ll receive the best patterns daily, delivered directly to your device. ✨📱 It’s a unique opportunity to stay up-to-date with the latest trends and designs, curated just for you. Don’t miss out on enhancing your projects and discovering new inspirations with the best patterns every day! 🎨🔝
In this Jack in the Box Quilt Block Tutorial, we’ve gone over all the essential steps to help you create this stunning quilt block from start to finish. From gathering materials to the final pressing, each step is key to ensuring a perfect block. Whether you’re new to quilting or a seasoned pro, the Jack in the Box quilt block is a great way to improve your skills and create something beautiful.
We encourage you to try out this block and experiment with different fabric combinations to make it your own. Please leave a sincere opinion or suggestions in the comments below, and feel free to share your experiences with the Jack in the Box quilt block! Happy quilting!


